My DL-18 blaster build...

Unfated

Sr Member
RPF PREMIUM MEMBER
I've always wanted a really nice DL-18 blaster replica, but have had a really hard time finding the RO72 pellet
gun used as the base. I was lucky to have found one in Germany from a fellow RPF member at a great price. So
the build begins. I had already started on the greeblies before it even came in the post. I did not get to take pics
of the start because i was to eager to begin.


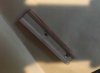
I have two scopes. One is 3D printed and the other is a resin copy I've had for a while
I'm not sure which I like better.
IMG_0415.jpg

I started with the main blaster by filling in the print and made in China marks on the sides.
I know this does not have to be done, but I wanted to. The blaster already came to me in parts.
IMG_0413.jpg

I have also already removed the front parts from the barrel and flipped them. I had to file a groove into
the barrel to match the top so the screw would go back in. I placed the marker cap part into place but I have not glued
it yet. It is a resin copy of the cap.
IMG_0414.jpg

And here is what I have so far for the fins. I cut them myself from a picture someone post here in another thread.
The domes are silver buttons I got for Joann's fabrics and fill with jb weld. They happened to be almost
perfect in size. I got the rocket model and resin motor coil parts with the pistol. Thank you Odiwan72!!!!
The shape of the fins are not perfect due to the fact that I'm not great at cutting styrene.
IMG_0416.jpg

More pictures to come as I move along in the build. I'm not sure what I'm going to
do about the scope plate. Any and all advice taken and appreciated!!!!
 
Sweet! I too have always enjoyed this blaster, and have always been disappointed with their rarity. Looking forward to see this build completed.
 
Ok, the rockets are too big for my fins. I wish someone would do a run of these! Or at least
a laser cut set in the proper size.
 
Scope plate done. Cut a piece styrene to .75" x 3.25" then glued two thin strips on the sides and shaped with sandpaper wrapped around
a piece of PVC right down the middle. Then a little bond and clean up. Lastly I just drilled two holes 4cm apart. Now I'll just prime it to see how it looks.
 

Attachments

  • IMG_0418.jpg
    IMG_0418.jpg
    36.1 KB · Views: 225
Side fins done. Not perfect, but as close as I'm going to get with me cutting them. Now I need to figure out how
I'm going to paint and distress them.

IMG_0423.jpg
 
Did your pistol come w/ the threaded endcap or did you fashion one?
It did not have a threaded end cap, but I was sent one with the pistol. I have a few resin ones now. I'll end up with
some extra assorted greeblies.


My first set of side plates, and the bullet part are finished. What do you guys think? Do they look alright?
Please be honest, I want this blaster to look primo.

IMG_0433.jpg
 
Last edited:
No, i just noticed you are using parts i made that were never meant for public use - i assume there was a misunderstanding.

Do you mean the bullet (marker cap looking thing), or other parts? No one is selling them if that makes any difference. A few odds and ends were thrown in when I bought the
RO72 pellet gun to make my build a little easier. I wish someone would offer a greebie set for this blaster.
 
Last edited:
After much drilling and filling I finlay finished the but cap hole. It was harder to find the center of the circle than I thought is would be.
I started with a small drill bit and kept going larger till I ran out of sizes and had to file the rest. Now I just need to glue in the washer
and then paint and glue in the treaded resin cap.

IMG_0435.jpg

On another front. I hate the paint job I did on my top side plate!!! It looks awful. Does anyone have advice
on how to paint these to look like chipped and scratched metal? Other than remake them in aluminum.
I'd buy a set if anyone was making them. Hell, if someone offered a screen accurate DL-18 I would have
bought that and not be building this one.

IMG_0436.jpg
 
HELP!!! I'm finished with everything, but the top side plates.I cant seem to get the paint distress looking right. I've sanded them down and re-primed
them four times. Anyone have tips or techniques? Did everyone maker theirs out of metal? Does someone Have a set of metal side plates to sell?

@OdiWan72 @Lichtbringer @kurtyboy
 
Last edited by a moderator:
I made mine from sheet alu - iirr 2mm for the small sideplates and 3 or 4mm for the bigger ones (can´t measure atm as i don´t have any of my blasters on display, all are stashed away in the basement).

Used the same kind of paper templates like you did, cut from a printed pic.

guns002.png


guns001.png


Iirr i used both, masking fluid and various disstressing methods (like sanding).
It´s to long ago, many blasters happened since then, so i can´t remember every detail - but i tried to make as much explaining pics as possible. If you searched for this blaster you probably already found my photobucket: http://s527.photobucket.com/user/Lichtbote/library/Props/Blaster/Jabbas Guard Blaster?sort=3&page=1
 
Thank you very much. Yeah I'be read your build thread a few times. I just wish I had a shop to make my side plates out of aluminum.
Distressing metal is much easier than painted styrene. I wonder if someone with metal cutter would take a commission for sets of these?
 
You have seen how i made my sideplates? Their irregular shape would be very time consuming, it´s easier to make them by hand, just with a drill and some files and sanding.

That´s the way i did mine, too.
 
This thread is more than 6 years old.

Your message may be considered spam for the following reasons:

  1. This thread hasn't been active in some time. A new post in this thread might not contribute constructively to this discussion after so long.
If you wish to reply despite these issues, check the box below before replying.
Be aware that malicious compliance may result in more severe penalties.
Back
Top