WIP: Idealized ST:III Communicator

FLM Concepts

Well-Known Member
I hope to make this my first prop fully built from scratch by myself.

TakeIV-09.jpg

This will allow me to get practice in nearly all of my skills and utilize nearly all of our tools.

The ST:III communicator has been one of my Holy Grail props that's been so elusive or expensive in the past that I figure the best way for me to get one the way I want it is to make it myself.

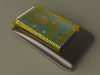
This won't be movie-accurate. It's more like the Mr Scott's Guide to the Enterprise version, which I'm not sure of its origins. Was it a prototype? Was it completely made up for the book? Either way, I like it.

I'll be making the blue bucket from styrene and the shell from clay. It will all be molded and cast in full-color resin.

The grill will be brass.

I do have a question before I begin...are there domed LEDs smaller than 3mm? I'd prefer 1mm or 1.5mm, but I'm having a very hard time finding them. Basically, I want to find LEDs the same size as rice lights.

This will take a while, so don't expect a ton of progress really quickly.
 

Attachments

  • TakeIV-09.png
    TakeIV-09.png
    465.3 KB · Views: 188
Last edited:
Looking forward to the build! The STIII is a nice looking communicator and a difficult one to find. It will be great to see someone tackle another variation of it :)

How will you be doing the grille? Photo/laser etch?

Here are a few through-hole LEDs with a 1.8 mm domed tip:
1.8 mm led Standard LEDs - Through Hole | Mouser

And surface mount are even smaller. If you don't find what you want in through-hole, maybe you could use clear cast lenses with surface mount underneath?
 
Thanks!

And thank you for pointing those LEDs out! Those will help a TON! 1.8 will be fine. The 3mm LEDs are just too large.

I don't have a laser, and I want the grills to be much sturdier than ones I've seen in the past, so I'll be using .020" or .025" sheets on my router.

I've decided there are a few things I'm not happy with on my current model, so I'm reworking some of it today (if it's idealized, I may as well make it EXACTLY as I want it), but here's a view with the grill open:

TakeIV-10.jpg

I'll also be doing the greeblies and greebly box on my router as one piece. The silver waves will be some sort of metal mesh. The decals will be done on clear vinyl on our thermal ribbon printer.

Oh, yeah, the mid-plate will be brass, too.

:)
 
First of all, let me apologize. My intent is not to show off 3d art. I sketch in 3d much better than with pencil and paper. I also like to fully visualize something before attempting to build it.

Also, since I will be using this model to create my physical templates and to cut parts, I want to make sure this is as perfect as possible before beginning.

I know this isn't a site about 3d art. :)

That said, I've completely rebuilt my model. I widened the blue bucket slightly. I did this to make it exactly 1.5" wide. The only real problem I see with this is that it pushes the hinge pieces out quite a bit from the actual prop.

What do you think of the results? Should I make it narrower again? It's very easy to do, so it won't hurt my feelings if people feel it shouldn't be so wide.

TakeIV-16.jpgTakeIV-15.jpgTakeIV-17.jpg

I hope to work on the shell this week and the grill this coming weekend after we put a new spoil board on our router.

Oh, one other thing...do you think the bottom shell should be a mirror of the top, or should be be more flat-bottomed with the wider contours of the front top portion?
 
Last edited:
The bottom shouldn't be an exact mirror of the top. The bottom should be more the same thickness all the way around, with a slight taper from the bottom to the top. At least that's MY 2 cents.
 
This has a subtle slope to it from the front (or bottom, if you were holding it) to the back (where the hinges are):

TakeIV-21.jpg

The difference it is subtle here, but the comm on the left has a slightly narrower blue bucket and grill. You can see the difference in how far out the hinge caps go and the width of the white cover (the cover is the same size on both).

TakeIV-19.jpgTakeIV-20.jpg

I think it's enough of a difference for me to want it narrower.

Other than prepping the greeblies and speaker box for my router, I think I'll call this one done and start building the real thing. :)
 
Thanks! :)

I hope I can make the real thing half as nice as this model. :$

I'm working from good source material, though, so there shouldn't be too much variation.
 
Today, if I find the time, I'll be slicing the shells up into contours to cut out of cardstock on my plotter. I was initially going to use styrene, cut on our router, but I guess styrene doesn't play well with Original Sculpey (the clay I have on-hand in abundance).

This coming weekend, I should be able to cut the prototype grill. I need to make a bending jig, but I already know exactly what I'll do for that. I just need to purchase some brass sheets and rods in a couple of different thicknesses.

I'm not sure exactly when I'll get to the greebly box. I need to slice up some machinable wax for that and make sure my smallest bit is long enough to sculpt the details. If it is, it will take a while to sculpt on our router, but it should be hyper-accurate with minimal cleanup.

I also need to create an exaggerated wavy jig for the metal mesh so when it comes out, it will be in the proper form. That will be done on our router, as well. I'll probably buy the mesh at a hobby shop, initially, unless anyone has any suggestions for something that will look good in that size (it's small, so the holes need to be tiny).

Like I said, this may take a while, but I've had more time available to me than I thought I would, so it's coming together quicker than I'd planned. :)
 
I didn't have as much time to work on this yesterday as I'd hoped.

I did, however, create the contours for my shells.

Shell-Contour-Render-03.jpg

That's the full-thickness. I'm trying to decide if it's best to just use those, fill in the voids with clay, and cast it, or if I should reduce the outlines by 1/8", fill the voids, and cover with a 1/8" sheet of clay before I make my first mold.

The more I think about it, I'm probably just going to use the full contours and cast from that. It will involve more filling and sanding out of my first mold, but I think it will end up more precise.

What comes out of my first mold will be the master for resin casting. It will be hollow to allow for electronics.

If anyone has any resources for LED circuits, I'd be happy to hear about them. I know I'm jumping ahead here, but I want the green LED to be solid in one state, and flashing in another, depending on if the grill is open or not.
 
I haven't had a chance to get to the grill yet because my husband hurt his back Thursday night and couldn't help me with installing our new spoil board on our router this weekend.

So it looks like it will be next weekend when I get to the grill.

I also didn't have a lot of time to work on the cross-sections this weekend. I'll post pics as soon as I have that part done.

Out of curiosity, how much interest would there be in a prop like this if I were to make it look half as good as my renders?

Second, if someone can let me know the ACTUAL dimensions of the grill (width, length, depth), I'd be happy to run those for screen accurate comms.
 
...if someone can let me know the ACTUAL dimensions of the grill (width, length, depth), I'd be happy to run those for screen accurate comms.

I don't have the dims, but I'm sure there would be some interest in screen accurate grills. I know I'd like one. Hope your hubby feels better soon.
 
you could also bondo instead of clay, and sand to get the contours you're seeking. I could help some with the electronics. But if you want a change of state when the lid is open, you'll have to incorporate some sort of sensor so the circuit will know. Like a protrusion on the axle to trip a microswitch, or maybe a reed switch that can sense the proximity of the lid. A blinker kit can be a couple of bucks. Basically, you want a microswitch that will close a steady circuit with the lid closed, then when it opens the switch breaks the constant circuit and closes the flasher circuit.
 
Subscribed! Love this com.

I do, too! :)

you could also bondo instead of clay, and sand to get the contours you're seeking. I could help some with the electronics. But if you want a change of state when the lid is open, you'll have to incorporate some sort of sensor so the circuit will know. Like a protrusion on the axle to trip a microswitch, or maybe a reed switch that can sense the proximity of the lid. A blinker kit can be a couple of bucks. Basically, you want a microswitch that will close a steady circuit with the lid closed, then when it opens the switch breaks the constant circuit and closes the flasher circuit.

Thank you! If you're willing, I'd like to pick your brain when I'm to the electronics stage. :)

I don't have the dims, but I'm sure there would be some interest in screen accurate grills. I know I'd like one. Hope your hubby feels better soon.

Thanks! He's feeling better now and should be up to helping me with our spoil board this weekend.

For more screen-accurate grills, should I do them in thinner brass, like the originals, or thicker for more durability? The grills for mine are going to be either .020" or .025", and the slat-width-to-gap ratio will be 1:1. I noticed on the pics I've seen of the originals that the gap seems to be a bit wider compared to the width of the individual slats. At least I have the right number of slats.

Also, on the originals, I know they're three-piece grills, but I can't figure out if the grill itself is rectangular or follows the contours of the side pieces. I have mine following the contours and is a part of the hinge, with the side pieces being reinforcement.

Any details of the original comms would be greatly appreciated from anyone. I only have a few grainy pictures to work off of. ST:V and ST:VI comm details appreciated, too, as they use the same shells, bucket, and grill, but the greeblies are gone in favor of Shatner's stupid light panel.
 
This thread is more than 9 years old.

Your message may be considered spam for the following reasons:

  1. This thread hasn't been active in some time. A new post in this thread might not contribute constructively to this discussion after so long.
If you wish to reply despite these issues, check the box below before replying.
Be aware that malicious compliance may result in more severe penalties.
Back
Top