You are using an out of date browser. It may not display this or other websites correctly.
You should upgrade or use an alternative browser.
You should upgrade or use an alternative browser.
The Fifth Element - Element Stones WIP
- Thread starter cavx
- Start date
kalkamel
Master Member
There is a flat edge on each stone. The stones offered by HCG awhile back as well as by Paul Francis (as featured in Phil Steinschneider's site here: http://www.steinschneider.com/props/fifth_element/fifth_element_stones_01.htm) were cast from the production made stones and they all have a flat edge on one corner. There were two sizes made for the movie, if I'm not mistaken. The smaller stones extracted from the Diva in Phloston, as well as the larger stones seen in the temple in the finale.
$2700! Are they solid?
Yep. Solid 3D printed sandstone. I wanted it to have a good weight to it in case someone actually BUYS them. :cool
cavx
Master Member
I'm pretty sure they are perfect triangles. From the screenshots it's quite obvious no?
In this screen shot yes.
From my $0.00 budget build, I don't think it will matter once each is mounted on a wall. When I get some free cash, I will do a proper set and have all the parts laser cut.
There is a flat edge on each stone. The stones offered by HCG awhile back as well as by Paul Francis (as featured in Phil Steinschneider's site here: http://www.steinschneider.com/props/fifth_element/fifth_element_stones_01.htm) were cast from the production made stones and they all have a flat edge on one corner. There were two sizes made for the movie, if I'm not mistaken. The smaller stones extracted from the Diva in Phloston, as well as the larger stones seen in the temple in the finale.
This must have been before I saw the coolness of prop collecting. I kick myself when I look back at the things I passed on because at the time, they were dust collectors. Are these the shorter version from the Diva extraction?
It is a shame they didn't take the photos the same for all stones. The clear shot of the back plus a clear front shot of the front like how they did AIR and EARTH are really useful. You can kind of see the other front face of FIRE, but can't both sides of WATER.
Yep. Solid 3D printed sandstone. I wanted it to have a good weight to it in case someone actually BUYS them. :cool
Maybe you should have offered them hollow and in two halves. if someone wants a heavy or solid part, it is very easy to slush some D65 resin around inside. I did this for cloneprops MAG ankle buckles to make the part thicker.
I printed a set for Secret Santa. I thought the file on thingiverse was pretty good. I modified the file to include a bottom, as his are open so you can light them.
After a quick round of filler, sanding, and paint, I thought they turned out pretty good.
https://uploads.tapatalk-cdn.com/20170131/8421f1ef7a3ddf3c83f59f327fc71de1.jpg
They look stunning. I'd be proud if I owned those.
Last edited:
cavx
Master Member
Ok once I worked out what the front was, I was able to get the details done. Because the angles are not correct, I am not going for screen accurate.
I have cut these down from 29cm to 24cm. I chose 24 because the stones are 12cm wide and the symbol patterns take up 12cm of height. I think they look better at this new height.

I ground the peak of angle down and added both the symbol details as well as some cracks.
Still need to bog the holes, sand and seal.
Sent from my SM-G900I using Tapatalk
I have cut these down from 29cm to 24cm. I chose 24 because the stones are 12cm wide and the symbol patterns take up 12cm of height. I think they look better at this new height.
I ground the peak of angle down and added both the symbol details as well as some cracks.
Still need to bog the holes, sand and seal.
Sent from my SM-G900I using Tapatalk
PHArchivist
Master Member
Excellent!
cavx
Master Member
Excellent!
Thank you.
Not screen accurate, but they will do. This is a prop I've wanted for quite some time.
cavx
Master Member
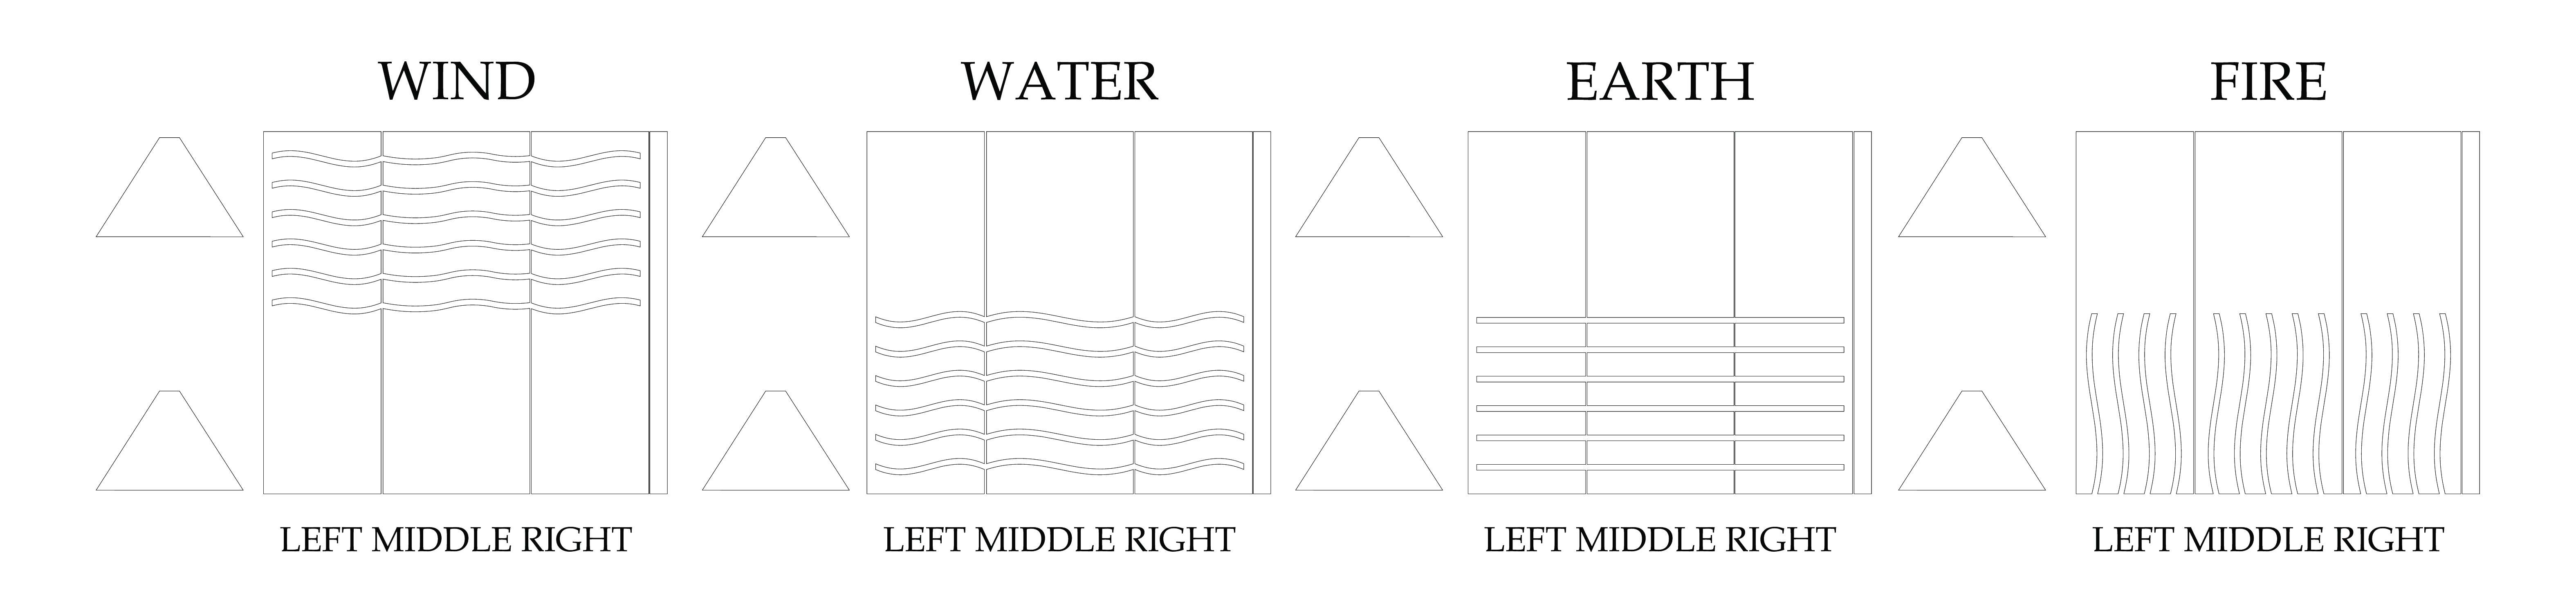
I don't know if this can help you out, but this is the template I drew up when I started my own stones project. I mocked up different heights from 9" to 11", but think I preferred 10.5" as the height.
So I have decided to have an other go at these. Using the template above, i imported it in MS Paint and found that scaling it up by 300% gave the closest size. I also created 4 separate A3 sized files that I could have printed by the local print place (20c each). My new files are 5000 x 4500 pixels, so at over 1MB each, too big to post here.
More "scrap" MDF was dug up and taken to the board cutter yesterday and hopefully I will get these parts back next week.
AGxM
Well-Known Member
Wow...talk about make you feel old. This and Hellboy are my favourite non-Trek films ever.
These are looking great!
Back in my storage unit in the UK I have a copy of some stones I got from a French seller via eBay, but never opened or displayed them, and recently bought a mini version from Etsy that I'm waiting for. The stones are just 6 or 7 cm so should fit in my tiny 300sq ft apartment ok.
cavx
Master Member
Wow...talk about make you feel old. This and Hellboy are my favourite non-Trek films ever.
These are looking great!
Thanks AGxM.
The one that gets me is that Star Wars turn 40 this year and the fact I was there in 1977 to see it on the big screen.
This year seems to have a few big birthdays - STAR WARS turns 40, PREDATOR will be 30 this year, Fifth Element is 20 and TRANSFORMERS hits 10 years. And I am currently working on some replica prop from all of these.
TuskenRaider
Active Member
Nice job so far. I've built the water stone and am in the process of building the others. My assessment based on screenshots etc were that there is just one flattened corner and if you think of that being the front, the back is wider then the other 2 sides. The horizontal patterns (air/wind, earth, water) go right the way across the back and on the other two side do not go all the way to the front (flattened corner). I scaled mine off a screenshot of Dallas holding one in his hand and since my hands are fairly small I've probably slightly under-scaled but my stone is around 8" high, the back is 90mm wide (sorry for mixing scales!) and the two narrower sides are about 75mm. The angles at either end of the back are 55 degs and basic maths should tell you that the 3rd angle is 70 degs (if you assume the corner isn't flattened off of course!). This is purely my interpretation, I'm not sure how close this is to the originals but I'm pretty pleased with the result.
Some of the photos are a little distorted from being so close to the lens so dimensions look a little funny, especially the 3rd pic of the front (flattened corner).


Rob
Some of the photos are a little distorted from being so close to the lens so dimensions look a little funny, especially the 3rd pic of the front (flattened corner).
Rob
Lisaisanut
New Member
Given these props are really, really high on my bucket list of things to make someday, this thread has just been amazing to read through and I made a LOT of notes.
The texture and cracks on those is incredible, how'd you pull that off?
The texture and cracks on those is incredible, how'd you pull that off?
TuskenRaider
Active Member
Given these props are really, really high on my bucket list of things to make someday, this thread has just been amazing to read through and I made a LOT of notes.
The texture and cracks on those is incredible, how'd you pull that off?
Thanks a lot, really appreciate the comment. To be honest the texture probably doesn't look quite as good in real life :$. It will help to explain my full process. I made a mould from foamcore (or foam board depending on your part of the world). This was in the triangular shape with the one flattened corner (although it would be a lot less fiddly to make a perfect triangle and then shave off the one corner afterwards). Picture of the moulds for the 4 stones I'm currently making....

I filled the moulds with plaster of paris and left to fully dry out. I then sanded the top flat as it will set slightly rounded. I tried printing the water pattern with my vinyl printer to use as a template bit it didn't work so well so I ended up drawing the water pattern by hand and then carving out mostly with a craft knife and wax carving tools.Then I used rounded sculpting tools to keep tapping away on the sides to make little indentations. It's tedious and takes a long time but I think gives a good result. My tip is to be as random as possible with the different sized tips and to overlap them to make the surface as irregular as you can. Picture of the type of tools I used - the round tips work really well to punch mall indentations into the relatively soft plaster...

Then I used wax carving tools to scrape the cracks all over the surface, again trying to be as random as possible and making some bigger ones to create more interest and digging some plaster out in random spots too...

cavx
Master Member
TuskenRaider your stone is beautiful. I agree with what you said, so when I get my MFD cuts back, make the triangle, then flatten the front edge by grinding it off. I love the texture of you piece. I do believe the stones that are taken out of the Diva are smaller than those at the end.
Note that the template I will use that was made by VashDstampede also has the pattern stop short of the flat edge.
Note that the template I will use that was made by VashDstampede also has the pattern stop short of the flat edge.
Last edited by a moderator:
TuskenRaider
Active Member
cavx Thanks so much. Yeah I used the scene where Dallas took the stones out of the Diva because there's a really clear shot where he's holding it in one hand and you can scale/estimate the size from how it would fit your own hand, that along with my own small hands means mine are only 8" high compared to the 10-11 that seems to be more accurate. I agree that when I compare mine to those at the end they do seem bigger.
Last edited by a moderator:
Similar threads
- Replies
- 5
- Views
- 979
- Replies
- 8
- Views
- 1,279