Anakin Starkiller V2 lightsaber show-off thread

Dumb question, but Ive seen a few of the builds here have a clamp lever rod that goes through the nut on the opposite end enough to stick out past the threaded block. While others it seems shorter. Obviously this depends on how much you tighten the lever.

How are some of you able to tighten it more than others? I have mine on as tight as it can go, and the lever rod doesnt go past the threaded block hole. I have my clamp tabs ground down to nothing, so its not that. I would have to nos use the lever washer to get it to turn any further.

View attachment 695847

open the clamp, slide it forward over the grenade, which is a smaller diameter, squeeze it together and tighten it up a couple of extra turns.
This is also how you get the clamp on and off the unibody version and still let it fit snuggly.
If you STILL can't get it tight, there's another trick. take the clamp off, unscrew the rod all the way, then rotate the square nut on the underside 1 half turn. This will let you get it a half turn tighter and still have it pointing the correct direction since is basically just changes where the threads start and therefore, end up.
 
Last edited by a moderator:
Thats not what I was describing, I can get it super tight on the saber, but when mine is tight, the lever pin doesnt stick out past the nut as much as it does on others I've seen, and isnt tight enough to hold the card at all without some tape or spacers. Maybe its just the difference between a real clamp and a Romans. I've also tried rotating the threads around as you describe. Maybe the body on mine is thicker than others or something, though Ive sanded it a few times and its unpainted. Mine is a leftover from the first run.

Still a helpful video though :)
 
Last edited:
Rather than clogging up the V2 thread proper with show-off photos, I thought I'd bring this one back to life because I can't stop messing with mine.

First up: Colors! I slapped some more onto the neck and windvane area to bring out the dirty brown/brass color only to bring it down again to recreate the blotchy appearance I see (and figure) it would naturally have. Now I'm happy with it and it actually reads on camera in the right lighting. Also, added paint on the whole of the emitter. Why? Our boy @scottjua confirms that it is not just black all over and, to me, basically confirms what many of us here believe and that the stunts were painted to resemble the OWK hero as much (or as decently) as possible to be on camera. So that, to me, means: black booster and grenade area, a brown color on the portion of the neck area, and then a dark gray for the emitter, ala:

obi2.jpg

Like I detailed before, the respective areas were painted with acrylics dry-brushed on top of the original black and then brought down afterwards. Also did another light touch of Alu-Black on the booster when I decided to repaint it with a more matching black. Again, I don't think it's noticeable to anyone beyond me.:p After getting it to where I liked it, I also ran the cone knob on the ground to dull the point before putting it all back together again.

IMG_6114.JPG

IMG_6109.JPG IMG_6129.JPG IMG_6154.JPG IMG_6166.JPG

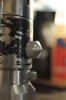
Another detail I added was finally the third emitter grub screw placed under the emitter plate. Because the nipple and the emitter are one piece on the hilt, it doesn't do anything beyond providing a cosmetic update, and using the clip from Mark Hamill's show as a starting point, I picked a place for the screw relative how my emitter is laid out. The chipping and orientation of it is in the "throne room" position, while the rest is seated in the "Anaheim" orientation. So though it won't be dead-on accurate, it is authentic enough for me in relation to the construction of the hilt.

Unfortunately, though having partially threaded the hole I drilled (because it was deeper than the screw I wound up using), the set screw I used met some resistance when twisting it in and the threading for the allen key just gave way and I'm unable to unscrew it or screw it in further. So though it's in the right place, the screw protrudes about a millimeter from the surface when I was looking to have it set further in, and though I'm a bit disappointed by it, it's not enough for me to be all too bothered.

IMG_6180.JPG IMG_6188.JPG IMG_6168.JPG IMG_6172.JPG

And then these two are just me trying to rereate how the hilt's color scheme looks in two environments (one in stark, broad daylight compared to one under white light) to better understand how it may look completely monochromatic in one photo, all black and silver, and then the true colors being glanced in another, similar to the images pulled from Pop-Culture Quest.

IMG_6106.JPG IMG_6122.JPG
 

Attachments

  • IMG_6205.JPG
    IMG_6205.JPG
    1.9 MB · Views: 125
Last edited:
I decided to take a slightly different approach with my 1 piece V2. Ladies and gentleman, I present the Kenobi ANH stunt!

IMAG0899.jpg

Next to my Starkiller 3 piece V2 (due for a makeover in light of recent revelations)
IMAG0900.jpg
And here she is next to my Roman Kenobi hero
IMAG0902.jpg

I did 3 rounds of oven cleaner and 0000 steel wool. I then shot the booster, grenade, windvane, and emitter with black primer. The booster and grenade were painted with Rustoleum satin black. The windvane was then dry brushed with an antique brass color that I custom mixed. I mixed up some gun metal acrylic for the emitter. I still need to install a d-ring, and I may yet put a Wannawanga V2 lever and Roman transistors on it. I also need to figure out what to do for the red power switch (that presumably turned the motor on and off for the spinning blade).

Edit:
Some pics of my inspiration
Alec saber.jpgobi_wan_saber-vi v2.jpg
 
That Obi-Wan stunt looks amazing! Still waiting for my unibody to arrive, but already hoping for another V2 run to have a go at the ANH stunt!
 
For real, that stunt saber is very nice!

Really dig the first photos with all the skinny neck sabers together:thumbsup
 
Pretty happy with my repaint using the last run of stencils. Darkened the booster and pommel cubes with black leather dye and MrSuperClear UV Cut clearcoat. The windvane has a dusting of dark brown to give it variation. Updates include the notch cut out of the tip of the rod and the dimple in the center, as well as the warping in the emitter.

I have the clamp and emitter in the position seen when on The Emperor's chair.

IMG_0257.JPGIMG_0259.JPGIMG_0258.JPGIMG_0250.JPGIMG_0249.JPGIMG_0256.JPGIMG_0255.JPGIMG_0260.JPGIMG_0262.JPGI
 
Last edited:
This thread is more than 3 years old.

Your message may be considered spam for the following reasons:

  1. This thread hasn't been active in some time. A new post in this thread might not contribute constructively to this discussion after so long.
If you wish to reply despite these issues, check the box below before replying.
Be aware that malicious compliance may result in more severe penalties.
Back
Top