I'm sure we've all seen the blueprints on 'tinternet of A Deck and how it was redressed as B & later the infirmary as the C deck engine control room, but I've yet to find any blueprints or plans for the C Deck 'garage' set where Brett goes chasing the cat. So, having watched the movie umpteen times and made my Garage set as it was done for the movie, I drew up a plan of the set in case anyone hadn't worked out what the passagways were connected to, and I reproduce it here.
A Deck, taken from a blueprint and massively cleaned up.

B Deck blueprint, numbered by me. A is the shuttle (built on the bridge set), B is the shuttle airlock, C is the main airlock, only seen from passageway E. D is the galley set redressed as both airlock anterooms, F is the infirmary (not used as B Deck) redressed, along with passageway section F1, as the engineering control room on C Deck. The hypersleep chamber G was obviously redressed for some sequence it would seem was never shot, and H is where Ripley goes to prepare the shuttle while Park & Lambert go down the ladderway to get the oxygen bottles.

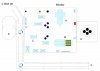
My C Deck plan. The passageways run along two sides of the vehicle garage, and were redressed multiple times to represent different parts of C Deck. The two ladderways should be obvious. Item A is the aerial vehicle, B is the large tracked vehicle where Brett finds the small alien has shed it's skin, C is the small 'prospecting vehicle', D is the landing leg room, E is the room that doubled as both where they tried to snare the cat in the net, and later as the oxygen tank room where Parker & Lambert are killed. The long passageway that ends at F represents the approximate position of where a large mirror was placed, to make the passage appear much longer. The reflections of Brett & Parker are just visible if you watch closely in the one shot in the movie.

The blue circles are the ceiling support pillars. The spacing of these pillars does seem a little odd, but this is how they were built. The dark red and green circles represents round objects that the camera passes in the sequence where Lambert & Parker collect the oxygen bottles from the aerial vehicle, the red oblong represents a large tubular structure deliberately placed in the same sequence just described, to hide the entrance to the landing leg room, thereby making it look like a different room. The shapes with X's represent unidentified pieces of equipment. The red line at the top of the image represents where the unseen wall of the room would have been, and I placed a hypothetical elevator in the wall of the room which houses the two large vehicles, which must have been on this wall as it is obviously not visible on any of the other three walls, to get the vehicles in & out of the ship.


")