Chipping away (literally) at the paint!
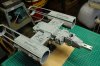
Way back in one of my early posts on this project I mentioned that I was planning to do something unique for the paint job on my Green Leader model. The original concept for the Y-Wing was that it was once covered by sleek aerodynamic panels but that Rebel mechanics, getting tired of constantly removing and reattaching the panels when doing maintenance eventually just decided to leave them off. My paint job is going to reflect that concept. Rather than paint the entire model a base grayish-white and weather that down I'm going to only paint the forward fuselage, engines and the rear of the main fuselage the white color and paint the majority of the "guts" a series of metallic shades. Kind of like a jet engine with the cowlings removed.
I am also planning to get a little finer with the chipping and other paint details. I think the original paint jobs looked fine streaking past on the movie screen but look a little crude when seen on a static display model.
Once the primer was good and dry the next step was to base it out with the metallic undercoating. I'm going to use the "hair spray technique" to actually chip the outer color coat layer of paint away in places revealing the metallic base coat underneath. The basic process is that you first paint the model with the color you want to be revealed by the chipped paint. Then a layer of hair spray, then over that an acrylic color coat. It has to be acrylic, this technique won't work with lacquer or oil-based top coats. Once the top coat is dry (but not too dry) you moisten the surface with a little water which soaks through to the hairspray dissolving it and loosening the top color coat. The top color coat can then be chipped away with a stiff brush, toothpicks, your fingernail, or other tool to create the desired look.
I used Vallejo Acrylic Metal Colors and a metallic Tamiya Acrylic paint to get the desired base coat.


After the metallic base colors had cured for a few days I masked off the main fuselage then sprayed the engines and forward fuselage with a couple coats of Vallejo's Chipping Medium. It's basically the same thing as hairspray just sprayed through an airbrush. I did some comparison tests first and the Vallejo product may actually work a little better than hairspray. Once the chipping medium was dry it was time to start spraying the color coat and chipping it. Something I discovered when painting my X-Wing is that you can't let the color coat dry for too long before trying to chip it. On that project I did some test panels where I chipped the paint away after it had dried for only a few hours, worked great. But when I did the actual model I had let the top paint dry for several days, by which time it was too hard and the water couldn't soak through and soften the hair spray. I ended up painting all the paint chips on that project by hand. So I started the process on the Y-Wing in the morning, knowing I would need to finish it the same day.
I used Tamiya Acrylic paints for the color coat on the model, mixing up a warm grayish-white color.


Once the grey color had dried for an hour or two I masked off the forward fuselage for the green "racing stripes" using a combination of Tamiya's yellow masking tape and 3M blue masking tape. The green paint was again a Tamiya Acrylic.


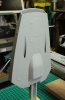
While the paint was drying on the main model I played around with some various metallic tones on the rear bulkhead for the forward fuselage. All water based paints brushed on over the base color which had been applied with an airbrush. It still needs a bunch more weathering, washes, over spray, dry brushing, but you can start to get the idea of my intent on the exposed mechanical guts of the Y.

Once the paint had dried for a couple of hours I started in on the chipping, working section by section, first wetting the area down with a little water, the scraping away the paint as it starts to soften. In some areas I think I applied too heavy of a coat of the chipping medium as the paint started to bubble up in little dots. At first I was concerned but it ended up looking great! Some of the nicest chips, scrapes and scratches were acheived by scraping the paint away with a fine Scotch-Bright pad. A toothbrush also worked well over larger areas, and as I mentioned before, tooth picks and fingernails.


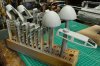
On the L'Eggs cones I used a darker graphite color for the base so the chipped paint would reveal something that looked a bit like carbon fiber.

Overall I'm thrilled with the results! The chips have a very fine, realistic look that should stand up to the closest scrutiny.