You are using an out of date browser. It may not display this or other websites correctly.
You should upgrade or use an alternative browser.
You should upgrade or use an alternative browser.
MCU Doctor Strange costume.
- Thread starter Moa Hunta
- Start date
Overview pictures
Attachments
-
 Benedict+Cumberbatch+Benedict+Cumberbatch+e5ESZE6bORix.jpg123.8 KB · Views: 1,363
 -
 Benedict-Cumberbatch-Doctor-Strange-Set-Pictures.jpg130.9 KB · Views: 731
 -
 doctor-strange-marvel-movie-poster-trailer.jpg109.5 KB · Views: 268
 -
 ds02.jpg304 KB · Views: 2,489
 -
 tumblr_o54vdfH82M1urvo2bo1_1280.png1.4 MB · Views: 2,140
Last edited:
Rings; both reference images and 3D printing models
Rings were modelled by Louise Passalacqua (AKA LouLu - https://www.shapeways.com/designer/loulu)
and can be found here:
https://www.shapeways.com/product/Q868SEYTH/the-keegan?optionId=59960721&li=user-profile
https://www.shapeways.com/product/Z2VWMVLJ9/the-keegan2?optionId=59961009&li=user-profile
Currently these include modelling costs and are for printing in metal. (I went for Matte Gold) - this may be re-listed later
-I have since noticed for anyone wanting super accurate, that the right right (squiggles not circles) has a surface curve going the wrong way.
Attachments
-
 Close left ring - front.PNG122.5 KB · Views: 213
 -
 Left ring HD.PNG351.2 KB · Views: 185
 -
 Left ring side.PNG275.1 KB · Views: 205
 -
 Right ring front.PNG133.3 KB · Views: 194
 -
 Right ring side.PNG152.2 KB · Views: 161
 -
 Side left ring.PNG336.8 KB · Views: 331
 -
 Left_top.JPG2.2 MB · Views: 223
 -
 Right _corner.jpg2.4 MB · Views: 187
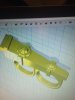
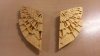
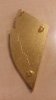
Lapel pin pieces.
These both these and the Eye of Agamotto (to follow) were modeled by Glenn Slingsby (AKA lensman - https://www.shapeways.com/designer/lensman?li=pb)
Note that in the reference image, these are not symmetrical. The 3d print models are accurate to the left side (right if you are looking at them)
Right - https://www.shapeways.com/product/8...-right-half?optionId=59812036&li=user-profile
Left - https://www.shapeways.com/product/6...e-left-half?optionId=59811390&li=user-profile
These have loops on the back for attaching and a very nice.
The current price is for printing in metal and include modelling costs, these will be uploaded again for a cheaper price.
(this one's not mine or Glenn's, but is cheap and plastic, no attach loops or anything, if someone wants it:
https://www.shapeways.com/product/LBX5V76NW/dr-strange-brooch-right?optionId=59885899)
Attachments


Last edited:
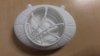
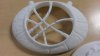
Eye of Agamotto
Reference images and 3D models
Modeling done by Glenn Slingsby (AKA "lensman" on shapeways)
https://www.shapeways.com/product/KK6VJMS6X/dr-strange-pendant-eye-of-agamotto?optionId=59858990
This is printed in 3 pieces to give access to the back of the eye, incase I want to rig it with a yellow LED for the Time Stone(?)
Came out really good.
Will probably upload the images I have so far of the lapel pieces and the Eye of Agamotto over the next couple of days.
(alternate done by another modeller who I suspect may be on here somewhere?
https://www.shapeways.com/product/B958JUJSK/dr-strange-s-eye-of-agamotto?optionId=59885898)
Attachments
-
 Front HD.PNG452.7 KB · Views: 193
 -
 Side.PNG793.9 KB · Views: 203
 -
 Front decent.PNG553.9 KB · Views: 227
 -
 Front average.PNG417.9 KB · Views: 203
 -
 Left.PNG628.1 KB · Views: 200
 -
 dr strange pendant render -final.jpg500.6 KB · Views: 174
 -
 dr strange pendant wip render2.jpg173.9 KB · Views: 195
 -
 dr strange pendant wip render.jpg563.6 KB · Views: 185
Last edited:
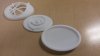
The lapel pins have arrived and look pretty good, now I just need to get red paint to color the recessed bits
They do weigh quite a bit which is really nice, maybe a tiny bit thick for my liking but otherwise PERFECT!
They do weigh quite a bit which is really nice, maybe a tiny bit thick for my liking but otherwise PERFECT!
Attachments
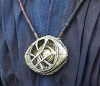
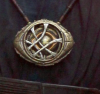
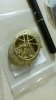
The Eye of Agamotto has arrived also.
This is how it looks, I'm looking to spray-paint them gold and then age them with oil based black paint.
-Edit: first spray paint images uploaded
-Edit2: Added aging paint - may still do some spot fixes later, we'll see how I feel in a week.
This is how it looks, I'm looking to spray-paint them gold and then age them with oil based black paint.
-Edit: first spray paint images uploaded
-Edit2: Added aging paint - may still do some spot fixes later, we'll see how I feel in a week.
Attachments
-
 20160531_131359.jpg1.7 MB · Views: 233
 -
 20160531_131327.jpg1.8 MB · Views: 182
 -
 20160531_131318.jpg1.5 MB · Views: 197
 -
 20160531_131312.jpg1.7 MB · Views: 209
 -
 20160531_131300.jpg1.6 MB · Views: 203
 -
 20160618_015013.jpg1.9 MB · Views: 199
 -
 20160618_015028.jpg1.9 MB · Views: 185
 -
 20160618_015049.jpg889.5 KB · Views: 224
 -
 20160620_221244.jpg885.9 KB · Views: 219
Last edited:
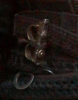
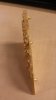
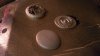
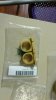
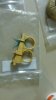
The rings finally arrived, there was a delay on these due to my modeller having a conference they needed to attend.
Unfortunately it seems I forgot to take original pictures when they arrived and the attached images are following me ageing them.
Note that due to the (14k?) gold plating on them I can't sand the corners or anything or the (White?) printing material below that will show.
These have been darkened with oil based paint and dirtied up a bit which really shows the designs off better!
I also quite like that if you look closely you can see where the oil paint is sitting in the printing lines a tiny bit more (1/64th of an inch type tiny)
Attachments
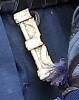
My leather arrived yesterday for my base belt/waist trainer type thing,
I have 3 fiber weave belts for the main 2 loops and the hanging plaited bit, which I will probably use an aluminum can as the little metal detailing bits.
I have a leather weave belt from http://www.thebeltshoppe.com/dockers-double-weaved-leather-laced-belt-black/ (these guys do a really good range for an amazing price)
http://www.amishworkshops.com/item/Black-Leather-Belt-Basket-Weave-280 could work also.. I hate that I can't find an exact duplicate..
I'm currently talking to a CNC mill company to look at getting the belt circle bit cut for me cause foam and circles isn't working for me. Once that's done I can spray it up with the black and grey and join the belts to it.
I will also be talking to the CNC people about cutting the lapel design stamp so that I can iron emboss the cog bit that trails the outer length of the cloak.
ClayTheSpider15
Active Member
Wow, this is gonna be SWEET! Can't wait to see finished product. Sub'd
Similar threads
- Replies
- 7
- Views
- 727
- Replies
- 15
- Views
- 7,572
- Replies
- 21
- Views
- 2,299
- Replies
- 1
- Views
- 1,061