Nike Mag V2 Mod Discussion (Page 58 Shopping List)

Status
Not open for further replies.
I just thought of using wire crimps are wire nuts.

Depends on big they are. You'll be surprised what you can feel under the heel. This is why I moved the battery to buckle.

- - - Updated - - -

You can always ask the props master, @cloneprops

Didn't he use speaker cloth?

- - - Updated - - -

WOW! I guess I will do the mod! Can you give us a scan of the upper. This guy did kinda the same thing: https://www.youtube.com/watch?v=u8EWj1mGGjQ

This is my a guy named calos who got banned about a year ago.
 
Ok just spent about 1 hr trying get it right but I made a new upper using the original shoe and some foam here's my turn out
 

Attachments

  • image.jpeg
    image.jpeg
    1.4 MB · Views: 108
Last edited:
Ok, here is "THE UPPER QUEST TUTORIAL (for V2s)"

What you need :
01.JPG
• 1 cardboard
• 1 foam sheet (1mm)
• Some black fabric
• Masking Tape
• X Acto
• ShoeGoo
• Velcro
• 1 Mushroom cream Snadwich

- STEP 1 - Eat the damn sandwich !
It might sound silly but I noticed that when you're starting a project it' better to have something in the belly :D
02.JPG

- STEP 2 - Tape the Upper of the shoe with DIY tape and trace the edges with the pencil
03.JPG

- STEP 3 - Place the tape on the cardboard and cut it by following the shape you've traved.
04.JPG05.JPG

- STEP 4 - Correct the shape of the holes.
I've used a RD pattern and reduce it so it is just close to the hole of the V2
06.JPG

- STEP 5 - Place the pattern on the foam sheet and cut everything
07.JPG

- STEP 6 - Spray some glue on the foam (here i made a mistake, I should have whrite on the other side but that's OK...)
08.JPG

- STEP 7 - Place the foam on the fabric and trace the "Y" shape in the ears
09.JPG

- STEP 8 - Cut the "Y" shape and glue around the hole.
Then fold the fabric till it reaches the glue. And push it on the glue.
10.JPG
NOTE : I've used my finger a lot - Don't be affraid to do so if you're using ShoeGoo :D

Afer repeating the folding/glueing process on all the excess fabric, you should obtain something like this :
11.JPG
At this point you can add another layer of fabric to protect the shoe from the glue (but as the glue is dry, everything is ok)
NOTE : This is not the same shape than the other in this tutorial (it is my first attempt) but you get the idea...

- STEP 9 - (Bonus) Adding some Velcro on the sides so you won't have to sew anything if you want ;)
To secure the velcro, I've made some stitches (just 4 points)
12.JPG

- STEP 10 - Place the Upper around the shoe using the velcro parts
13.JPG

- STEP 11 - Replace the strap around
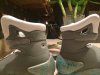
14.JPG

- STEP 12 - ENJOY :)
15.JPG

16.JPG
NOTE : On this view you can see the stiches I made to secure the Velcro on the additionnal upper part.

PS : I'm going to re-do everything with a better matching cloth somedays, This is just a Test so...
PPS : I'll edit this TUTORIAL someday to add some notes, see below.

- - -
OTHER NOTES :
• I'll check if I can find some way to work on the original holes and if I can modify them without destroying too much the shoes
• For a V3 of this (this tuto is the result of my 2nd test) I'll put something that'll make it more "RD" like... I'm sure you'll like this idea but be patient ;)
• If I find a fabric that matches the one of the V2 (it is more like velvet to my eyes) I'll make another one that'll be fixed with some stitches
- - -
To @prime3446 : I can't give you a pattern because every mag is different, I even didn't got the same from the pair I have. You'll have to trace your own and draw the "holes" from a picture or a pattern of the RDs ;)
 
Last edited:
That velcro idea is good because it allows the additional velcoro to be attached for the strap if you want that or no velcro for a more RD finish.
 
Guys, do you think that the shade of gray is the same as the V2S? I would not make an order unnecessarily.
 
That velcro idea is good because it allows the additional velcoro to be attached for the strap if you want that or no velcro for a more RD finish.

that's why I made it ;)
KGC : don'know, but it look lighter but close enough.
 
Last edited by a moderator:
Has anybody tried sugru yet to build up their midsoles

I am curious about that as well.

Another option would be mixing a small amount of oil based paint into Shoe Goo

I mix light grey pigment into some clear (tha stuff I use on my soles) and let it run into gel state and it gives a good result. I apply the splatter by mixing aqua into a 2nd smaller batch and do the same.

The earlier attempts gave streaks. In the latest attempts on my US8s, I have placed bigger dobs of aqua on first, layered over that with light grey and give the mid-sole a grind with the dremil to take off just the surface of grey, exposing aqua and giving a more spotted, screen used look.

You lose the factory texture, but gain a more color fast result that is flexible and harder wearing than paint.
 
Quick silly question guys. I'm sure I must have missed the page discussing this (from the 300+ pages in the thread), but just need some clarification on the charging setup.

Pictured is the female DC jack (which goes into the ankle) and the male DC plug that goes into that. My question is, where does the other end of the male plug go? Am I supposed to chop it off and solder it to the 9v batter connector (which then plugs into the charging adapter)?

Having a brain fart as I should know this by now. Cheers all!
.

MagCharging.jpg
 
Quick silly question guys. I'm sure I must have missed the page discussing this (from the 300+ pages in the thread), but just need some clarification on the charging setup.

Pictured is the female DC jack (which goes into the ankle) and the male DC plug that goes into that. My question is, where does the other end of the male plug go? Am I supposed to chop it off and solder it to the 9v batter connector (which then plugs into the charging adapter)?

Having a brain fart as I should know this by now. Cheers all!
.

View attachment 566322

Do you have access to a multi-meter? The positive is the centre connector on these so the red wire needs to go to that and the black wire goes to the outer shell.
 
Do you have access to a multi-meter? The positive is the centre connector on these so the red wire needs to go to that and the black wire goes to the outer shell.

No multi-meter at the moment BUT, I completely overlooked the wire. It seems it has these white dashes on one side of the wires.

I assume the white dashes are my positive?
wire.jpg

If that's the case, then I assume I can just cut off the ends, and connect that to my 9v connector?

wire2.jpg
 
Status
Not open for further replies.
Back
Top