Cri7e
Active Member
Hello everybody,
In this thread I will be documenting the complete build of my Iron Man Mk 39 Starboost armor.
I will keep the first post updated, so that new people can see the overall progress and don´t need to scroll through the entire thread.
Progress September 2015:

Torso and electronics for the torso are complete.
Content:
Original 1st Post:
In this thread I will be documenting the complete build of my Iron Man Mk 39 Starboost armor.
I will keep the first post updated, so that new people can see the overall progress and don´t need to scroll through the entire thread.
Progress September 2015:
Torso and electronics for the torso are complete.
Content:
Torso
Part 2: http://www.therpf.com/showthread.php?t=244763&p=3741902&viewfull=1#post3741902
Part 3: http://www.therpf.com/showthread.php?t=244763&p=3748819&viewfull=1#post3748819
Part 4: http://www.therpf.com/showthread.php?t=244763&p=3756921&viewfull=1#post3756921
Part 5: http://www.therpf.com/showthread.php?t=244763&p=3767692&viewfull=1#post3767692
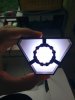
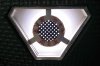
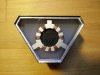
Custom ARC Reactor
Part 1: http://www.therpf.com/showthread.php?t=244763&p=3741902&viewfull=1#post3741902
Part 2: http://www.therpf.com/showthread.php?t=244763&p=3762297&viewfull=1#post3762297
Part 3: http://www.therpf.com/showthread.php?t=244763&p=3762533&viewfull=1#post3762533
Timelapses
Part 3: http://www.therpf.com/showthread.php?t=244763&p=3748819&viewfull=1#post3748819
Part 4: http://www.therpf.com/showthread.php?t=244763&p=3756921&viewfull=1#post3756921
Part 5: http://www.therpf.com/showthread.php?t=244763&p=3767692&viewfull=1#post3767692
Custom ARC Reactor
Part 1: http://www.therpf.com/showthread.php?t=244763&p=3741902&viewfull=1#post3741902
Part 2: http://www.therpf.com/showthread.php?t=244763&p=3762297&viewfull=1#post3762297
Part 3: http://www.therpf.com/showthread.php?t=244763&p=3762533&viewfull=1#post3762533
Timelapses
Part 1: Iron Man Mk 39 #001 Intakes Timelapse: https://www.youtube.com/watch?v=y3xKB9nR934
Part 2: Iron Man Mk 39 #002 Jet Engines Timelapse: https://www.youtube.com/watch?v=PmHVIOwB07A
Part 3: Iron Man Mk 39 #003 Torso Assembly Timelapse: https://www.youtube.com/watch?v=Oafthe269fY
Part 4: Iron Man Mk 39 #004 Finishing Touches Timelapse: https://www.youtube.com/watch?v=L8z-Imet3L0
Part 5: Iron Man Mk 39 #005 Torso Electronics Timelapse: https://www.youtube.com/watch?v=fSJ4TcB3nWo
Part 3: Iron Man Mk 39 #003 Torso Assembly Timelapse: https://www.youtube.com/watch?v=Oafthe269fY
Part 4: Iron Man Mk 39 #004 Finishing Touches Timelapse: https://www.youtube.com/watch?v=L8z-Imet3L0
Part 5: Iron Man Mk 39 #005 Torso Electronics Timelapse: https://www.youtube.com/watch?v=fSJ4TcB3nWo
Original 1st Post:
Hey guys,
welcome to my new built! In this thread I will be documenting my Iron Man Mk 39 Starboost/Gemini built. I only finished my last built (Iron Man Mk 2 helmet which can be found here: http://www.therpf.com/showthread.php?t=242304) about two weeks ago, but after a project finishes, I tend to get bored of too much free time qickly so I needed another project.
I always loved the Mk 39 Starboost armor ever since I saw it at a toys convention three years ago at a city nearby. What really inspired me to do this built was the one and only MasterLe Cosplay who has already done this armor.
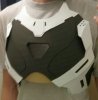
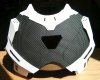
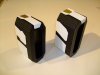
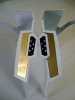
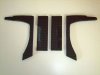
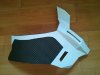
What I really got tired of quickly in my last built was all the sanding! It took forever and made a giant mess in my workshop. So I knew I wanted to do something different this time. I noticed that MasterLe used a different technique. He uses thin plastic sheets to from the suits out of. So I went online and ordered two sheets of 1mx2mx1mm PVC for the white parts of the armor. The black, honeycomb textured parts will be made out of EVA Foam, which already has the texture I like. I know in the original suit its a honeycomb texture and not what I will be using but I honestly dont have the patience to cut out so many shapes and I think the texture of the EVA foam will look just fine.
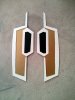
As always all of my builds start out with pepakura files, even when I will be using much thicker materials. For pepakura files, I used those from the wonderful @PepCowboy who did a perfect job creating these files! Having all the .pdo files I had the ability to create my own unfords to fit my needs, since I wont be needing all of the detail that he designed.
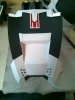
After simplifying all the parts of the armor, which took about a week, it was as simple as printing the files and starting the work. I will be building the torso first. I cut out the pieces from the paper and traced them onto the PVC, then cut out the PVC parts and glued everything together. I bought PVC glue but it takes about 30min to cure and aint nobody got time for that! So Im sticking with super glue at the moment. So far I really like the results! The shaped PVC parts are basically finished and only need painting and some more details. And to get to this point is took about a day so it is way faster than paper/resin and most important: NO SANDING NEEDED! I might try my first steps with EVA foam tomorrow, well see how that works out.
See you in the next one guys!
welcome to my new built! In this thread I will be documenting my Iron Man Mk 39 Starboost/Gemini built. I only finished my last built (Iron Man Mk 2 helmet which can be found here: http://www.therpf.com/showthread.php?t=242304) about two weeks ago, but after a project finishes, I tend to get bored of too much free time qickly so I needed another project.
I always loved the Mk 39 Starboost armor ever since I saw it at a toys convention three years ago at a city nearby. What really inspired me to do this built was the one and only MasterLe Cosplay who has already done this armor.
What I really got tired of quickly in my last built was all the sanding! It took forever and made a giant mess in my workshop. So I knew I wanted to do something different this time. I noticed that MasterLe used a different technique. He uses thin plastic sheets to from the suits out of. So I went online and ordered two sheets of 1mx2mx1mm PVC for the white parts of the armor. The black, honeycomb textured parts will be made out of EVA Foam, which already has the texture I like. I know in the original suit its a honeycomb texture and not what I will be using but I honestly dont have the patience to cut out so many shapes and I think the texture of the EVA foam will look just fine.
As always all of my builds start out with pepakura files, even when I will be using much thicker materials. For pepakura files, I used those from the wonderful @PepCowboy who did a perfect job creating these files! Having all the .pdo files I had the ability to create my own unfords to fit my needs, since I wont be needing all of the detail that he designed.
After simplifying all the parts of the armor, which took about a week, it was as simple as printing the files and starting the work. I will be building the torso first. I cut out the pieces from the paper and traced them onto the PVC, then cut out the PVC parts and glued everything together. I bought PVC glue but it takes about 30min to cure and aint nobody got time for that! So Im sticking with super glue at the moment. So far I really like the results! The shaped PVC parts are basically finished and only need painting and some more details. And to get to this point is took about a day so it is way faster than paper/resin and most important: NO SANDING NEEDED! I might try my first steps with EVA foam tomorrow, well see how that works out.
See you in the next one guys!
Last edited:

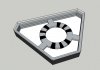
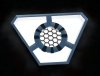
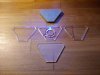
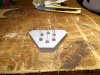
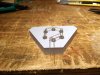
 I did a quick drawing in SketchUp to see what it will look like. It is built out of 5 layers of acrylic and lit with LEDs behind the ring. It fits perfectly into the armor since i drew it from real world measurements.