Limited Run Luke ROTJ V2 lightsaber- based on the new info from SWCA (UPDATE PG 37)

Re: Luke ROTJ V2 lightsaber- based on the new info from SWCA (UPDATE PG 12)

Trent, that setup sounds good. And it makes a lot of sense because there might be a little difference between each part.

Tom, ideally, from the face of the rod that is exposed at the tip of the saber, the bearing should start at 3.442" inches down from the tip face.
 
Re: Luke ROTJ V2 lightsaber- based on the new info from SWCA (UPDATE PG 12)

ive been working since 7am this morning, what a hellish day. everything that could have gone wrong has... came home to a super surprise!!! dan thank you so much for doing this run, this thing is beautiful. even after seeing everyone post there when i unwrapped all my stuff i was full of excitement! thank you for putting such hard work into this run. and thank you for going back to the shop and having them thread the holes on the emitter, everything is perfect
 
Re: Luke ROTJ V2 lightsaber- based on the new info from SWCA (UPDATE PG 12)

Dan, do you know how far up the rod the bearing is supposed to go? I plan on setting it in place with a little superglue but I can't figure out how to measure the distance between that and the emitter correctly while it's dropped inside the saber.

tom i plan on fastening my bearing on the shaft with one of these

262512-1.jpg


if i can find one small enough, which i know i can. if you have a lathe you can make a small grove in the rod for the C-clip to clip into. if you dont have a lathe you can simply do what i did with a power drill and hacksaw
button5.jpg


here i am cutting a nail in half the nail is glued inside the button so i put the nail inside the drill and drill it up against a hacksaw cutting it in half. except dont cut the rod in half lol, plus i dont know if the rod is hardened, but you wouldnt have to go too deep
 
Re: Luke ROTJ V2 lightsaber- based on the new info from SWCA (UPDATE PG 12)

It's there, finally.
I came home for one week thinking every day: "Today is the day"
But today when I didn't believe to get it anymore ;) ... there it is.

Everything looks fine. I was in the "No Problem" group. The emitter looks very nice and clean and shiny, the pommel looks just the way I thought it would look with some small nicks and one or two deeper nicks. The body looks awesome.

Thank you Dan. As everybody else has said yet, great work, thank you for your effort. I hope you are just a little bit happy about all the other happy people (let alone those in the machine shop :lol )


What is the best way to getting the grease off? Warm soap water? Aceton?
 
Re: Luke ROTJ V2 lightsaber- based on the new info from SWCA (UPDATE PG 12)

tom i plan on fastening my bearing on the shaft with one of these

https://www.etundra.com/images/prod...ing-023927-retaining-ring-c-clip/262512-1.jpg

if i can find one small enough, which i know i can. if you have a lathe you can make a small grove in the rod for the C-clip to clip into. if you dont have a lathe you can simply do what i did with a power drill and hacksaw
http://i1026.photobucket.com/albums/y323/lightningdan/ESB saber/button5.jpg

here i am cutting a nail in half the nail is glued inside the button so i put the nail inside the drill and drill it up against a hacksaw cutting it in half. except dont cut the rod in half lol, plus i dont know if the rod is hardened, but you wouldnt have to go too deep

I like that idea. but where would I find one, what are they called?

If you find one, I'd gladly send you a couple bucks to ship it... that is if I can't get it easily in Canada (which wouldn't surprise me... friggin nothing here).
 
Re: Luke ROTJ V2 lightsaber- based on the new info from SWCA (UPDATE PG 12)


Andymac84 said:
viewpost-right.png

I'm very sorry Anakin Stark. Due to the pick-up of another hardly wanted item (http://www.therpf.com/showthread.php?t=227507) I have to pass on my spot here...If there are any issues in getting it sold, call me back. I hope that's okay for you :-/


I will take your spot if it's still open! I missed out on this one.
 
Last edited by a moderator:
Re: Luke ROTJ V2 lightsaber- based on the new info from SWCA (UPDATE PG 12)

Got mine the other day. Looks great! Many thanks for all your hard work, Dan.
 
Re: Luke ROTJ V2 lightsaber- based on the new info from SWCA (UPDATE PG 12)

Thanks for the ideas guys! I would love to know more about that C clip, and thanks for the data Dan :)
 
Luke ROTJ V2 lightsaber- based on the new info from SWCA (UPDATE PG 12)

What you call a c-clip is known as a retaining ring. In Dutch it's even better, we call it 'asborgring'. Over here we always connect several words into one :)
 
Re: Luke ROTJ V2 lightsaber- based on the new info from SWCA (UPDATE PG 12)

Anakin Starkiller, please check my PM regarding paypal status and shipping status.

Karl
 
Re: Luke ROTJ V2 lightsaber- based on the new info from SWCA (UPDATE PG 12)

Anakin Starkiller can we put online a video editing Luke v2 thank you to advance morgan
 
Re: Luke ROTJ V2 lightsaber- based on the new info from SWCA (UPDATE PG 12)

I think he's asking for an assembly tutorial video.
 
Re: Luke ROTJ V2 lightsaber- based on the new info from SWCA (UPDATE PG 12)

Pretty pleeeease let another run happen.
 
Re: Luke ROTJ V2 lightsaber- based on the new info from SWCA (UPDATE PG 12)

Got mine today and as per usual, its absolutely fantastic.
 
Re: Luke ROTJ V2 lightsaber- based on the new info from SWCA (UPDATE PG 12)

I like that idea. but where would I find one, what are they called?

If you find one, I'd gladly send you a couple bucks to ship it... that is if I can't get it easily in Canada (which wouldn't surprise me... friggin nothing here).

i went to lowes the other day for parts for work and checked out a few things, though i like the snap ring idea i came up with a more simpler solution that only requires a power drill. so heres alittle tutorial on what i did ( i figured i posted in this thread to help others, if i am going about this the wrong way i am sorry and will repost it where ever necessary thank you)

Ok so first i ran to lowes and picked this up
nylon%20keeper.jpg


i brought the rod with me to make sure the hole in the nylon spacer was smaller. here is the bag with part number i used.

I than mic'd the rod and recorded the number
rod%20mic.jpg


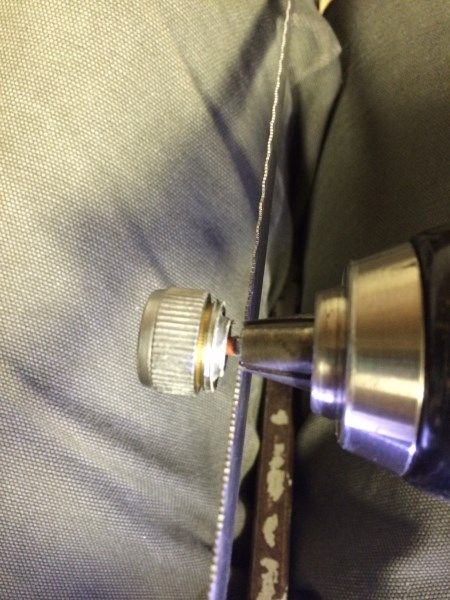
i then bored out the nylon spacer with a drill bit .055 smaller then the rod
keeper%20bore.jpg


once bored out i tried pressing it on by hand and it was a no go ( which is a good thing, i wanted the hole small, so it was a very tight fit) i then took a file and filed only one edge. so no one side of the spacer is bigger then the other, i placed the bigger side on the end of the rod, and tapped it on with a hammer. CAUTION when tapping this on with a hammer use eye protection, though im not hitting it hard enough you dont want to hit hardened steel with a hammer, which i believe this rod is.

hammer%20time.jpg

you can slightly see the mark i made a 3.442 (that mark later doesnt work for me)
3.442.jpg


now the spacer will only go down until its flush with the rod, so i used a 9mm deep socket to push the nylon spacer further down to the 3.442 mark
socket.jpg


which will end up looking like this
3.442%20done.jpg


this is so tight, i pulled and pulled and it wouldnt budge, so i was happy with it, threw the bearing on to test fit
bearing%20install.jpg


when using the 3.442 mark, my tip was alittle long so i pushed the nylon spacer back until i was happy with this tip. dont know if it needs more or less
tip.jpg

i used this measurement to achieve the above picture
3.592.jpg

measurement = 3.592

heres alittle video i made of it spinning, i love it!!
https://www.youtube.com/watch?v=s8DXxs19mAs

my only question is, i havent done enough home work. I had to file my pommel to get inside the main body. i sanded both sides by hand, slowly because i didnt want to go too small. i can get the pommel inside the body and i press with all my might and i have a small space/gap. is this normal? i can fit the tip of my file in it
little%20space.jpg

is this gap normal or do i have to do deeper sanding?

i hope my tutorial helped!!

- - - Updated - - -

I'm sorry. But I don't understand what you're asking for here.

I think he's asking for an assembly tutorial video.

if you want Dan, i can make a video of how i assembled mine? i just posted a little tutorial above, but if a video is required i can throw something together real quick this weekend

nylon%20keeper.jpg


rod%20mic.jpg


keeper%20bore.jpg


hammer%20time.jpg


3.442.jpg


socket.jpg


3.442%20done.jpg


bearing%20install.jpg


tip.jpg


3.592.jpg


little%20space.jpg
 
Last edited by a moderator:
Re: Luke ROTJ V2 lightsaber- based on the new info from SWCA (UPDATE PG 12)

Nice tutorial! I used a similar trial and error process when determining the proper location for the bearing stop on my emitter rod. Though, instead of the nylon collar, I used a piece of tape - with the piece of masking tape near the end as a temporary stop I could insert the rod into the saber body (with the bearing in place), and then adjust the length of the rod until it was positioned correctly (the tape slid down the rod as it was positioned).

After I found where the rod stop should be I drilled through and added a small machine screw & nut to act as a more permanent stop:

ROTJ v2 emitter rod stop


By the way, did anyone else have to essentially press fit the bearing into the saber body? From the other posts in this thread it appears the bearing on most of these is a loose fit in the saber body. On mine, however, I had to tap the bearing into place with a small diameter plastic tube and mallet to get it positioned at the end of the bored out saber body. Otherwise the emitter rod would not have been long enough to reach.
 
Last edited:
Re: Luke ROTJ V2 lightsaber- based on the new info from SWCA (UPDATE PG 12)

my bearing slide right on


Sent from my iPhone using Tapatalk
 
Re: Luke ROTJ V2 lightsaber- based on the new info from SWCA (UPDATE PG 12)

Oh while I'm at it, the finished lightsaber (with upside down clamp card, oops!):


The paint is just Krylon semi-flat black put directly on the metal. It may be more of a temporary paint job. Initially I had used Microscale Micro Mask to mask off areas in a pattern similar to the Celebration pictures, but when I removed the mask more of the paint came off than I intended. Should have just painted it on solid and used a toothpick to etch it away since the paint doesn't hold to bare metal enough to use masking fluid. Sanding first too would have helped. But this first run was more of a test and I intended the paint to come off easily (just not quite that easily). I filled in some additional detail with a black acrylic paint pen.

If I redo the paint with the upcoming vinyl masks I'll have to try a primer (self etching or at least in black) or adhesion promoter first.

A small note. The clamp card fits perfectly in an authentic clamp, but if you are using a Roman clamp you'll need to sand the edges just a tiny bit. It needs to be just a bit narrower, with more rounded edges as the clamp fit is slightly different.
 
Back
Top