I just sort of sit the lid on top. If your bucket lid creates an airtight seal, it probably couldn't hurt to drill a couple holes in the lid, but somebody more chemically-savvy than me would have to tell you whether they thought it was necessary or not. (I never had any problems though)Originally posted by franz bolo@Dec 21 2005, 10:38 PM
Nexus6: good idea. Can you close the lid, or do you need it to vent?
FB
[snapback]1141169[/snapback]
You are using an out of date browser. It may not display this or other websites correctly.
You should upgrade or use an alternative browser.
You should upgrade or use an alternative browser.
OWK Saber Progress
- Thread starter franz bolo
- Start date
franz bolo
Sr Member
I brought it in for the holidays, and cleaned it up with some steel wool and scrubbed it with a toothbrush and salt.
The salt let me get abrasives into the grooves where the steel wool couldn't get.
The 4th image is just thrown together for the picture.


FB
The salt let me get abrasives into the grooves where the steel wool couldn't get.
The 4th image is just thrown together for the picture.
FB
Last edited:
lesternessman
Sr Member
real nice, frank, really nice....
SaaaWEET. :eek
Just sink that grenade 1/4" in to the clamp and it will be PERFECT.
Just sink that grenade 1/4" in to the clamp and it will be PERFECT.
franz bolo
Sr Member
Romans, I just threw it together for the pic. It's just sitting on there right now.
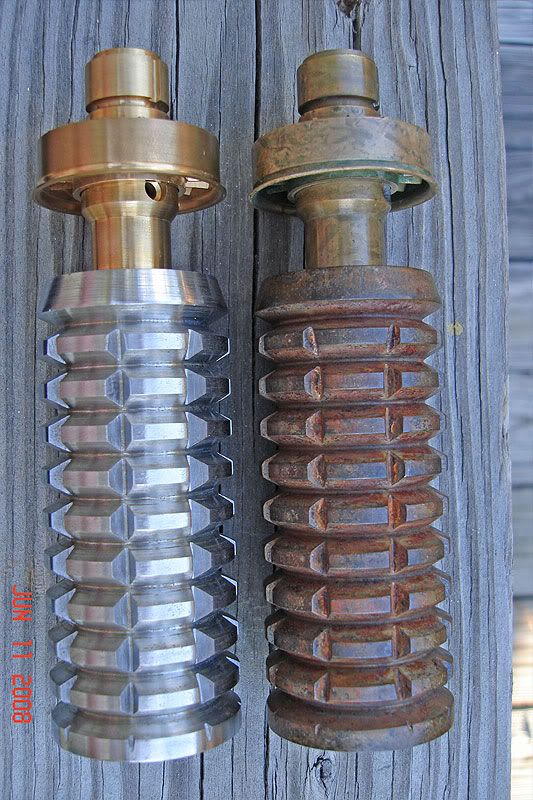
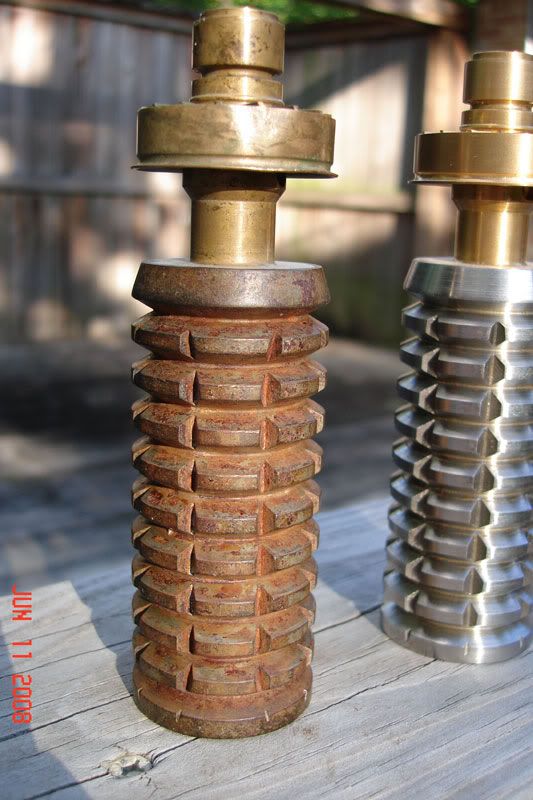
The Brass turned out really nice. The grenade looks good to, but I wish it was all brown. I have some Rust Blue ideas to try next.
In this picture, it has a white piece of Delrin for a temporary spacer. See below for the metal one I just made.
FB
The Brass turned out really nice. The grenade looks good to, but I wish it was all brown. I have some Rust Blue ideas to try next.
In this picture, it has a white piece of Delrin for a temporary spacer. See below for the metal one I just made.
FB
franz bolo
Sr Member
I have been into props for less than a year, but I was looking through my parts drawer and found I had a bunch of extra stuff. I thought I'd post some of it along with the latest version of my saber. I also included an SD Studios Replica.
I'm almost done with my OWK. I have to get a replica sink tap to finish this one off. I don't want to use the original one yet.
I made the spacer from a metal sink tube. It works with the booster perfect. I have to add the resistors now.
Here is what I have for my OWK saber build up.


FB
I'm almost done with my OWK. I have to get a replica sink tap to finish this one off. I don't want to use the original one yet.
I made the spacer from a metal sink tube. It works with the booster perfect. I have to add the resistors now.
Here is what I have for my OWK saber build up.
FB
Last edited:
Darth_Pain
Well-Known Member
:love BEAUTIFUL.
Obi-wan's ANH lighsaber is one of favorites.
Obi-wan's ANH lighsaber is one of favorites.
franz bolo
Sr Member
Can you show how you put the spacer, clamp, and booster together?
Sure, here it is:
These are all the pieces I am using. The part to the right of the clamp is the spacer I cut out of a 1.5" faucet pipe. I did it with a dremel kind of fast so it's not super smooth, but it works just fine because it's level.
I left the threads on the spacer because I didn't feel like cutting both sides. If I can get a saw, I'll probably cut another piece so that only smooth metal show through the clamp holes.

This is a photo of where the spacer would be placed and how it keeps the booster and grenade separated.

Here is a close up of the inside of the clamp with the spacer already inside of it.

Here's what it looks like with the rod going through all the pieces. I left the spacer hang out on the left side just for the photo.

Everything is fitted like it should be and this much of the thread will be used to attach the emmiter.

All screwed together and ready to go. Here is the tip with the brass nut I used.

Here is a shot inside the back of the booster.

Hope this helps.
FB
Last edited:
clancampbell
Sr Member
Where can i get a pair of those transistor washers? They really look the business.
Oh yeah...your saber is looking amazing too. I love a well weathered Obi.
Rich
Oh yeah...your saber is looking amazing too. I love a well weathered Obi.
Rich
franz bolo
Sr Member
Thanks for the comments.
The transistors are Chen's. I think Stormpath made some nice ones also.
I need to order the sink knob to finish it off. Then I get to start on the Clean Version. I need to get another set of transistors to.
Oh Yeah, I have to weather the emmiter. It's stock and I haven't done anything to it yet.
I want to make a display with all the original parts eventually but I have no clue what it will look like.
Can't wait to see what other people come up with.
FB
The transistors are Chen's. I think Stormpath made some nice ones also.
I need to order the sink knob to finish it off. Then I get to start on the Clean Version.
I need to get another set of transistors to.Oh Yeah, I have to weather the emmiter. It's stock and I haven't done anything to it yet.
I want to make a display with all the original parts eventually but I have no clue what it will look like.
Can't wait to see what other people come up with.
FB
Last edited:
Star Wars Man
Well-Known Member
pimpsta
Darth_Pain
Well-Known Member
So, how can I get a Chen grenade?
franz bolo
Sr Member
Chen's are still around here and there.
I got 2 from members here by asking for one in the JY. They will run anywhere from $200-$300 I would expect.
I know Serafino might eventually tackle the grenade, but that might be a couple projects away.
The original sink knob doesn't screw in to the booster at all. In fact it doesn't really touch the threads on the booster. It would be pressure fit and you could use a little epoxy to secure it.
There are 8 "ribs" inside the original sink knob and that is what slides onto the smooth end of the booster and forms the pressure fit. The threads just stop the knob from sliding up any more.
The Sink Knob I have is a pressure fit with no need for glue, but I'll get a replica knob and let you know how it fits.
It should just pressure fit on since it's made from an original sink knob.
FB
Last edited:
darth_myeek
Sr Member
Hi FB,
Fantastic thread!
Would you mind posting updated pics with how they look now? I would like to see how the rust continued to advance over the years.
Also, this should be archived in my opinion. Thanks for sharing your processes.
-DM
Fantastic thread!
Would you mind posting updated pics with how they look now? I would like to see how the rust continued to advance over the years.
Also, this should be archived in my opinion. Thanks for sharing your processes.
-DM
franz bolo
Sr Member
Hi FB,
Fantastic thread!
Would you mind posting updated pics with how they look now? I would like to see how the rust continued to advance over the years.
Also, this should be archived in my opinion. Thanks for sharing your processes.
-DM
Thanks, I actually re-linked the pics today when I saw the NEW THREAD on weathering.
Here are 2 pics I just took. The lighting makes the colors look different. The saber is still taken apart. I'm still trying to figure out how to finish it! :redface
FB
Last edited:
darth_myeek
Sr Member
Thanks for posting the follow-up pics. :love
I love how awesomely-awesome your weathered grenade is.
-DM
I love how awesomely-awesome your weathered grenade is.
-DM
Similar threads
- Replies
- 0
- Views
- 1,059
- Replies
- 13
- Views
- 1,641
- Replies
- 13
- Views
- 1,344