My most recent build was a Tusken Raider mask kit I purchased off Etsy. I saw it recommended here and decided it was the best option since I was unable to get a Godzilla kit.
I ordered aluminum parts and special ordered a aluminum nose, which isn't typically part of the kit. After opening the kit, the contents were nice for the price and the directions were great, but I decided to get new leather and cloth. The nose was also smaller than I expected, but other than that I was really happy with everything.
The initial build was pretty straightforward, so I hadn't documented anything really. It's once I finished that I realized it wasn't quite what I wanted.
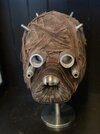
Build 1


While the details turned out okay, I was so hyper-focused on the minor details I didn't realize the overall shape of the snout and the symmetrical nature wasn't what I was looking for. I wanted to mimic the droopier style I prefer and decided to rip it up and alter it.
Not quite sure where I was going to go with this, so I call this next phase, "Doing random stuff until things start to make sense". I started by just adding some milliput to reshape the snout a bit. I realized that beyond reshaping the snout, I wanted the nose to be lower and slope at a downward angle. In the initial build you can see the nose is straight and at the same height as the face rods.

After continuing to add to the nose and reshape it, I realized I was getting a bit too far away from the face, so I sliced into the milliput and the plastic to create more of an angle back towards the mask.


Continuing to "figure it out" by reshaping and adding more milliput, I started testing out a new area for the nose to sit.

Feeling better about the overall placement, I started to continue to shape the nose. I was having a lot of issues getting the overall shape I wanted so I had to add a lot more milliput so I could cut away some of the plastic mask. This added a lot of weight, so I had to go back after and hollow out the inside to get it down.

One of the hardest parts was really just visualizing if the snout was correct. Since I was doing it by hand, it was really easy to get mixed up at different angles. So I decided as I got closer to test out the snout by putting on a wrap.

The hole in the middle was too tight and the shape of the top was a bit too round, so I shaped more and messed around with using a smaller piece of leather to get more of a peak. I then opened up the middle a bit more and thinned the sides a bit to give more of a curve.

Feeling pretty good about it, I moved to complete it, adding the wrap and leather strips.


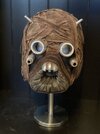
The new version had a nose that is lower and at the angle I wanted and the snout has the droopier shape I wanted. I was feeling good about it...until I put it in the cabinet and took pictures.


After getting it off the table and elevating it from different angles, I realized how the nose was too big and too far away from the face.
A bit demoralized, I decided I would keep at it. After thinking about it, I realized it shouldn't be too bad to trim it at this point. So I took out the dremmel and shaved away a significant portion to bring it close to the face, change the shape from the front and also trim around the bottom and sides. Overall making it smaller and closer to the face.

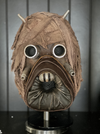
I was happier with the trimmed snout and also took the opportunity to change the angle of the face rods so they pointed down more. After some more final details and messing with the head wraps a bit, I was finished. In the end, I think the final version turned out improved.


I got more of the side profile I wanted here with the face rods and snout both pointed downward and the eyes straight.


Original vs Final.


It's still not perfect and I'm sure I can mess with it forever, but I'm happy with the end result. Its still slightly on the large side, so I may rework it again when I have the energy. The images also make it appear a bit wonkier than it appears in person, so you add another 10% less wonkiness in your mind. lol
Update: 5/14/22
Just finished a Godzilla kit, which has more accurate parts.


Update: 1/22/23
One more update to my existing Godzilla mask to make it a bit more in the ANH style.


I ordered aluminum parts and special ordered a aluminum nose, which isn't typically part of the kit. After opening the kit, the contents were nice for the price and the directions were great, but I decided to get new leather and cloth. The nose was also smaller than I expected, but other than that I was really happy with everything.
The initial build was pretty straightforward, so I hadn't documented anything really. It's once I finished that I realized it wasn't quite what I wanted.
Build 1
While the details turned out okay, I was so hyper-focused on the minor details I didn't realize the overall shape of the snout and the symmetrical nature wasn't what I was looking for. I wanted to mimic the droopier style I prefer and decided to rip it up and alter it.
Not quite sure where I was going to go with this, so I call this next phase, "Doing random stuff until things start to make sense". I started by just adding some milliput to reshape the snout a bit. I realized that beyond reshaping the snout, I wanted the nose to be lower and slope at a downward angle. In the initial build you can see the nose is straight and at the same height as the face rods.
After continuing to add to the nose and reshape it, I realized I was getting a bit too far away from the face, so I sliced into the milliput and the plastic to create more of an angle back towards the mask.
Continuing to "figure it out" by reshaping and adding more milliput, I started testing out a new area for the nose to sit.
Feeling better about the overall placement, I started to continue to shape the nose. I was having a lot of issues getting the overall shape I wanted so I had to add a lot more milliput so I could cut away some of the plastic mask. This added a lot of weight, so I had to go back after and hollow out the inside to get it down.
One of the hardest parts was really just visualizing if the snout was correct. Since I was doing it by hand, it was really easy to get mixed up at different angles. So I decided as I got closer to test out the snout by putting on a wrap.
The hole in the middle was too tight and the shape of the top was a bit too round, so I shaped more and messed around with using a smaller piece of leather to get more of a peak. I then opened up the middle a bit more and thinned the sides a bit to give more of a curve.
Feeling pretty good about it, I moved to complete it, adding the wrap and leather strips.
The new version had a nose that is lower and at the angle I wanted and the snout has the droopier shape I wanted. I was feeling good about it...until I put it in the cabinet and took pictures.
After getting it off the table and elevating it from different angles, I realized how the nose was too big and too far away from the face.
A bit demoralized, I decided I would keep at it. After thinking about it, I realized it shouldn't be too bad to trim it at this point. So I took out the dremmel and shaved away a significant portion to bring it close to the face, change the shape from the front and also trim around the bottom and sides. Overall making it smaller and closer to the face.
I was happier with the trimmed snout and also took the opportunity to change the angle of the face rods so they pointed down more. After some more final details and messing with the head wraps a bit, I was finished. In the end, I think the final version turned out improved.
I got more of the side profile I wanted here with the face rods and snout both pointed downward and the eyes straight.
Original vs Final.
It's still not perfect and I'm sure I can mess with it forever, but I'm happy with the end result. Its still slightly on the large side, so I may rework it again when I have the energy. The images also make it appear a bit wonkier than it appears in person, so you add another 10% less wonkiness in your mind. lol
Update: 5/14/22
Just finished a Godzilla kit, which has more accurate parts.
Update: 1/22/23
One more update to my existing Godzilla mask to make it a bit more in the ANH style.
Attachments

Last edited: