Edged
Active Member
My knowledge of 3D prints and PLA are very limited. What I do know, is that my general view towards them when they first appeared were always stand offish. I never really researched the why before now, so I just assumed it was a new tech that wasn’t quite realized for the common household at the time and I let it be. In short, I absolutely abhorred those striations and I wanted no part of it.
Fast forward to a few months ago, when I simply had to have a certain blaster, I decided to look into it again. At first I was seeing the same old quality I had grown to hate over the years until I happened upon a kit that looked pretty clean. I read a few reviews on the seller and noticed people were praising him for the quality of the kits and that their prep time was much shorter than others. That’s what I wanted to hear, so I decided to give it a go.
I asked the guy about about his stuff in comparison to others before it arrived. I figured he simply had a higher end machine, but that wasn’t it. He explained that it had much to do with many factors. The quality of the filament, maintaining and cleaning of the printer, but mostly designs that were optimized for printing. Too many, albeit talented, 3D artists were making models and sharing the files, but most of them while pretty as a render didn’t quite print out as such. He ended it his explaination by saying an experienced printer could make a great print on a $200 machine.
Making that kit was an absolute pleasure. I did balk at some of the problem areas where the lines were more difficult to get to in the beginning, but with some advice, encouragement, some needle files and persistence, I got them all out and I’m glad I stuck with it! My next kit was just as seemless. Made by a fellow RPF member who clearly not only had the talent, but also a love for the source material. This wasn’t a business for him, but a labor of love, so no shortcuts were taken and the kit shows in every way.
Which brings me to the reason I’m posting this. Now that both my projects are pretty much done, I decided I enjoyed doing this so much that I needed another. Unfortunately the guy who made
my first blaster didn’t have a kit for this one that I liked. Oddly enough his was very under-detailed. Maybe it was one of his first offerings as I noticed it was not listed on Etsy, but on his webpage only. In any event, I went with another guy who seemed to nail every tiny detail….unfortunately for me.
Honestly, I don’t even know how to proceed. I don’t know if I just got lucky with the first two kits and this is pretty much the standard for the majority of them? I’m guessing this was just rushed compared to the others I’ve had. DONT get me wrong, I love the kit itself. It’s very well designed, but I’m pretty disappointed by the quality of the pieces themselves. This is gonna take weeks before I can even lay any paint down.
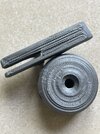
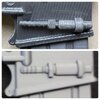
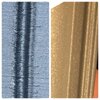
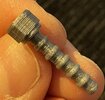
I know I don’t have to illustrate it, but just look at the difference between the first kit and this one. It took me over hour to do the piece you see below in the second pic and that was a relatively “easy”
part in comparison. I don’t have a clue how to do these tiny individual pieces. It looks like what considered to be the ultimate selling point wound up being it’s ultimate downfall. I’ve already broken one of the pieces identical to it and now I don’t even wanna bother finishing it all.
Fast forward to a few months ago, when I simply had to have a certain blaster, I decided to look into it again. At first I was seeing the same old quality I had grown to hate over the years until I happened upon a kit that looked pretty clean. I read a few reviews on the seller and noticed people were praising him for the quality of the kits and that their prep time was much shorter than others. That’s what I wanted to hear, so I decided to give it a go.
I asked the guy about about his stuff in comparison to others before it arrived. I figured he simply had a higher end machine, but that wasn’t it. He explained that it had much to do with many factors. The quality of the filament, maintaining and cleaning of the printer, but mostly designs that were optimized for printing. Too many, albeit talented, 3D artists were making models and sharing the files, but most of them while pretty as a render didn’t quite print out as such. He ended it his explaination by saying an experienced printer could make a great print on a $200 machine.
Making that kit was an absolute pleasure. I did balk at some of the problem areas where the lines were more difficult to get to in the beginning, but with some advice, encouragement, some needle files and persistence, I got them all out and I’m glad I stuck with it! My next kit was just as seemless. Made by a fellow RPF member who clearly not only had the talent, but also a love for the source material. This wasn’t a business for him, but a labor of love, so no shortcuts were taken and the kit shows in every way.
Which brings me to the reason I’m posting this. Now that both my projects are pretty much done, I decided I enjoyed doing this so much that I needed another. Unfortunately the guy who made
my first blaster didn’t have a kit for this one that I liked. Oddly enough his was very under-detailed. Maybe it was one of his first offerings as I noticed it was not listed on Etsy, but on his webpage only. In any event, I went with another guy who seemed to nail every tiny detail….unfortunately for me.
Honestly, I don’t even know how to proceed. I don’t know if I just got lucky with the first two kits and this is pretty much the standard for the majority of them? I’m guessing this was just rushed compared to the others I’ve had. DONT get me wrong, I love the kit itself. It’s very well designed, but I’m pretty disappointed by the quality of the pieces themselves. This is gonna take weeks before I can even lay any paint down.
I know I don’t have to illustrate it, but just look at the difference between the first kit and this one. It took me over hour to do the piece you see below in the second pic and that was a relatively “easy”
part in comparison. I don’t have a clue how to do these tiny individual pieces. It looks like what considered to be the ultimate selling point wound up being it’s ultimate downfall. I’ve already broken one of the pieces identical to it and now I don’t even wanna bother finishing it all.
Attachments

Last edited: