EngineeringDeck
New Member
Hi all.
I started this quite a while back, and never got too far with it. I see a couple of other people are attempting the remote.
I started with the bomb, and have just finished designing the remote.
Not got too far with the main bomb yet, as I am waiting for my new 3d printer to arrive. Plus, the huge pile of parts I ordered for the electronics.
I won't repeat too much of the remote, as there is another thread in here that is basically the same.
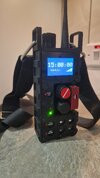
The remote has an ESP32 in it (I have piles of those), and is charged inductively. The arm key is being made using some brass USB style plugs and sockets I found in China.
One of the two arm key USB sockets is used to talk/program the ESP32 (so I don't have to keep taking it apart), and the other actually arms the remote.
I can upload to the ESP32 using OTA (over the air), but I prefer a wired connection.
There is a multiplexer in the remote so that I can make use of all the buttons, leds etc. If you hold the Safe/ON button when you insert the arm key, the remote becomes a controller for the main bomb as a simple alarm clock.
Just inserting the arm key otherwise puts it in 'film' mode.
The remote works exactly like the one in the film.
The remote looks for a Wi-Fi connection that is issued by the bomb. One connected, it keeps time with the clock on the bomb by sending out a sync pulse each second.
Should you go out of range, the timers count independently and whichever gets to zero first (in theory,at the same time), triggers detonation.
Insert the arm key, it comes to life. Set the time using the rotary encoder on the top. Pressing that changes minutes, seconds and Ms.
Once you switch on the toggle switch, removing the arm key makes no difference, the clock will still keep ticking. You must turn off the toggle switch first.
If disarmed, the arrow buttons open/close the core.
The other buttons operate 'film quotes' or play various Mission Impossible music tracks.
The trial code is on the breadboard (wrong font... I know. That will be changed).
The bomb. A nightmare of inconsistent images and scales!
The timer I am pretty sure is CGI (as is the one on the remote).
But, after what seemed forever, I think I have the scale and design as close as I will ever get it.
Not sure yet if I am going to make the central mounting plates out of aluminium. That will be expensive, but that is what they should be.
The whole design is a nightmare of angles and everything being 120 degrees spaced makes design interesting.
I should have used Fusion360 for the drawing, but I am still learning that. So I seriously pushed the boundaries of Tinkercad!
Pretty much all of it will be 3d printed, with aluminium bars for the frame. I could not find good matches for the control boxes, so I designed my own.
The linear actuators for the opening core will be housed in a 3d printed enclosure to match the prop.
This will function as a prop, but also as a posh alarm clock.
LONG way to go.
I started this quite a while back, and never got too far with it. I see a couple of other people are attempting the remote.
I started with the bomb, and have just finished designing the remote.
Not got too far with the main bomb yet, as I am waiting for my new 3d printer to arrive. Plus, the huge pile of parts I ordered for the electronics.
I won't repeat too much of the remote, as there is another thread in here that is basically the same.
The remote has an ESP32 in it (I have piles of those), and is charged inductively. The arm key is being made using some brass USB style plugs and sockets I found in China.
One of the two arm key USB sockets is used to talk/program the ESP32 (so I don't have to keep taking it apart), and the other actually arms the remote.
I can upload to the ESP32 using OTA (over the air), but I prefer a wired connection.
There is a multiplexer in the remote so that I can make use of all the buttons, leds etc. If you hold the Safe/ON button when you insert the arm key, the remote becomes a controller for the main bomb as a simple alarm clock.
Just inserting the arm key otherwise puts it in 'film' mode.
The remote works exactly like the one in the film.
The remote looks for a Wi-Fi connection that is issued by the bomb. One connected, it keeps time with the clock on the bomb by sending out a sync pulse each second.
Should you go out of range, the timers count independently and whichever gets to zero first (in theory,at the same time), triggers detonation.
Insert the arm key, it comes to life. Set the time using the rotary encoder on the top. Pressing that changes minutes, seconds and Ms.
Once you switch on the toggle switch, removing the arm key makes no difference, the clock will still keep ticking. You must turn off the toggle switch first.
If disarmed, the arrow buttons open/close the core.
The other buttons operate 'film quotes' or play various Mission Impossible music tracks.
The trial code is on the breadboard (wrong font... I know. That will be changed).
The bomb. A nightmare of inconsistent images and scales!
The timer I am pretty sure is CGI (as is the one on the remote).
But, after what seemed forever, I think I have the scale and design as close as I will ever get it.
Not sure yet if I am going to make the central mounting plates out of aluminium. That will be expensive, but that is what they should be.
The whole design is a nightmare of angles and everything being 120 degrees spaced makes design interesting.
I should have used Fusion360 for the drawing, but I am still learning that. So I seriously pushed the boundaries of Tinkercad!
Pretty much all of it will be 3d printed, with aluminium bars for the frame. I could not find good matches for the control boxes, so I designed my own.
The linear actuators for the opening core will be housed in a 3d printed enclosure to match the prop.
This will function as a prop, but also as a posh alarm clock.
LONG way to go.
Last edited: