Shotzy
Active Member
Hey everyone!
This is my first thread on the forums so i'll do a quick introduction before I jump into the build. I'm from Minneapolis, Minnesota and have been a long time reader on these forums so I thought that I should finally post something!
Alright so lets talk about this Kylo Ren mask/Helmet project that I am currently working on, I'm gonna run through what I've done so far and I'll try to keep the progress updated on this thread as much as I can!
STEP 1: Pepakura to 3-D Printable .Stl
To start off I used the pepakura model of Kylo Ren's Helmet that @rundown so generously released for the public.

First I converted the pepakura file to .obj using Pepakura Designer 3, the new .obj 3-D model is paper thin (obviously..) so now needs some thickness! I opened the new 3-D model in Blender and used the "Solidify" modifier to thicken it, this modifier saves A LOT of time when you want to make a pepakura model 3-D printable!


Now at this point I could smooth out the model a bit to get rid of some of the polygonal lines but I'm still working on my 3-D modeling skills... but thankfully most of my talent lies in the post print production anyways! My plan was to give the model a very high infill density so I could sand away the edges a bit and model over the print itself with epoxy class as needed to clean it up, but first I took my freshly thickened model and cut into manageable size pieces for 3-D printing! The easy way to do this in my opinion is using a program called NetFabb, its very simple and even the free version has some great features.

First off ignore the errors, I fix them a bit later! So initially I only made two cuts for a total of 4 pieces to print but I decided to add an additional cut at the top of the helmet to GREATLY reduce both the print time and amount of material used. Thankfully one of my 3-D printers has a huge 12x12x12 build space so I was able to minimize the amount of cuts I had to do which in turn reduces the amount of post-print work that needs to be done!
STEP 2: Test Print
Now that I have my 3-D printable files its time for a test print!
![IMG_2775[1].JPG](https://therpf-f28a.kxcdn.com/forums/data/attachments/219/219434-564d522b62649c0297d4fdaaee53876a.jpg "IMG_2775[1].JPG")
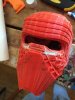
So for the test print I ended up cutting the model again down the middle to save a bit of time since its symmetrical anyway. The final test prints ended up coming out great and gave me a pretty good idea of what post production work would need to be done. I ended up scaling the original model up by 1/10 because the test print was a tad small, i did this in my slicing program Repetier Host which made scaling it very simple.

I painted the test print without doing any sanding just to see how it would look and to be honest its not half bad! Im still going to round out those edges in post anyway though because I want it to look as good as possible!
STEP 3: Printing
Now its time to just sit back and relax while I print the 3 pieces for the front of the mask!
![IMG_2801[1].JPG](https://therpf-f28a.kxcdn.com/forums/data/attachments/219/219447-3518d1f801e6b28b5db61608527c7daa.jpg "IMG_2801[1].JPG")
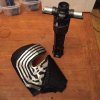
Here is a photo of the entire front bottom piece of the mask printed at full scale!

And here is the painted test print next to the first full size printed piece to show the 1/10 increase in scale! Now it's time to print the rest of the front of the helmet!
![IMG_2826[1].JPG](https://therpf-f28a.kxcdn.com/forums/data/attachments/219/219445-1c7ff6e616f3898edd2dd0de721483c8.jpg "IMG_2826[1].JPG")
I forgot how much I hate support material... 3 blisters later its almost cleaned up and ready for assembly!
STEP 3: Assembly and Post Cleanup

With the whole front of the helmet finally printed (which only took about 24hr) its time to assemble the pieces and get ready to sand my hands off! (time-travel engage)
![IMG_2845[2].JPG](https://therpf-f28a.kxcdn.com/forums/data/attachments/219/219444-fbbfebccfee40cc4507fd9fb0f5208a6.jpg "IMG_2845[2].JPG")
All glued up and drying! Next I used epoxy clay to reinforce the seam inside of the helmet and ensure the pieces have a nice and tight bond to each other.

After the glue and epoxy clay dried it was time to stop and reflect... and then it's back to work for the supper (not) fun part! Sanding and patching the the gaps..

So this is where I currently am at with this project! I patched any imperfections with epoxy clay and gave the whole thing a light sanding and i also started making references for the damage scars i still need to add. My next step is going to be to apply a coat of XTC-3D resin to the whole thing to fill in all of the lines and gaps and then go to town on sanding it!
So what do you guys think so far? Thanks for reading!
- Sean
This is my first thread on the forums so i'll do a quick introduction before I jump into the build. I'm from Minneapolis, Minnesota and have been a long time reader on these forums so I thought that I should finally post something!
Alright so lets talk about this Kylo Ren mask/Helmet project that I am currently working on, I'm gonna run through what I've done so far and I'll try to keep the progress updated on this thread as much as I can!
STEP 1: Pepakura to 3-D Printable .Stl
To start off I used the pepakura model of Kylo Ren's Helmet that @rundown so generously released for the public.
First I converted the pepakura file to .obj using Pepakura Designer 3, the new .obj 3-D model is paper thin (obviously..) so now needs some thickness! I opened the new 3-D model in Blender and used the "Solidify" modifier to thicken it, this modifier saves A LOT of time when you want to make a pepakura model 3-D printable!
Now at this point I could smooth out the model a bit to get rid of some of the polygonal lines but I'm still working on my 3-D modeling skills... but thankfully most of my talent lies in the post print production anyways! My plan was to give the model a very high infill density so I could sand away the edges a bit and model over the print itself with epoxy class as needed to clean it up, but first I took my freshly thickened model and cut into manageable size pieces for 3-D printing! The easy way to do this in my opinion is using a program called NetFabb, its very simple and even the free version has some great features.
First off ignore the errors, I fix them a bit later! So initially I only made two cuts for a total of 4 pieces to print but I decided to add an additional cut at the top of the helmet to GREATLY reduce both the print time and amount of material used. Thankfully one of my 3-D printers has a huge 12x12x12 build space so I was able to minimize the amount of cuts I had to do which in turn reduces the amount of post-print work that needs to be done!
STEP 2: Test Print
Now that I have my 3-D printable files its time for a test print!
So for the test print I ended up cutting the model again down the middle to save a bit of time since its symmetrical anyway. The final test prints ended up coming out great and gave me a pretty good idea of what post production work would need to be done. I ended up scaling the original model up by 1/10 because the test print was a tad small, i did this in my slicing program Repetier Host which made scaling it very simple.
I painted the test print without doing any sanding just to see how it would look and to be honest its not half bad! Im still going to round out those edges in post anyway though because I want it to look as good as possible!
STEP 3: Printing
Now its time to just sit back and relax while I print the 3 pieces for the front of the mask!
Here is a photo of the entire front bottom piece of the mask printed at full scale!
And here is the painted test print next to the first full size printed piece to show the 1/10 increase in scale! Now it's time to print the rest of the front of the helmet!
I forgot how much I hate support material... 3 blisters later its almost cleaned up and ready for assembly!
STEP 3: Assembly and Post Cleanup
With the whole front of the helmet finally printed (which only took about 24hr) its time to assemble the pieces and get ready to sand my hands off! (time-travel engage)
All glued up and drying! Next I used epoxy clay to reinforce the seam inside of the helmet and ensure the pieces have a nice and tight bond to each other.
After the glue and epoxy clay dried it was time to stop and reflect... and then it's back to work for the supper (not) fun part! Sanding and patching the the gaps..
So this is where I currently am at with this project! I patched any imperfections with epoxy clay and gave the whole thing a light sanding and i also started making references for the damage scars i still need to add. My next step is going to be to apply a coat of XTC-3D resin to the whole thing to fill in all of the lines and gaps and then go to town on sanding it!
So what do you guys think so far? Thanks for reading!
- Sean
Attachments
Last edited:
")