Hi,
EDIT: The piece is finished, scroll down")
as part of the Half Life costume I'm currently building (still in the resining phase ...) I also need suitable prop to carry, which is obviously the crowbar, and I'd like to share the progress here.
Now why building a crowbar when I could buy it instead? Three quick reasons, first, the weight. I don't want to carry around two and a half kilos (yeah, I'm from Germany, I don't know how many pounds that is) all day. Second, I don't think I could go to a comic con or so with an actual crowbar. Just a guess... Third, I'd like to gain some experience with resin, putty, sanding, painting and so on, and with the crowbar, it's not that I've destroyed ten hours of pepping when I do something wrong.
Ok, I decided to make the crowbar using massive fiberglass putty. I don't know the name but it's like Bondo stuffed with glass fibers. I guess that is what you call mudglass? Well it's muddy and it has glass, so...
This stuff gets really really hard. But I cannot pour it into a mould or something cause it's so pasty. So I thought I squeeze the putty into a rack which I've made from cardboard.
Here's the lower part. I've used the shape from a picture and scaled it up.
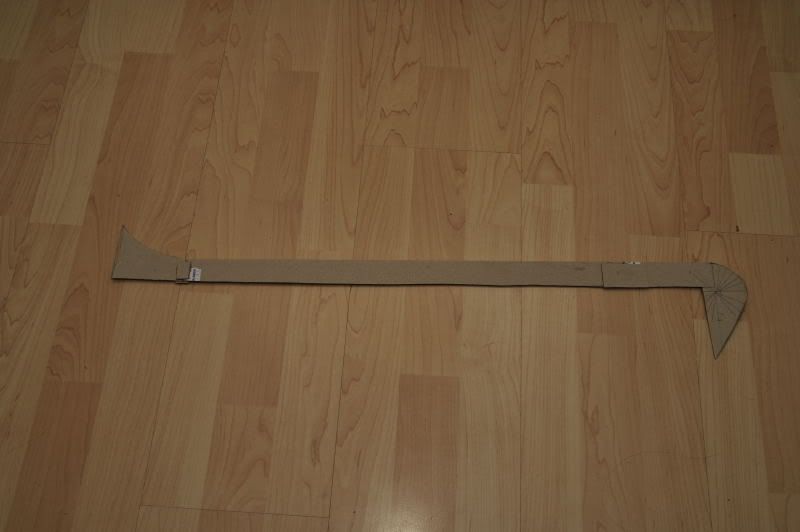
The putty goes on TOP of this shape, kinda like this:

You also see that I was quite accurate with upscaling the image
On top of this comes kind of a "plate" on which the putty is applied.

Here's a zoom up of the upper piece.

This plate is now surrounded by "walls", to hold the putty:

So now there is a "tunnel" for the putty, but it's still rectangular, so I applied acrylic inside and smoothed it with a hexagonal scraper. I want the crowbar to be hexadonal in diameter, not perfectly round. Well the scraper is actually half a hexagon, as the upper part will stick out and will be shaped by me applying the putty. The paper and the acrylic can be torn off once the cast is hard. So heres the final "mould":


You can kinda see the half-hexagonal "rack" for the putty.
Ok, next is applying the putty into the shape. I have used a lot, almost 600grams (again, no idea how many ounces those are...). As the stuff hardens quite fast, I used three rounds. Here's the filled thing:

As you can see, I wasn't quite able to shape the upper half nicely with my scrapers, but I hope I can sand them down to a hexagonal profile.
Finally, after the putty has hardened, I tore the cardboard-and-acrylic-mould from the cast, which pretty much looks already crowbar-like:

Now the part which was in the mould (here the upper part) Is much more smoother and hexagonal, but I really hope I can sand the rest down and/or fill stuff up with normal Bondo.
And this thing seems unbreakable, I mean I've not tried to open crates with it, but I cannot bend it at all!??!
Ok, that is it for now, I'd appreciate any comments, and I hope I have some more pictures soon.
Greetings from Germany!
EDIT: The piece is finished, scroll down
as part of the Half Life costume I'm currently building (still in the resining phase ...) I also need suitable prop to carry, which is obviously the crowbar, and I'd like to share the progress here.
Now why building a crowbar when I could buy it instead? Three quick reasons, first, the weight. I don't want to carry around two and a half kilos (yeah, I'm from Germany, I don't know how many pounds that is) all day. Second, I don't think I could go to a comic con or so with an actual crowbar. Just a guess... Third, I'd like to gain some experience with resin, putty, sanding, painting and so on, and with the crowbar, it's not that I've destroyed ten hours of pepping when I do something wrong.
Ok, I decided to make the crowbar using massive fiberglass putty. I don't know the name but it's like Bondo stuffed with glass fibers. I guess that is what you call mudglass? Well it's muddy and it has glass, so...
This stuff gets really really hard. But I cannot pour it into a mould or something cause it's so pasty. So I thought I squeeze the putty into a rack which I've made from cardboard.
Here's the lower part. I've used the shape from a picture and scaled it up.
The putty goes on TOP of this shape, kinda like this:
You also see that I was quite accurate with upscaling the image
On top of this comes kind of a "plate" on which the putty is applied.
Here's a zoom up of the upper piece.
This plate is now surrounded by "walls", to hold the putty:
So now there is a "tunnel" for the putty, but it's still rectangular, so I applied acrylic inside and smoothed it with a hexagonal scraper. I want the crowbar to be hexadonal in diameter, not perfectly round. Well the scraper is actually half a hexagon, as the upper part will stick out and will be shaped by me applying the putty. The paper and the acrylic can be torn off once the cast is hard. So heres the final "mould":
You can kinda see the half-hexagonal "rack" for the putty.
Ok, next is applying the putty into the shape. I have used a lot, almost 600grams (again, no idea how many ounces those are...). As the stuff hardens quite fast, I used three rounds. Here's the filled thing:
As you can see, I wasn't quite able to shape the upper half nicely with my scrapers, but I hope I can sand them down to a hexagonal profile.
Finally, after the putty has hardened, I tore the cardboard-and-acrylic-mould from the cast, which pretty much looks already crowbar-like:
Now the part which was in the mould (here the upper part) Is much more smoother and hexagonal, but I really hope I can sand the rest down and/or fill stuff up with normal Bondo.
And this thing seems unbreakable, I mean I've not tried to open crates with it, but I cannot bend it at all!??!
Ok, that is it for now, I'd appreciate any comments, and I hope I have some more pictures soon.
Greetings from Germany!
Last edited:


