the.rebel.agent
Sr Member
Latest update: 04/17/2013: resin cast:
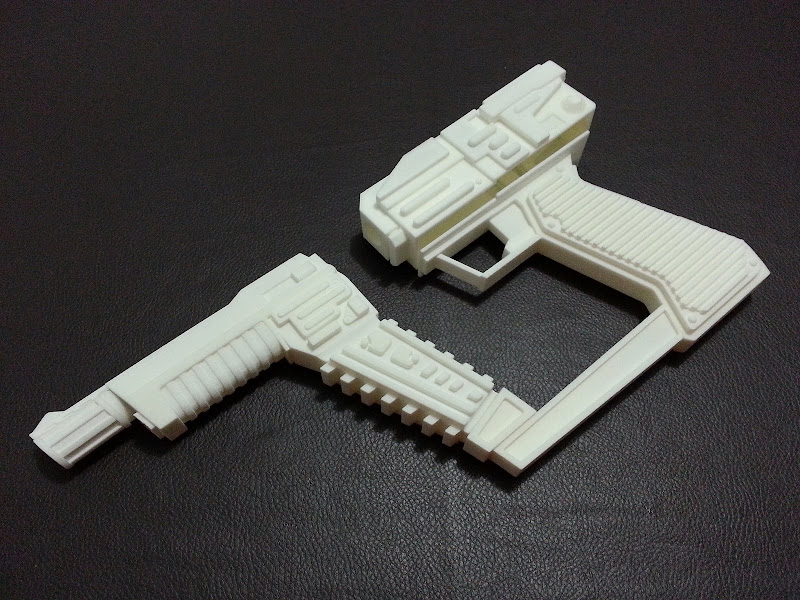
Latest update: 03/04/2013: 3D print result:
IMPORTANT:
Latest news about this project here:
http://www.therpf.com/f9/v-visitor-laser-gun-replica-prop-idealized-150840/index6.html#post2587610
***********************************************************************
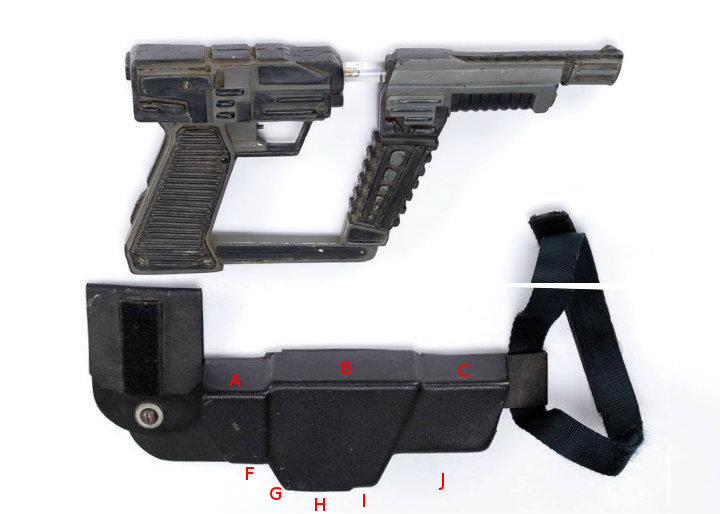
Got my resin gun from a known vendor, and despite I was well aware of the shape and design of it, I am kinda disappointed. When I was a child, looking at the TV show, I thought the gun was really symmetrical and perfectly done. Real prop looks cranky, twisted and kinda awkward.
This is the series V1 version:

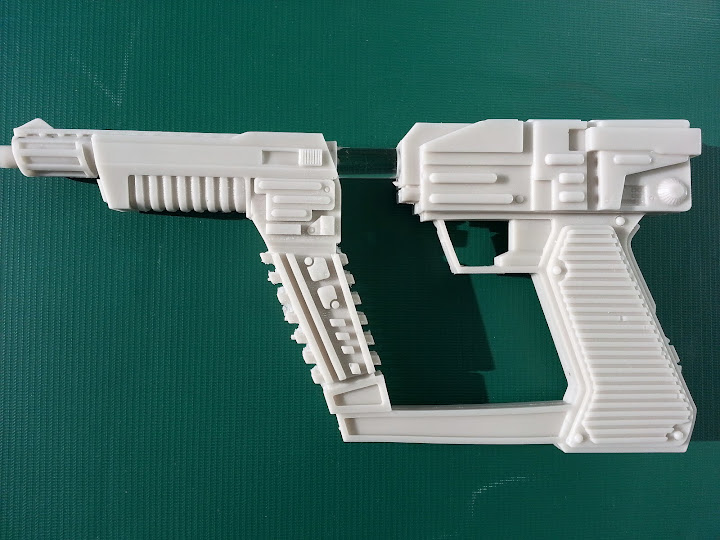
So, since I have a lot of experience with the 3d modeling and 3d printing I told my wife and friends that I will re-create an idealized version of the gun, and I did it.


The gun is completely modular. It means that I will be able to assembly like a LEGO, and create a mold of it to cast it in resin. The dimensions are quite close to the resin model but symmetrical. You can see more photos here from different angles:
https://picasaweb.google.com/the.rebel.agent/VisitorLaserGunMakingOf?authkey=Gv1sRgCJG7lJK10_63Rg#
I am arranging the parts in a single .stl file to save some money. It is almost 174.41 cm3. Interior is completely hollow. Will take some screen captures from the interior to show you. What do you think? Any feedback will be welcome.
Planning to use this thread to develop the final prop getting your feedback. Here you can read about possible pricing:
http://www.therpf.com/f13/v-visitor-laser-gun-replica-prop-idealized-150727/#post2305033
It is hollow, so we can figure out how to install electronics and a functional trigger:


Latest update: 03/04/2013: 3D print result:
IMPORTANT:
Latest news about this project here:
http://www.therpf.com/f9/v-visitor-laser-gun-replica-prop-idealized-150840/index6.html#post2587610
***********************************************************************
Got my resin gun from a known vendor, and despite I was well aware of the shape and design of it, I am kinda disappointed. When I was a child, looking at the TV show, I thought the gun was really symmetrical and perfectly done. Real prop looks cranky, twisted and kinda awkward.
This is the series V1 version:
So, since I have a lot of experience with the 3d modeling and 3d printing I told my wife and friends that I will re-create an idealized version of the gun, and I did it.
The gun is completely modular. It means that I will be able to assembly like a LEGO, and create a mold of it to cast it in resin. The dimensions are quite close to the resin model but symmetrical. You can see more photos here from different angles:
https://picasaweb.google.com/the.rebel.agent/VisitorLaserGunMakingOf?authkey=Gv1sRgCJG7lJK10_63Rg#
I am arranging the parts in a single .stl file to save some money. It is almost 174.41 cm3. Interior is completely hollow. Will take some screen captures from the interior to show you. What do you think? Any feedback will be welcome.
Planning to use this thread to develop the final prop getting your feedback. Here you can read about possible pricing:
http://www.therpf.com/f13/v-visitor-laser-gun-replica-prop-idealized-150727/#post2305033
It is hollow, so we can figure out how to install electronics and a functional trigger:
Last edited:
")