Daft Punk - Guy-Manuel de Homem Christo Build

Sorenzo

Well-Known Member
RPF PREMIUM MEMBER
tumblr_lem7m17jRL1qe3le9o1_500.jpg


Finally getting round to this thread, sorry about the wait.

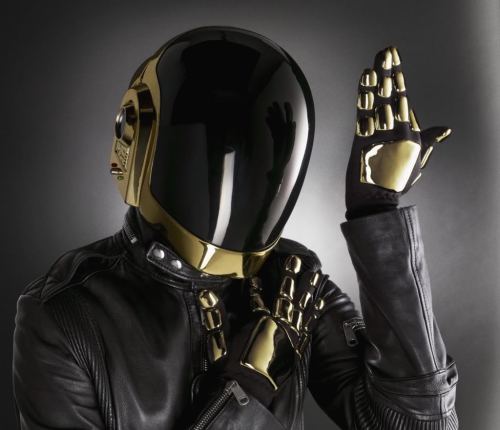
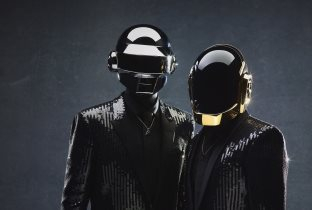
This build is part of 3 Daft Punk helmets i am making, you may have seen, or will see my other threads for the Tron version of Guy-Manuels helemt, and of course, Thomas's helmet.

As i mentioned in my other threads, i'm almost ready to cast ( tomorrow could be the day :thumbsup) so i'm going get the builds to date up on here as quickly as possible.

Again i would like to say that these projects would not be possible if I hadn’t studied and research previous builds that have been catalogued here over the last year or more. so a big thank you to everybody who has inspired me and hopefully these posts will inspire somebody else.:thumbsup

All feedback, comments queries and suggestions are greatly appreciated.

Hope you enjoy my build.

Here are the threads for the other builds,

Thomas Bangalter Helmet Build


Guy-Manuel Tron Build
 
Yada yada, cardboard to scale, former from mdf, foam, you get the picture.

5784219452_a30b5eefde_z.jpg

5788107324_095e621854_z.jpg

5787551477_fc42496379_z.jpg


Unlike the Tron version, Guy's older helmet have beautiful rounded feature at the bottom, for this reason the former was a little more complicated with a layer of foam at the bottom. this acted as a guide for the outer rim to be built on, and also allowed for slot where the ear piece templates could be fixed onto.

5787548157_ac644eff51_z.jpg

5787548541_0126603586_z.jpg

5788105124_acf5f40e16_z.jpg


I wanted to be able to build the outer rim around the ear pieces so they could then be removed and the actual ear pieces inserted giving a clear seam.

5787549345_0891684777_z.jpg

5788105990_226e82804d_z.jpg


The same technique used for the Thomas and Tron build, using long strips of sandpaper to run around the dome was appied here to get a quick even finish.

5788106524_6164a8c3a7_z.jpg

5787550717_dafaa196be_z.jpg
 
Ok, so i'm a bit hacked off now. I've recently realised that thanks to my wonderful Iphone deciding to pack it in at this point of the build, and of me not backing up my picture as regularly as i should, i have lost about a weeks worth of progress.

I will try my best to describe the steps i took.

Once i had the dome to a perfect finish ( lots of sanding and filling ) i then set about building up the higher edges. The ear piece template were postioned and the curves were carefully marked out in pencil. I then stuck strips of styrene (i think about 5 or 6mm deep, the same thickness as the MDF ear piece templates) directly onto the smoothed dome. this provided a channel which could then be filled in with filler. Diclo was used to stick the styrene to the filler, a very handy trick, no need for hot glue or messy super glue.

Here is the helmet about a week later with the channels filled in and the templates removed. you may be able to see the styrene walls in these images?

5794415053_de930df7d8_z.jpg

5794971334_00e05aaef9_z.jpg
 
To form the earpieces, the basic shape was cut from MDF, 2 for each side. 2 would be hollowed out and fixed onto the others. They were then sanded and rounded.

5794415133_dd9e0b99cb_z.jpg

5794415217_01a8d24fd0_z.jpg

5794415375_183c825fff_z.jpg


I then vat formed over the pieces with .5mm styrene, this would give an instant smooth finish and save me time in sealing and sanding the MDF.

5794971712_4c5232d2ce_z.jpg


I had intended to lazer cut the circuit deatails on a seperate piece of acrylic and insert it to the ear piece, but filling in the edges would be a nightmare. I hollowed out the back of the pieces so a thicker piece od acrylic with the engraved details could be inserted and vat formed over.

5794415175_8fa0948221_z.jpg

5794971514_d925f43a71_z.jpg


The results was quite inpressive, if i do say so myself.

5794971632_434da1576b_z.jpg


The cones were formed on the lathe and vat formed over.

5794415469_fa5fd4e575_z.jpg

5794971564_a37cdb173d_z.jpg


I used a good coat of spray adhesive to fix the form to the MDF, stuck the cones in place, then used spacers to place and fixed the ear pieces with a bit of contact adhesive.

5794971870_8be3f47629_z.jpg

5794972046_1e00b4f9a4_z.jpg

5794971806_a6afa9dfda_z.jpg


Finally, he was starting to look like Guy-Manuel.

5794972396_1de8d05271_z.jpg

5794973708_5a04deb44d_z.jpg
 
You're helmet builds are very impressive. I am in awe of how clean and sharp your lines are!

If I were to make one suggestion, which I feel bad doing so since you seem to be so close to being done, its that I think the chin of both of your Guy-Man helmets could benefit from some tweaking.

Guy-Man's helmet, in all versions, has a pretty squared off chin. Its one of those things that you can really only see in certain photos. Here are some of the Human After All helmet that might help you.

lb78fe863449f1d52045d3a.jpg


sebastientellier.jpg


daftpunk1h.jpg


daftpunk2l.jpg


6a00e398210d13883300e55.png


And for good measure here is a picture of a Guy-Man formed visor, which I really think shows off the squared chin:

dpvisormolds3.jpg
 
You're helmet builds are very impressive. I am in awe of how clean and sharp your lines are!

If I were to make one suggestion, which I feel bad doing so since you seem to be so close to being done, its that I think the chin of both of your Guy-Man helmets could benefit from some tweaking.

Guy-Man's helmet, in all versions, has a pretty squared off chin. Its one of those things that you can really only see in certain photos. Here are some of the Human After All helmet that might help you.

lb78fe863449f1d52045d3a.jpg


sebastientellier.jpg
Arrrggh, your so right! haha, i was going to cast Guy on monday, but i think i might pass on that. here is Guy at the minute

5794972626_ee4dd59482_z.jpg


I've had him ready (or so i thought) for quite a while now, been working on the other too trying to catch up. I must admit i wasn't entirely happy with the lower half of the visor, but i was trying to compromise so i could use the one cast to make not only HAA lids, but also the earlier Homework/Discovery lids which seem rounder towards the bottom.

Looking at reference pics i don't know how i didn't spot this sooner :angry

daftpunk.jpg


Its as obvious as a slap in the face. I had it in my head that the Tron lid had a squared chin, the others were rounded.

Think i migh hold off casting til i can rectify this.

Thank you so much, those images are amzing by the way.
 
Now I feel bad!

The truth is Sorenzo you have a very nice helmet as is, with or without the squared chin. I think if you were to mold the helmet as it is now it would still look great.

Regardless of what you do I think the final product will look fantastic.
 
^I completely agree with Ray. This is a sweet looking build, so no need to compromise it this late in the molding stage
 
How do I suscribe to all of your theads with one click? :)

Em? i don't know? i was going to do one thread, but thought it'd be too much seeing as i seem to be always working on them similtaneously.

just gonna have to keep checking back i guess, unless anybody can suggest something i haven't thought about?
 
Em? i don't know? i was going to do one thread, but thought it'd be too much seeing as i seem to be always working on them similtaneously.

just gonna have to keep checking back i guess, unless anybody can suggest something i haven't thought about?

Sorenzo, it was just a way to say that I love your threads so much that I need to suscribe to all of them! :)
 
Now I feel bad!

The truth is Sorenzo you have a very nice helmet as is, with or without the squared chin. I think if you were to mold the helmet as it is now it would still look great.

Regardless of what you do I think the final product will look fantastic.

Don't feel bad, i still have 2 other lids that are just about ready for molding. I want to do it once and do it right!!
I've been rushing a little lately trying to get ready for an exhibit, was hoping to have a cast pulled, but i'm not going to waste a couple hundred quid on something that isn't as perfect as i can get it.
The molding can wait.
 
Sorenzo, it was just a way to say that I love your threads so much that I need to suscribe to all of them! :)

haha, i kinda got that, its a pain in the ass for me to keep track of them, so i thank you for making the effort. cheers :thumbsup
 
Little bit of a back track here. I found an image which shows how i created the raised section of the lid on both this build and the Tron build. Strips of styrene were used to create the outline, which was then filled in with bondo. Left really clean lines, which you'll see later on.

5833397047_3cd15ac057_z.jpg
 
So, once I was happy with the raised edges ( lots of filling, sanding, priming and sanding again :( ) it was time to unleash the beast.

5794973442_38e84281ee_z.jpg


The styrene channels were carefully removed leaving a nice clean rim.

5794973596_3d3cd471af_z.jpg

5794417007_ef08796f70_z.jpg


I also removed the masking tape which i had foolishly placed to protect the dome.

Bad idea!!

Even though i de-tacted the tape, it managed to rip up small piece of paint and even some filler. Nothing too bad, but a pain in the ass none the less.

5794417437_71e48f8ab1_z.jpg


Lesson learned!
 
now it was a matter of the finer details. As per always, lots of spots needing filling or sanding, or both. it seems the more you do the more that become obvious that you've missed. You will notice that the lower section of the lid is as rough as ****. This part is going to be cut away, so i'm not going to waste much time getting it perfect.

5794415783_824649d4c5_z.jpg


There is a clear seam on the back of Guys lid on both sides linking the seam around the ears to the back panel which has the wired finish. I had intended to place a strip of styrene here which could then be removed, but instead opted to manually carve the seam out, which i'm glad i did. This method gave me far more control, especially when rounding the edges.

Marked it off with a pencil first.

5794973028_1bee9d2506_z.jpg


Then placed styrene to act as not only a guide, but also protect the surrounding area.

5794973346_f0d8b57a3d_z.jpg


Then after about 30 min careful filing with a narrow diamond file....

5794972432_bddece5449_z.jpg
 
symmetry is key with a build like this, so nexted i wanted to match all the curves on the angled elements on both sides. They were already formed, but alot more acutely then intended so that i could remove any excess.

Using a 2 pointed divider to match them all up then remove the excess.

5794415559_ab92d6ded9_z.jpg

5794415715_a46514d235_z.jpg
 
This is as far as i've got to the build thus far. haven't really made much progress with any of my builds the last week or so.

this is how the lid sits now...

5794416455_f6e4c2b2d4_z.jpg


I took this photo about the same time Agent Rayban pointed out some potential areas for improvement. I decided to postpone molding and casting and took out my magnifying glass and fine tooth comb. I'm only doing this job once and i want to get it right!
 
This thread is more than 10 years old.

Your message may be considered spam for the following reasons:

  1. This thread hasn't been active in some time. A new post in this thread might not contribute constructively to this discussion after so long.
If you wish to reply despite these issues, check the box below before replying.
Be aware that malicious compliance may result in more severe penalties.
Back
Top