Another Pipboy Scratch build

War Poodle

Member
I know there are quite a few Pip-boy builds posted on this site but I thought I'd add another.
The main difference with my build is that i didnt want to slice it all the way down the middle and slap a hindge on it.
Also i have fairly large arms so I've been able to make it to fit the huskier gentleman.
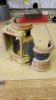
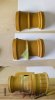
Here's where I'm up to so far
20140518_193755.jpg20140519_155903.jpg20140602_153049.jpg20140602_153056.jpg20140602_153102.jpg
 
Last edited:
I've started to add some detail to the front. I'm planning on making a resin cast of this and fitting it with a backlit acrylic screen and some LED's. Nothing too fancy as I've not added any kind of electronics to a prop before.
attachment.php
 

Attachments

  • update.jpg
    update.jpg
    28.1 KB · Views: 2,025
Last edited:
Today I've built up the front section and added the strap around the middle.
I get the Milliput to a rough shape and let it set over night. I dont know what everyones experience of milliput is but I find its easy to carve into shape with a sharpe chisel and tidy up with some sand paper. You can see where I've done this on the details at the bottom of the piece.

10372749_654186054650946_4306473345609627629_n.jpg
 
Last edited:
Looking really great. The fit would be an issue with me too, i have a small wrist but my arms are fat lol. I tried wearing the clock that you got as a preorder but it just wouldn't fit even if i had gutted it. I'd like to think that they'd have had different sizes of pipboys since they handed them out at 10 years old and everyone was a different size.
 
Well the base for this build was a piece of 4" pipe so it fits my 13.5" arm fine. The wrist section is made of 3" pipe so there is loads of room for a long sleeved top to go under. I'm making one for myself and another for someone who has smaller arms. So my hope is that i can build the inside of the cast up with padding to make a better fit. But i'll cross that bridge when i get to it.
 
I've added some more detail and built up the screen visor. It's not 100% accurate but i'm happy with the look of it so far.

10366011_657895064280045_4386105935977698436_n.jpg
 
Last edited:
Great build. So many details. If you do cast it, take pics. All those details are going to be a killer and I am curious to see how you will deal with it
 
Thank you!
Once it's finished If people think its up to a decent standard I'll do a few casts to sell.

I love Milliput. I've been putting it on thick and once its set I cut it to shape with a chisel. I want to try some Apoxie sculpt but finding a supplier in the UK is a challenge and ebay prices are crazy.

Any suggestions on how to make a mould for this would be greatly appreciated. I was planning on doing a two part mould for the main piece and slush casting it but it looks like its going to have to be some kind of three piece mould because of some of the undercuts.
 
Last edited:
Yeah, I am working on a gauntlet build myself, that is about to be casted. And.... I am pretty sure I am going to have to cut mine into four sections. Mine is bigger, clunkier and can afford the cuts. Im not sure how you are going to pull yours off but I cant wait to see. Its a gorgeous build I hope you dont have to make to many cuts.

*grabs popcorn
 
My question is this, I know you said you used a piece of 4" pipe and 3" pipe, but what where those other parts that you used for the base?

Thanks!
All the round parts are MDF that I turned on my lathe. For anything thicker than 18mm I had to glue sheets together. The problem with this is that the glue is tougher than the MDF. So when you cut it the MDF comes away easier than the glue and ridges form. The ridges get worse when you sand it.

You can see the ridges in the piece at the top of this photo. I ended up having to do a scraping cut with a really sharp chisel to take them down.
attachment.php


You can also see in this photo that I made these in the same way that you would make a bracelet on a lathe. I also cut recesses and tenons on either end so that the pipe would slot into place neatley when constructed.
 
Since I painted the pip-boy it's easy to spot the bits that don't look right. So I've spent some time correcting some of these. Again using milliput to build out areas and then cut them to shape once it's set.
10501936_669810389755179_8656865858251301766_n.jpg
10447870_669810413088510_2811451343669269973_n.jpg


I'm really happy withe shape of the cuff section that I've built up with the milliput. It tapers down to the small pipe section but is square where it meets the back of the screen. Very unusual shape.

I've also been filling all the tiny imperfections with spot filler and sanding it ready for more coats of primer.
10544412_669810429755175_5022606297590867580_n.jpg
10551069_669810513088500_7716869896106953762_n.jpg
10494624_669810549755163_6719015799497703968_n.jpg
10313006_669810579755160_2866335215766390563_n.jpg
 

Attachments

  • pipboy cuff.jpg
    pipboy cuff.jpg
    208.8 KB · Views: 150
Last edited:
This thread is more than 8 years old.

Your message may be considered spam for the following reasons:

  1. This thread hasn't been active in some time. A new post in this thread might not contribute constructively to this discussion after so long.
If you wish to reply despite these issues, check the box below before replying.
Be aware that malicious compliance may result in more severe penalties.
Back
Top