1:1 Millennium Falcon Cockpit Replica - Group Build

Re: 1:1 Millennium Falcon Console Replica

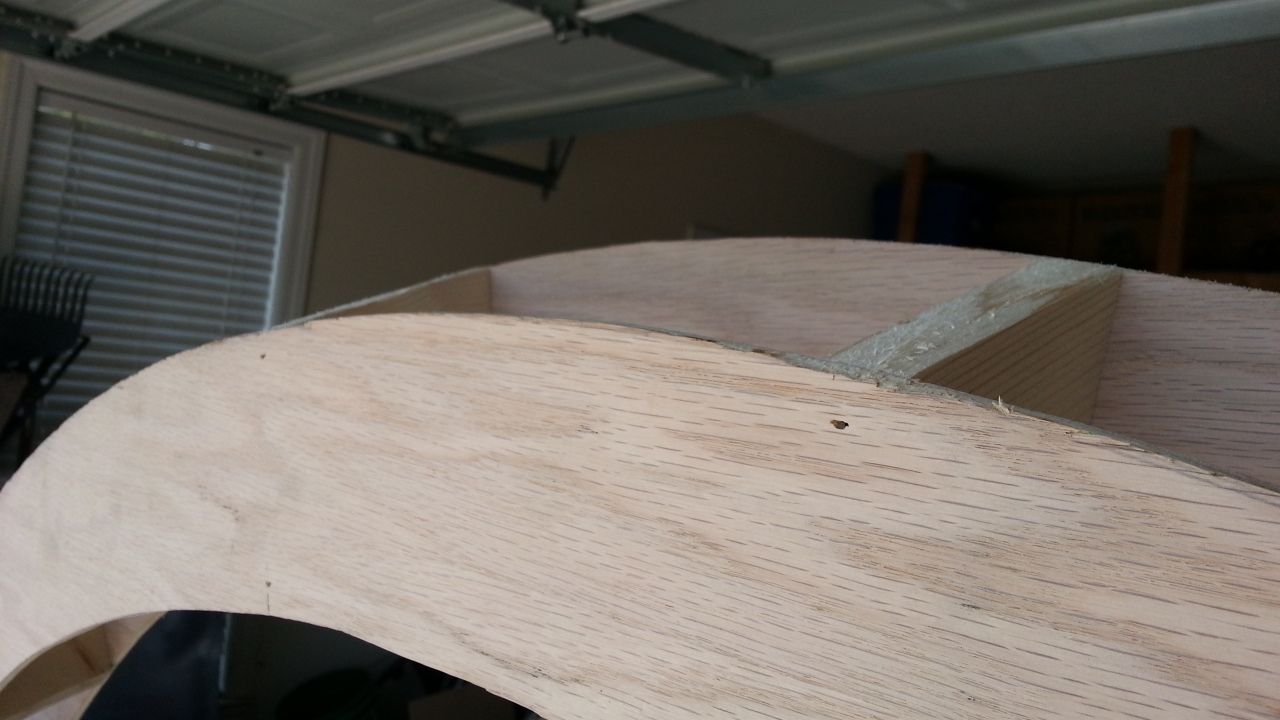
OH I see what you're saying... This is the approach I'm taking. I'm going to "roll" the frame across a thin sheet of ply and take very rough measurements leaving 2-3 inches of play on each side and at the ends. I'll then cut the ply, adhere to the frame and then trim the excess... Again... I say that now... :)

And I'm not good at math...

Probably your safest bet! :lol
 
Re: 1:1 Millennium Falcon Console Replica

Hi Gang,

I started the process to cast all the knobs...

Created the box and sealed the edges
20130610_105932_zps2e567bf6.jpg


Hot glued the various knobs into position - this keeps them from moving around while the mold cures
20130610_110013_zps2fe46f74.jpg


Mixed and poured the silicone mold - I have to wait until tomorrow before I can make any castings
20130610_112527_zpsa2997814.jpg


Stay Tuned!
 
Re: 1:1 Millennium Falcon Console Replica

Hi Gang,

I've been pouring over both screen grabs and the 3D model and I'm prepping for a BIG push in the build! I'm hoping I have enough clearance in the garage... :)

I've also cast the first set of knobs. Only 100+ more to go! :) Also, I've been in contact with a LED distributor and we're discussing the cost 850 3mm flat top LEDs. More specifics later. Lot's going on!

Stay Tuned!
 
Re: 1:1 Millennium Falcon Console Replica

This...this is...holy crap how do I describe it? This is beautifully wonderful. Best build I've seen on here yet!
 
Re: 1:1 Millennium Falcon Console Replica

This...this is...holy crap how do I describe it? This is beautifully wonderful. Best build I've seen on here yet!

Hi T,

Thank you so much. Those are VERY kind words, indeed. :) Stay Tuned for more updates!
 
Re: 1:1 Millennium Falcon Console Replica

If you're still having issues with the super glue, here's some info you might enjoy. Cyanoacrylate gets very fragile when cold, and while it has superior pull force, it has almost no shear force.

How does that help you? Take a piece of wood and press it up against the square you're trying to remove. Take a can of compressed air, turn it upside down, and blast around the edges for a few seconds. Take a hammer and give the wood a few quick whacks and the piece should come off, nice and clean.

In modeling, we would normally just throw the piece in the freezer for a while, and then pry it apart with a razor blade. I don't think you have access to a freezer large enough for a cockpit ;) :lol

-Fred
 
Re: 1:1 Millennium Falcon Console Replica

...Take a piece of wood and press it up against the square you're trying to remove. Take a can of compressed air, turn it upside down, and blast around the edges for a few seconds...

Hi F,

Everything makes sense! Thanks for the info.... I do have one question: I'm assuming the piece of wood is the same size as the square I'm trying to remove?
 
Re: 1:1 Millennium Falcon Console Replica

Doesn't really matter, as all it's doing is giving you something to hit against, so that you don't damage the rest of the piece. I usually use a piece of 2x4, when doing something similar.

I'd take a piece of cardboard and lay that on the surface (to prevent scuffs). Butt the piece of wood against whatever you're trying to knock, then whack the wood. The wood gives you larger surface to hit (so you don't have to be so precise), plus it absorbs the impact force, so you don't have to break the piece you're trying to remove.

If you don't have enough room to get a piece of wood in there, try using an angled scraper (like this DOMINATOR Angled Carbon Scraper Set, 4 Pc - Putty-Joint Knives, Spatulas, Scrapers - 4WMD2|60004 - Grainger Industrial Supply ). Use the compressed air, then pop off the piece, using the angled scraper, like a pry bar.

-Fred
 
Re: 1:1 Millennium Falcon Console Replica

OH I see what you mean... :)

I'm wondering if the cold air will change the paint? I don't think it should... I've tried using fishing line with no success "yet". I'm hoping this freezing and shearing process works! Maybe a combination of the two? Thanks for the great advice!
 
Re: 1:1 Millennium Falcon Console Replica

My pleasure.

Once the paint has cured, the air won't have any effect on it.

The fishing line, will never work, unless you get braided nylon fishing line (I like Power Pro, in a 40lb test, myself). Monofilament line has too much stretch. Cyanoacrylate is crystalline in structure, when cured - it would be like trying to cut through glass. Braided line on the other hand, has been known to cut through ceramic and steel line guides on fishing gear, and under tension, will cut your damn finger off. If you go the braided line route, be careful. Wrap the ends around 2 pencils and use a sawing motion to cut through the glue.

-Fred
 
Last edited:
Re: 1:1 Millennium Falcon Console Replica

Didn't have any time last night to do anything last night... I'm hoping to get a can of compressed air and try out your suggestion! I'm hoping the tiles just pop off! I am a little afraid of "digging" into the panel when I try to remove them - but... won't know until I try. :) I also have a ton of those knobs to cast...

I'm still trying to figure out how I'm going to create the canopy and attach it without exposing any bolts...
 
Last edited:
Re: 1:1 Millennium Falcon Console Replica

How about rare earth magnets instead of bolts? A few larger ones in key places both sides should do the trick, the small 5x4mm ones I have can hold up to 10kg before seperating, though its a bit less with one magnet on metal (hence the suggestion of placing them both sides).
 
Re: 1:1 Millennium Falcon Console Replica

Depending on how thick the wood you need to attach the canopy to is, you could use countersunk pop rivets. They are not as prone to coming loose as screws, which might be a problem if you countersink the screws and putty over them, plus they only require a small amount of putty to hide the rivet. They are also cheap and you can find "pop" or "blind" rivet tools cheap. If you do go this route, I would maybe suggest a pneumatic rivet tool. I just finished a case that used about 150 rivets and by the end I was ready to upgrade my rivet tool.

You could also use semi-tubular rivets, which are more robust, but require access to both sides and some special tools.

Can't wait to see more. This is an epic build, 118 pages and still going! Way to stick with it.

Heath
 
Re: 1:1 Millennium Falcon Console Replica

I assume you're looking for a way to attach it that would allow you to disassemble for transport correct? If that's the case the rare earth magnets should work for you, otherwise you could make it so that there's a lip that the glass slides in to.
 
Re: 1:1 Millennium Falcon Console Replica

I assumed he was talking about the entire canopy assembly, not just the glass panels. We'll see what he says when he gets back on. If it is the whole thing, having it removable is a good idea. Then I think just dowels and holes would work and the weight of the assembly would keep it in place.
 
Re: 1:1 Millennium Falcon Console Replica

Hi Gang!

There is going to be a minor work stoppage... Just had a HUGE auto repair bill come my way so there won't be any "BIG" progress for a while... BUT... I think I have plenty of wood/greeblie "stock" to continue working several smaller projects that definitely need to be done: rocker knobs, new instrument panels, throttle housing, etc... So no worries - lot's of updates coming! :)

Speaking of which...

The barrage of rockers knobs is slowly coming...
20130610_164626_zpsf42a8364.jpg


20130615_110032_zps8da8cb02.jpg


Tanning in the sun...
20130615_110057_zpsd88c9855.jpg


20130615_110106_zpsc60896f8.jpg


Edges are now lined up on the canopy window
20130615_110116_zps1fffe033.jpg


20130615_110122_zps7cc09f25.jpg


More to Come!
 
Last edited:
Re: 1:1 Millennium Falcon Console Replica

chirp--chirp--chirp ....(sound of crickets).... lol.

I know I know... LOL I've been doing TONS of sketches to figure out how exactly I'm going to approach this and I think I figured it out. Unfortunately, I just got hit with a HUGE auto repair bill so the canopy will sit for a little bit. I have enough little projects as I mentioned to keep going... ugh...

- - - Updated - - -

How about rare earth magnets instead of bolts? A few larger ones in key places both sides should do the trick, the small 5x4mm ones I have can hold up to 10kg before seperating, though its a bit less with one magnet on metal (hence the suggestion of placing them both sides).

Hey C! Long time no chat! :) Hope all is well? HMMMM... I've never heard of those. My concern is the amount of flexing that will occur when people go in and out... I've got the basics down... it's attaching the actual structure (canopy) to the frame. And countersinking might be what I decide. I'm definitely going to look at these magnets. :)

- - - Updated - - -

Drill a counterbore, recess the bolt head, fill over with putty or spackle.

http://i853.photobucket.com/albums/...bb2ba7ec90bc446211d8827f992df_zps7d2fb9ed.jpg

Hi J,

That's exactly where I was headed! I don't think I'm going to use screws. I definitely want to use bolts. Just not sure what size yet. :)

- - - Updated - - -

Depending on how thick the wood you need to attach the canopy to is, you could use countersunk pop rivets. They are not as prone to coming loose as screws, which might be a problem if you countersink the screws and putty over them, plus they only require a small amount of putty to hide the rivet. They are also cheap and you can find "pop" or "blind" rivet tools cheap. If you do go this route, I would maybe suggest a pneumatic rivet tool. I just finished a case that used about 150 rivets and by the end I was ready to upgrade my rivet tool.

You could also use semi-tubular rivets, which are more robust, but require access to both sides and some special tools.

Can't wait to see more. This is an epic build, 118 pages and still going! Way to stick with it.

Heath

Hi H,

Thanks for the GREAT advice! You guys NEVER cease to amaze with all the guidance and knowledge! I'll definitely look into the pop rivets. 118 pages? WHEW... And I still have a long way to go. I was thinking I'd be done in a few weeks... ;)

- - - Updated - - -

I assume you're looking for a way to attach it that would allow you to disassemble for transport correct? If that's the case the rare earth magnets should work for you, otherwise you could make it so that there's a lip that the glass slides in to.

Correct! I'm still debating whether to leave the canopy as one large piece of break it into several for easy transport ("...the first transport is away..."). As I mentioned, I've done numerous sketches and I'm at about a 90% solution... Long term is whether or not to skin the exterior. That changes a lot of assumptions...
 
Last edited:
Re: 1:1 Millennium Falcon Console Replica

I assumed he was talking about the entire canopy assembly, not just the glass panels. We'll see what he says when he gets back on. If it is the whole thing, having it removable is a good idea. Then I think just dowels and holes would work and the weight of the assembly would keep it in place.

Hi J,


Thanks for the guidance! :) That's exactly what I'm working. I don't think I'm going to include any glass/plexi panels. If you look at the screen shots you can definitely see a gap where glass is supposed to be. That's probably where I'm going to go with the design/build. Give it the look of having glass without actually using any. Better to make it simple than continue to hurt my brain.

Also, with the amount of movement within the cockpit, I will need to be as solid as possible. So I think I'm going to continue with the bolts - just not sure what size yet... :)

Screen Grab - you can see the gap where glass is supposed to go. This is the look I'll be going for!!! :)
Shadow of Reflection: Movie Screencaps R-S: Click image to close this window

More to Come!
 
Back
Top