Rylo ROTJ Reveal Lightsaber Build... Help!

Edraven99

Sr Member
RPF PREMIUM MEMBER
So I've been lusting after one of these babies ever since I found out that they existed; I entertained the thought of getting an eFX reveal since they were a less expensive option and because of the light-up feature, but ultimately all of you on here who own one swayed my decision with all of your rave reviews about the quality and craftsmanship of the Rylo.

Fast forward to a few weeks ago... Eureka! I managed to pick one up in the Junkyard... and an AP to boot!

BUT (why is there always a 'but'?) it's unassembled and unpainted. Now for many of you talented folks this probably isn't that big of a deal, but for me, let's just say that the extent of my prop making skills was building old MPC X-Wing models when I was a kid and unfortunately doing a ****-poor job of them at that... and that was just the gluing them together part!

Fortunately assembling it shouldn't be too much of an issue since a lot of it is fairly self evident and even a novice like myself can probably stumble my way through it (read: idiot proof!).

But, I do have LOTS of questions and will need a fair bit of advice so I thought I'd ask the experts. Here goes....

1) Painting the 'grenade', connecting stem, activator plate, and control box buttons


  • I asked Rylo himself and he painted all of the completed sabers that he made in his run while Darth Detroit (whom I bought the saber from) said that he had his parts anodized and wet-sanded the high points for his personal reveal.
    • Is one method 'better' than the other or is it just personal choice?
    • Is there a way of 'selectively' anodizing sections of a piece or is it all or nothing and having to sand down the high points as Darth Detroit did with his? Is it difficult to rub/sand off anodized pieces?
    • If I opt for the painting option, do I need to prime the pieces first? Do I have to wait for the paint to fully dry before I acetone off the high points, or is this an immediate thing that needs to be done?
    • Connecting stem (the part that connects the grenade to the brass stem): to be prop/screen accurate, is the underside of the of the round plate completely painted, or is it just the stem and the first 'lip'? I've seen pictures of it both on the RPF and online being painted both ways.
2) The control box

  • What's the best method of attaching the brass activation plate mount to the control box - epoxy or something else?
  • What's the best method of attaching the control box buttons - again, epoxy or something else? I was also contemplating taking it to a machinist and having both the buttons and the control box drilled so that I can have the buttons mounted by a pair of small screws - would that be a viable option?
  • The reveal foam "circuit board": for those of you that have a completed reveal, is this piece glued down or is it loose? Or does it secure to the control box bottom in some other way that I'm missing?
  • Are there any cool or obvious simple mods that I can be made aware of to the control box; i.e. lighting the arrows (which of course would require more machining), etc.?

3) The crystal chamber

  • How is the crystal secured in the chamber, is it glued down? Is there a more elegant method of securing the crystal?
  • Are there 'better' crystals out there to use for the chamber?

4) The finish

  • To polish, or not to polish, that is the question! Would a polished Luke ROTJ look 'wrong'?
  • And if I do choose to polish it, what's the best method of polishing/buffing machined aluminum? I believe I read somewhere to use fine steel wool, would this be the best method?

I think that's it... but if I think of anything else I'll be sure to add to the list. Any help or advice that any of you can give me would be very much appreciated!

Thanks!!!
 
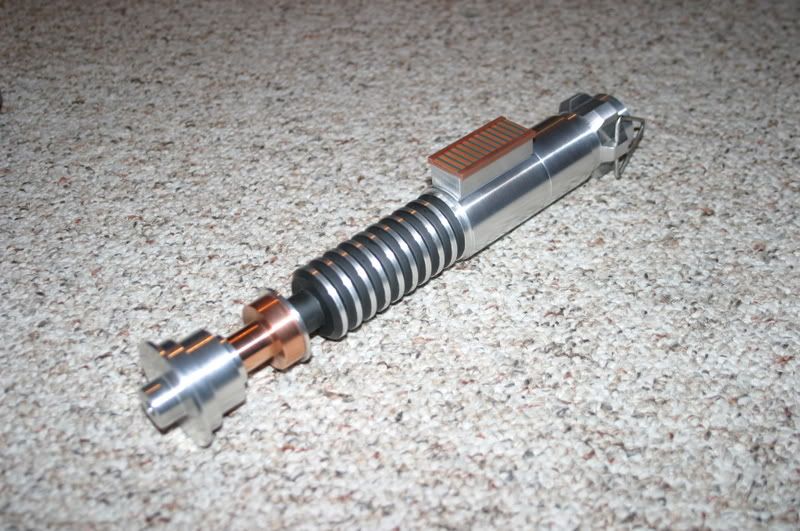
This is the one I built when they first came out. I just painted my rings flat black, and then took a piece of fine grade sandpaper, cupped it in my hand, and turned the saber back and forth until the paint was gone from the rings.


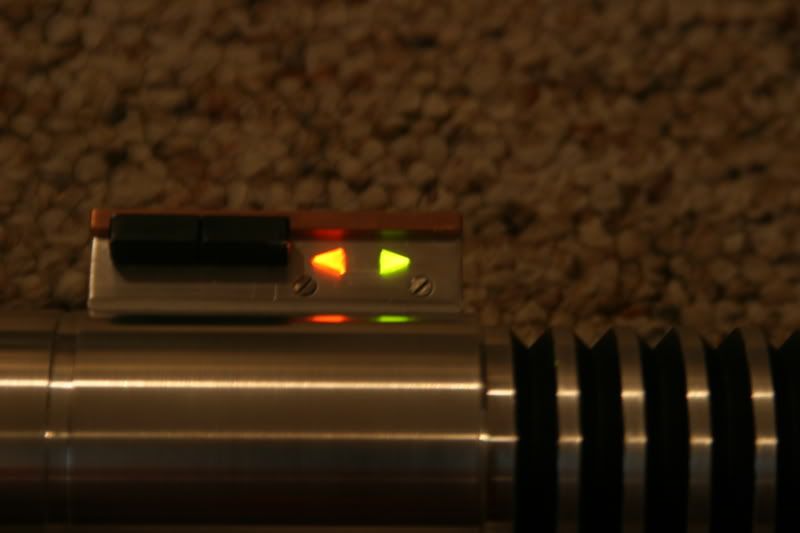
And then of course I added working LEDs to mine.


I just super glued my copper plate on. My black button was the on/off switch so it slid back and forth.
 
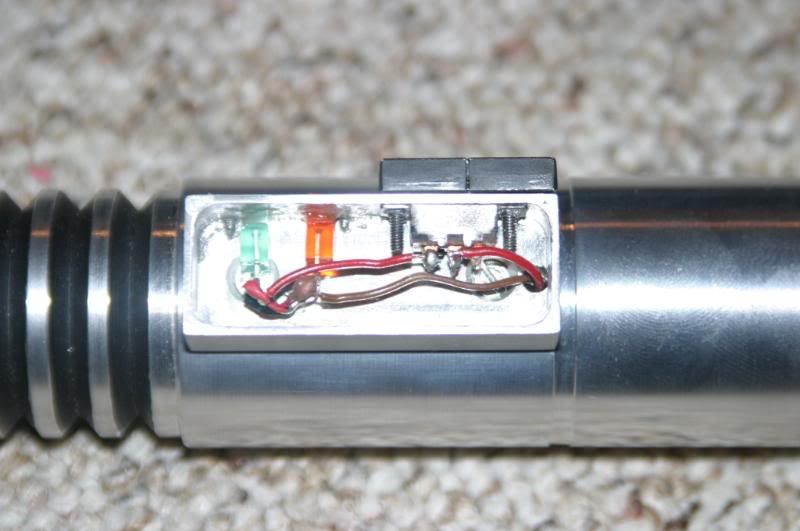
I was able to source real triangle LEDs off EBay. I used my Dremel to drill pilot holes and then used needle files to shape the openings for the LEDs to push thru. Same with the switch. I Dremeled out the back of the black bar for the switch to fit into. The watch battery fits in the bottom of the body above the pommel.


^ can you list out that circuit? It looks like theres something there other than the switch, LEDS and battery...haha Im not very educated on electronics - always wanted to do that though
 
Very cool! Did you have to prime your grenade before you painted it or did you just go ahead and paint?
 
I just painted the ringed section with flat black and then sanded after it had dried a few days.
 
Thanks Robiwan!! :)

Any of you other Rylo owners out there have any answers to my other questions? Any help would be very much appreciated!
 
Not sure if you happened to see my thread, after I made some mods to my Rylo reveal:

http://www.therpf.com/f9/luke-rotj-reveal-saber-showoff-145222/

To further address some of your questions...

1.) Anodizing would probably give a more even finish than just using paint yourself, but I think it comes down to how much you'd be willing to spend (I have no idea how much anodizing costs, mind you). So yes - I'd say it's simply personal preference.

There is no way to selectively anodize only certain parts - it's all or nothing. So therefore it would be back to the personal preference question - ie. anodizing vs. paint. I have no direct experience with removing anodizing from a surface, but I can't imagine that it would be much different than removing paint. It would definitely have to be sanded off - no solvent is going to remove anodizing.

I didn't use primer when I painted mine. I did soak the parts in acetone before I painted them, to make sure that they were good and clean. I did get a little bit of minor "orange peel" surface when painting, but nothing too bad. Priming *might* have helped to prevent that. I don't think it would hurt to prime before painting - it would just mean one more layer to sand through.

If you use acetone to remove the paint (instead of sanding it off) I'd advise caution - use it sparingly. If you soak the rag with too much acetone, there's a good chance of the acetone making its way into places where you don't want it, and ruining your paintjob. I'd also advise waiting until the paint is good and dry, just to be safe - it won't matter if it's fresh or a day old... the acetone will remove it, either way.

2.) I used JB Kwik (steel reinforced epoxy) to attach the activation plate frame to the control box.

I simply used high-strength double stick tape to attach the buttons - worked like a charm.

In the finished sabers the foam circuit board pad is glued down in the bottom of the box. In the process of disassembling and modding mine, I was able to pull mine up and tear it free with only very minimal damage. Once again, I used double stick tape to stick it back down.

3.) The crystals are glued down with JB Weld in the finished examples.

See my thread for what I did with mine.

4.) I think this is another personal preference question. Remember though that the Star Wars Universe is a "used" universe - nothing is shiny and new.

Good luck! :thumbsup
 
Awesome! Thanks D48thRonin!!! That's incredibly helpful and exactly the sort of response I was hoping for!

One more quick question though... as opposed to painting and then sanding/acetoning off the paint in the high areas of the grenade, would taping off those sections be a feasible alternative? It would be a bit of a pain to do I know given the surface area of the rings, but are there any drawbacks to doing this?

Thanks again!
 
No... I had that same thought, and even tried a couple different widths of 3M pin striping tape at work. First, none of the standard widths of the tape rolls were exactly right - they were either a little too wide, or a little too narrow. Second, the tape didn't want to stick very well - I'm guessing it was a combination of too little surface area and the slick surface of the aluminum. And there was no way I was gonna try to precisely cut custom widths of masking tape. Too much of a hassle and too time consuming - it's much easier and quicker (and cleaner) to just paint the whole thing and sand off the high spots.
 
Ok... I just saw the other Rylo lightsaber thread and it got me thinking that should finally try and get going to try and find some time this long weekend to build this beauty LOL

But here's the question I have for all of you since I'm a little indecisive about this:

Should I build this to Rylo's original specs or should I try to mod it; i.e. add electronics, etc.

Part of me feels that since this piece is a work of art in itself, and because it's an AP, that I should build it up as Rylo originally intended to and making any changes to it would be akin to painting a mustache on the Mona Lisa.

Another part of me feels that it would be neat to try and "eFX" it to try and add the lit arrows and crystal chamber.... though how I would do that is still a bit beyond me...

What do you guys think???
 
No updates yet unfortunately... been sidetracked by my real parts Obi build... and this wedding thing my fiance keeps harping about ;)
 
No updates yet unfortunately... been sidetracked by my real parts Obi build... and this wedding thing my fiance keeps harping about ;)


Ohhhh good plan... hide the cost of the Obi build in with the wedding plans.... I did that. Slid a few classic toy purchases in with the wedding bills! :D
 
This thread is more than 10 years old.

Your message may be considered spam for the following reasons:

  1. This thread hasn't been active in some time. A new post in this thread might not contribute constructively to this discussion after so long.
If you wish to reply despite these issues, check the box below before replying.
Be aware that malicious compliance may result in more severe penalties.
Back
Top