You are using an out of date browser. It may not display this or other websites correctly.
You should upgrade or use an alternative browser.
You should upgrade or use an alternative browser.
Hasbro Boba Fett blaster upgrade/conversion
- Thread starter Ki Djowac
- Start date
Loving all the photos of the process!
Thx y'all. Almost done.
The metallic layer :

The last matt black layer and started weathering on the scope. While applying the last mat black layer i tried to take into account that it doesn't have to be an overall evenly sprayed layer. Tried to do some sprayed weathering sort of speak. The final weathering effect/result i tried to get was done with a mild sanding job using a 600 grid sandpaper. While slowly uncovering the metallic layer underneath to get the weathered effect. I'm no expert on weathering as this is my first try on doing something weathered, but i like where it brought me. The sanding job more or less got me a random effect as it uncovered the layer underneath. The trick is not going too far while sanding and the rest comes down to where you feel : 'enough is enough'.")

At the moment the stock part is put into the handle permanently, but seems to have become a tiny bit bigger possibly due to sculpting and cracked the top handle insert. This will require some sanding, sculpting, spraying etc all over again in that area. Little setback, but nothing serious. Pushes the end result back though due to drying times of apoxie and paint.
The metallic layer :
I demand a tutorial for that weathered paint job.
The last matt black layer and started weathering on the scope. While applying the last mat black layer i tried to take into account that it doesn't have to be an overall evenly sprayed layer. Tried to do some sprayed weathering sort of speak. The final weathering effect/result i tried to get was done with a mild sanding job using a 600 grid sandpaper. While slowly uncovering the metallic layer underneath to get the weathered effect. I'm no expert on weathering as this is my first try on doing something weathered, but i like where it brought me. The sanding job more or less got me a random effect as it uncovered the layer underneath. The trick is not going too far while sanding and the rest comes down to where you feel : 'enough is enough'.
At the moment the stock part is put into the handle permanently, but seems to have become a tiny bit bigger possibly due to sculpting and cracked the top handle insert. This will require some sanding, sculpting, spraying etc all over again in that area. Little setback, but nothing serious. Pushes the end result back though due to drying times of apoxie and paint.
Darth Sparrow
New Member
I think you need to offer a kit for the electronics :-D
On to the 99% finished result. By 99% i mean i still got a small area to fix and this is where i'm at right now :
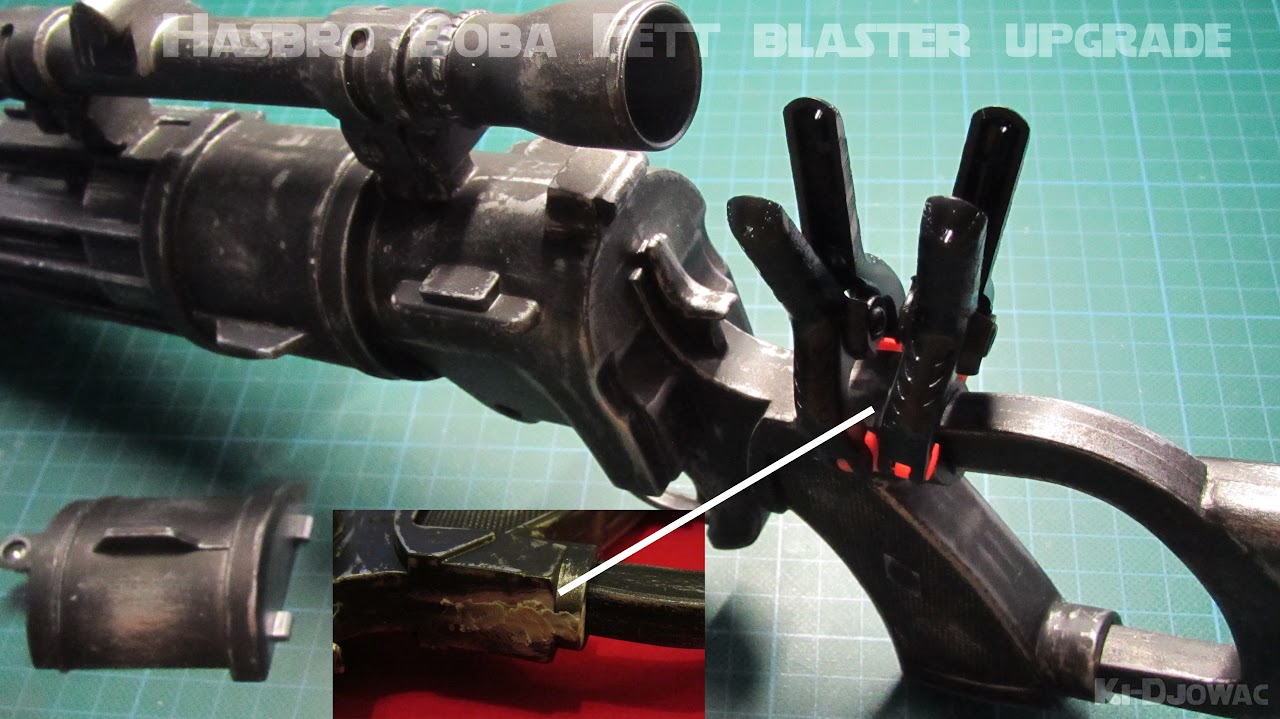
The cracked handle is glued back together with the strongest glue i could get my hands on locally. Apoxie sculpt is already put on after letting glue dry for 2 days.
Enough about fixing things. I've testfired this puppy a couple of times and i like it. Nice evenly spread light distribution and not blinding on the front. Little rumble motor tucked away in the handle adds a nice little rumble while firing. The recovered DVD lens part glued in the front end of the scope which is 12mm in diameter also adds a bit of a scope effect. Only thing is when looking through it you see everything upside down :lol
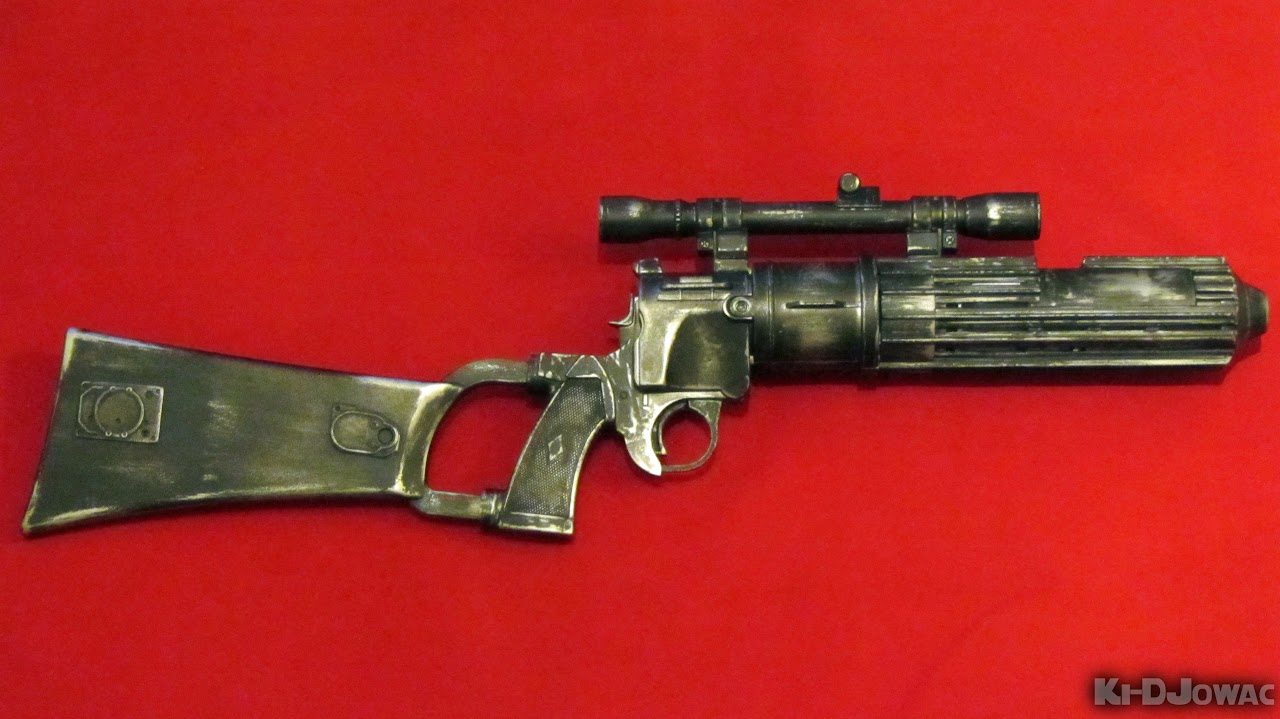
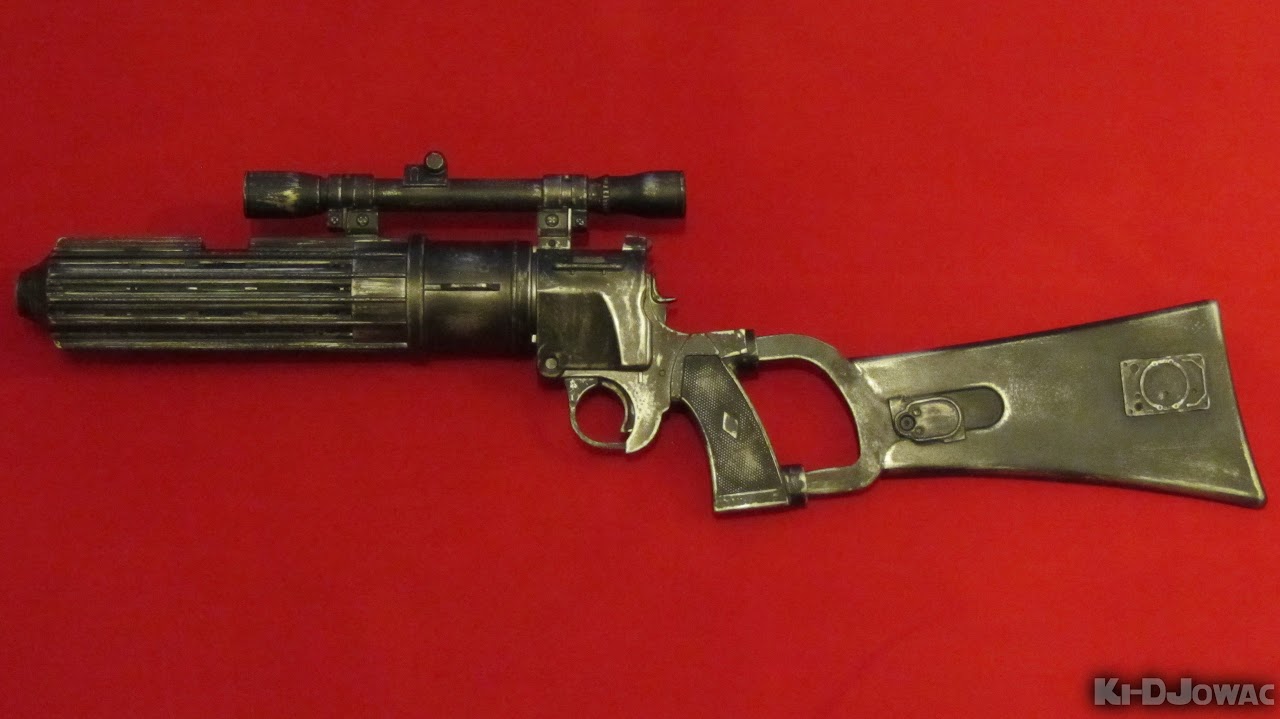
Here you have the final result :


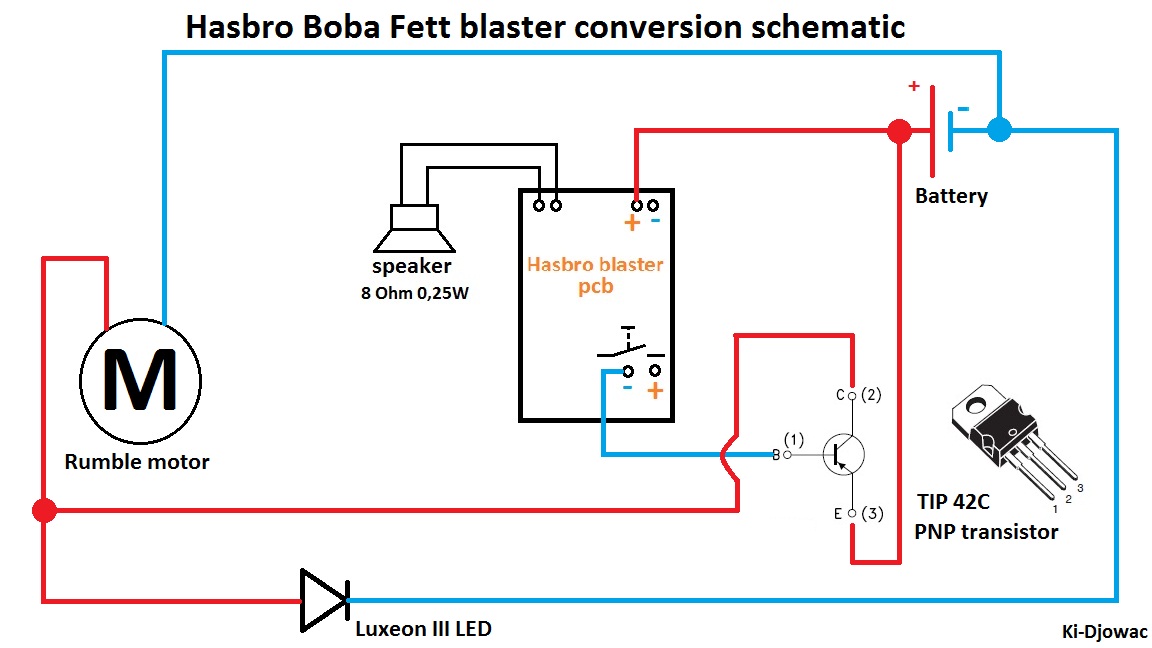
To end it all, here's the wiring schematic (shout out to Rhyen Skytracker for the inspiration of this schematic as it's based on one of his hasbro economy wiring schematics) :
That's it. I may do a little vid in a couple of weeks. Feel free to share thoughts and comments
The cracked handle is glued back together with the strongest glue i could get my hands on locally. Apoxie sculpt is already put on after letting glue dry for 2 days.
Enough about fixing things. I've testfired this puppy a couple of times and i like it. Nice evenly spread light distribution and not blinding on the front. Little rumble motor tucked away in the handle adds a nice little rumble while firing. The recovered DVD lens part glued in the front end of the scope which is 12mm in diameter also adds a bit of a scope effect. Only thing is when looking through it you see everything upside down :lol
Here you have the final result :
To end it all, here's the wiring schematic (shout out to Rhyen Skytracker for the inspiration of this schematic as it's based on one of his hasbro economy wiring schematics) :
That's it. I may do a little vid in a couple of weeks. Feel free to share thoughts and comments
Boba Binks
Well-Known Member
Very nice conversion.
postmanpat
Sr Member
Awesome conversion.
battlebroad
New Member
AMAZING!!! I'll definitely have to try this! Thanks for the detailed pics!
Updating this old thread with news
I did this blaster back in 2012 i believe and who could have thought that 2014 : The real Boba Fett would hold and fire this very same blaster ? It is what happened at Antwerpconvention april 27th :
Home | Antwerp Convention
We were there with a Force Relics booth and the Rebel Legion Benelux. Since 2012 and now i had a custom plaque made by Rich Feezle and had a 'how it's made' book printed at a local store. Knowing Boba Fett would be there i took all 3 items with me
I told him how the blaster started as a standard Hasbro Toy and was heavied down, upgraded electronics etc... Explained him what the book was and talked a bit about the paint job. He was impressed with the blaster as it looked real metal and the weathering effect was great. I was honored to receive these compliments to say the least. He liked the book and was happy to sign all 3 items.
Here are some of the pics my wife took :
Me and Jeremy (his wife in the background and on the far left corner a glimpse of Alan Harris aka Bossk)


Signing session with the plaque, book and blaster :


(Alan Harris aka Bossk again in the background)


And a couple of shots were fired


Here's where the rumbling starts... He was pleasantly surprised with that effect looking up towards the ceiling and joking around what just happened here ?? We had some good laughs at that moment !

It was a great experience and i've met Jeremy twice now. If you ever have a chance to meet and talk to Jeremy, please do so. One of the greatest people you'll ever meet.
I did this blaster back in 2012 i believe and who could have thought that 2014 : The real Boba Fett would hold and fire this very same blaster ? It is what happened at Antwerpconvention april 27th :
Home | Antwerp Convention
We were there with a Force Relics booth and the Rebel Legion Benelux. Since 2012 and now i had a custom plaque made by Rich Feezle and had a 'how it's made' book printed at a local store. Knowing Boba Fett would be there i took all 3 items with me
I told him how the blaster started as a standard Hasbro Toy and was heavied down, upgraded electronics etc... Explained him what the book was and talked a bit about the paint job. He was impressed with the blaster as it looked real metal and the weathering effect was great. I was honored to receive these compliments to say the least. He liked the book and was happy to sign all 3 items.
Here are some of the pics my wife took :
Me and Jeremy (his wife in the background and on the far left corner a glimpse of Alan Harris aka Bossk)
Signing session with the plaque, book and blaster :
(Alan Harris aka Bossk again in the background)
And a couple of shots were fired
Here's where the rumbling starts... He was pleasantly surprised with that effect looking up towards the ceiling and joking around what just happened here ?? We had some good laughs at that moment !
It was a great experience and i've met Jeremy twice now. If you ever have a chance to meet and talk to Jeremy, please do so. One of the greatest people you'll ever meet.
That is awesome my friend! Jeremy is one of the best.
The photos and the directions are so great.Very professional.They could be out of a "how to make-book"...and the blaster looks great.
The hasbroblasters are not really screenaccurate,but its a lot of fun to mod them.
Thanks !
True about accuracy
They are about half-size-ish i'd estimate.The custom made book was an afterthought, but it's cool to display at cons so people can take a look at the process of how it was done
Chris Smith
New Member
After seeing your convert I did my own..looks fantastic. Added the full wood stock and strap too. Awesome looking to do a Jango Fett Pistol now...thanks for your insights
Chris
Chris
Similar threads
- Replies
- 14
- Views
- 2,009
- Replies
- 7
- Views
- 566