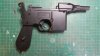
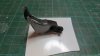
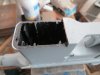
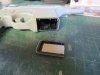
Hello there. This is a thread that I thought I would share with you as I have been wanting to a DL44 blaster for a while. I thought it would be fun and I decided that it wasn't going to be 100% accurate as there are so many differences and subtle changes with each gun. Blaxmyth got the BB gun for me for $29.00NZ and I started from there. The first thing to do was to pull it apart, taking the compression spring mechanism out and adding some weight to it, to give it a bit of heft. To add weight, I filled it up with steel 4.5mm BB pellets and glued them into place with epoxy glue, making sure that any holes were filled first. The two halves of the gun were then glued together.
You are using an out of date browser. It may not display this or other websites correctly.
You should upgrade or use an alternative browser.
You should upgrade or use an alternative browser.
ANOTHER DL44 BLASTER-from a cheap BB gun
- Thread starter Nick K
- Start date
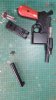
Before I glued the halves together, I took the trigger out and filled in the recessed detail then filled with putty, sanded it smooth, and put back in position.
Attachments
HermesBlackstar
Well-Known Member
Wow--that is pricey!!!
You can get a metal airsoft Mauser here for half that.
Good luck with the build.
You can get a metal airsoft Mauser here for half that.
Good luck with the build.
Blaxmyth
Sr Member
Looking good, Nick! 
As for the price, it's like most things here in New Zealand - they're a lot dearer than they would be in the States. But I guarantee that once Nick has finished this, I'll remember the quality long after I've forgotten the price!
Looking forward to seeing some more pics, Nick. :cheers
As for the price, it's like most things here in New Zealand - they're a lot dearer than they would be in the States. But I guarantee that once Nick has finished this, I'll remember the quality long after I've forgotten the price!
Looking forward to seeing some more pics, Nick. :cheers
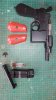
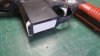
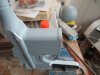
Thanks for those comments guys. For what the gun is quality wise, I'll try my best to do a good job. I next started to fill in all the screw holes on one side, and modify the bottom of the mag holder. I also spent a bit of time on the ejector slide on top as well.
Attachments


Last edited:


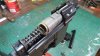
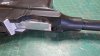
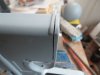
There was a lot of filling and sanding to be done to get the sides smooth. This gun came with the cocking slide and rear sight chrome plated, so I sanded these down with wet'n'dry sandpaper and painted them satin black.
Attachments

Last edited:
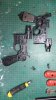
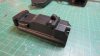
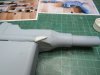
I then primed the whole thing so that I could see where I needed to use filer. I also removed the bottom of the Mag Housing so that I could install weights to give it 'heft'
Attachments
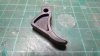
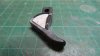
I started detailing a Safety Lever for the gun, as it didn't have one. Initially I made the thumb piece from some grooved dowel, but it didn't look right, and then I found some grooved plastic tubing I had lying around and used that instead. It looks much better. The hammer was glued in the ****** position.


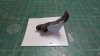
I then filled the grip plates with steel 4.5mm BBs and made the Flash Hider from styrene and cut out a template for the scope mount. Unfortunately, I didn't take any pics of the components for the Flash hider build. If you'd like, I'll dummy them up and post some pics here for you.


The next part to construct was the flash hider. This was done using styrene sheet cut into a lot of tapered strips glued around a couple of plastic discs cut to the right diameter and glued to a shaft at the correct distance. The "hose fitting" was made by wrapping plastic round and round until I got the right diameter. Various details were then added to this from plastic bits again.


Broilermaker
Sr Member
Thanks for the pictures of the flash hider, on mine i am going to use a connector from some pvc, and a piece off of a fire extenguisher, i was going to carve all of the detail in but i think i like your solution better


Similar threads
- Replies
- 15
- Views
- 976
- Replies
- 25
- Views
- 1,371
- Replies
- 3
- Views
- 346