(Almost) scratchbuilt pipe E11

Okay, more primer and greeblies added.

E11_11080603.jpg


We now have a trigger, a cocking handle and a rear stock-catch (minus the insert)..

E11_11080601.jpg


We have a bolt on top of the mag housing, a mag with scallop detail and you can just see the front ironsight.

E11_11080602.jpg


Next up in this overall shot you can see my cack-handed failure of an attempt at grip pattern. This will get smoothed and re-done. You can also see a little bulge where the scope rail bolts to the front of the body. This is re-inforcement where the PVC split right across two of the vent holes as I was fixing the rail in place. I tried and failed to glue it from inside, but luckily this 'patching' solution won't detract too much from the overall effect.

E11_11080604.jpg


Lastly, a detail shot of the front ironsight - filed from acrylic sheet.

E11_11080605.jpg


Still to add: D ring, bayonet lug on side of barrel, fire selector switch, more detailing at the back of the mag housing, non-wonky grip patterning! I plan to insert an imperial roundel in styrene to the right side of the grip - as I've seen in some resin versions - cuz it looks cool.. :)
 
Cheers Rich! Here's an update. I had a painting disaster at first, had to strip the gun down - clean off all the crap black paint and find a better brand of rattle can. Went with an automotive satin black - which looks the bomb!

Still lots to do - but it's starting to look shweet..

E11_11081301.jpg


E11_11081302.jpg


E11_11081303.jpg
 
The method i use for the grip xhatch is to shape the grips then apply filler(ie milliput,bondo) let it start to go off then use wire mesh(the kind you get with auto fibre glass kits)to make a imprint.
i own 2 real deac sterlings,and this method gets very close to the real thing


As someone who's been a member of the bbc(BLASTER BUILERS CLUB)for a few years and scratch built my own e11's,i gotta say yours are fricken A,keep up the good work

i bet if i put it next to the real thing you'd only knowe the real one ,by picking it up cos of the weight,so once again ...good work man
 
Great work ! I'm going to rebuild a Boba Fett ROTJ blaster to replace my current one and There are some usefull tips in your thread. Nice build up and thanks for posting this !
 
k13 - Thanks mate!

madmax - Thanks for the kind words, and the excellent suggestion regarding grip pattern. Genius! Now I just have to steel myself for sanding off the grips. I might have to wait until I've 'shot' the family a little more. "Pew, pew" :)

robn1 - Thanks, it's getting there! Just a few bits to add and some weathering, like adding some dry-brushed brass colour to the scope etc.

weaselhammer - Cool! If I was going to start over (which I might do, it's just so much fun) the build would go a lot smoother and quicker with what I know now. Glad I can help, go for it man!
 
Nice, piece, Skiffy! Seeing your great looking build is actully what prompted me to finally get some pics up of mine :) I like the texture you were able to get on the grip - did you use the above sugestion about bondo, then a piece of mesh pressed into it as it sets?
 
Hey Timmythekid - your pics are pushing me to add more detail - so we're riffing off eachother. lol

The grip pattern you see there was my first (failed) attempt using the edge of a file to manually groove the dried milliput. I need to sand it all off and start again, but I'm too busy playing out ANH scenes at the moment... "Ben? Ben!... Noooooooo. Pew, pew, pew".
 
Its a beaut. Time has gotten in my way,so building mine is on hold.....for now. I have book marked this thread for future endeavors.

Thanks for the inspiration

Aaron
 
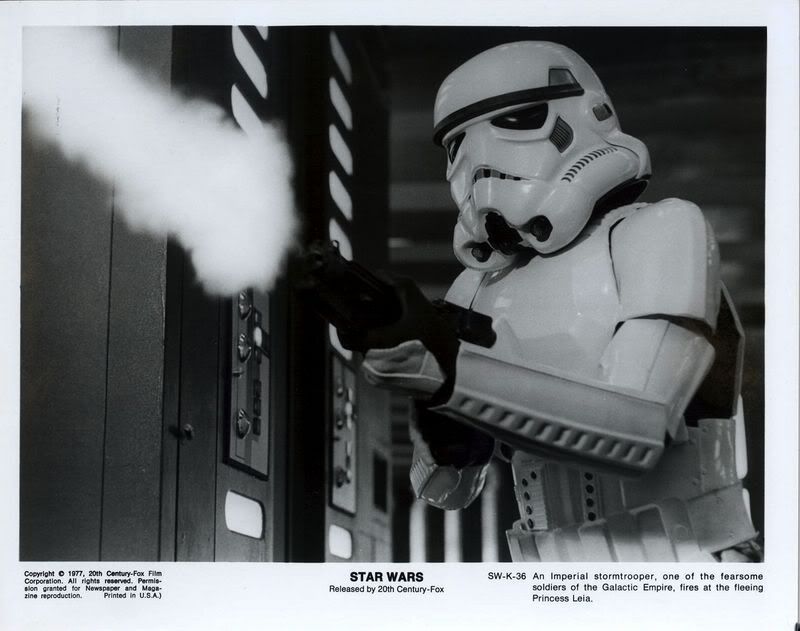
Whilst browsing the Stormtrooper Oddities thread I stopped at this picture...

anhsingl6.jpg


I've been told recently that some ANH E11's fired blank rounds to get that spectacular muzzle flash. Well, look at the bottom left of the lobby card... Yup - that's brass ejecting!
 
Hey, that's a good catch. :thumbsup I never noticed it.

I've always been amused by this particular card, as it describes stormtroopers, "fearsome soldiers of the Galactic Empire, fires at the fleeing Princess Leia," when it's really Han, shooting the control room guard in the gut. :lol
 
I'm just finishing up on the detailing = the bayonet lug on the barrel is done, as is the fire selector switch, the end cap stop-catch and the mag detailing - and I replaced the front half-circle guard thing over the vent hole (close to the front iron sight) since the plastic one broke off. The replacement is bent up from 3/16 steel sheet and has three pins which locate in holes in the barrel shroud, and is epoxyed in - so it's not going anywhere!

I've got an Empire symbol roundel (made from layers of styrene sheet) ready to fit into the grip, as soon as I add the proper grip patterning (or as close as I can get) using a coarse file to impress over fresh milliput.

I've also done the last bit of detailing - the 'D' ring and housing on the end cap. It just needs finishing and screwing/glueing in place.

The whole thing will then get another coat of satin black.

Pics soon!
 
Hey, Skiffy, where did you find references for the bayonette lug? I couldn't find anything clear enough to buid one off of, and so have just left the area filed flat at the moment (weathering and a couple of tiny details are on hold while I finish modding a Hasboro for my kids using the Doopy kit). Any chance you could pop a picture of what you built for it up here?
 
Hi Timmythekid - See pic below - I basically winged it, presuming it would be something that a slotted bayonet handle would slide around.

E11_11081302.jpg


Here's the fire selector, and (just visible) mag detailing.

E11_11081303.jpg


The components of the D ring and housing.

E11_11081305.jpg


"D-ring assemble!".. The four small nails aren't strictly canon, lol, but I didn't want to rely on glue alone.

E11_11081304.jpg


This was hard to photograph - but it's the Empire roundel which will sit on the grip. I've yet to re-do the grip pattern.

E11_11081301.jpg


That's it for now!
 
And finally - I'm finished. There are still some changes to be made - but I'm happy to leave them as is for a while.

The grip pattern turned out OK - I couldn't find and appropriate mesh, so I pressed a roughing file into the milliput, and I'm fairly happy with how it turned out.

Pics then!

E11_11090701.jpg


E11_11090702.jpg


E11_11090703.jpg


E11_11090704.jpg
 
Nice blaster, Skiffy! Are you going to weather it (aside from the scope, very nice and subtle there!), or leave it "factory fresh"?
 
Thanks Timythekid - I might add some weathering to the non-metal pieces. the rest will subtly chip amd flake in time. It's already started in some areas, but I might help it along with some sandpaper..
 
This thread is more than 8 years old.

Your message may be considered spam for the following reasons:

  1. This thread hasn't been active in some time. A new post in this thread might not contribute constructively to this discussion after so long.
If you wish to reply despite these issues, check the box below before replying.
Be aware that malicious compliance may result in more severe penalties.
Back
Top