Ultimate Spider-man Suit: WIP (Pictures and progress inside!)

Re: Classic Spider-man Suit: WIP (Pictures and questions inside!)

Shipping Update:

The printed pattern has been shipped to TrophyWife. She would probably receive it by the end of this week. So I'm giving it about 2 weeks or so turn over time before I receive the sewn suit.

This is perfect a time for me to research what type of shoes I would like to use for the suit. I've also been watching videos on how to sew soles.
 
Re: Classic Spider-man Suit: WIP (Pictures and questions inside!)

Shoes/Soles Update:

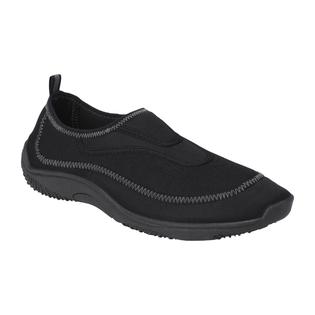
While waiting for the suit and faceshell+lenses, I did research about what soles to put. I decided on attaching aqua shoes to the soles of the suit. Here's what I'm ordering tonight: Athletech Men's Keaton Aqua Sock - Black - Shoes - Mens - Athletic

spin_prod_237544601


I chose this primarily because of the thick sole. It looks very sturdy. The shape also seems to work. Although I'm still browsing for shoes to buy, I think I'm pretty set on this one.
 
Re: Classic Spider-man Suit: WIP (Pictures and questions inside!)

Shoes/Soles Update:

While waiting for the suit and faceshell+lenses, I did research about what soles to put. I decided on attaching aqua shoes to the soles of the suit. Here's what I'm ordering tonight: Athletech Men's Keaton Aqua Sock - Black - Shoes - Mens - Athletic

http://c.shld.net/rpx/i/s/i/spin/im...op_sharpen=1&resMode=sharp&op_usm=0.9,0.5,0,0

I chose this primarily because of the thick sole. It looks very sturdy. The shape also seems to work. Although I'm still browsing for shoes to buy, I think I'm pretty set on this one.
great choice, how's the thickness on the outlying shoe? it looks to be around 3.5mm
 
Re: Classic Spider-man Suit: WIP (Pictures and questions inside!)

great choice, how's the thickness on the outlying shoe? it looks to be around 3.5mm

I'm actually not entirely sure about its thickness. But the sole seems to be thick. I'll update once I get more definite measurements.
 
Re: Classic Spider-man Suit: WIP (Pictures and questions inside!)

Sewing Update:

TrophyWife finished sewing the suit today. She will be mailing it out on Tuesday so it should be here sometime around Friday or early next week. Communicating with her is very easy and she responds very quickly. She made me feel very comfortable working with her. I highly recommend her services if you want your suits sewn.

Some of you are familiar with TrophyWife's work, but for those who aren't here are the progress pictures she's been sending me along the way while she's sewing the suit.

This is the extra separate mask I plan to wear when I feel like (e.g. work, at home, etc). It has a zipper at the back as well.
20140215_154425.jpg

The sewn gloves/sleeves.
20140215_174744.jpg

Close up of the front of the suit.
20140216_010358.jpg

The completed front of the suit.
20140216_155555.jpg

The completed back of the suit.
20140216_155540.jpg

TJack has also shipped my faceshell+lenses combo. I've also ordered shoes for the soles of the suit. All of these should arrive sometime before Friday or early next week. One thing I've learned while doing this project is you have to be patient and know when to time your shipments so there isn't too much down time while waiting for each item to arrive.

I'll update as soon as the everything arrives. I'm happy and excited that the suit is coming together nicely. Thanks for reading!
 
Last edited:
Re: Classic Spider-man Suit: WIP (Pictures and questions inside!)

That is a beautifully saturated print. That muscle base is off the hook. I might have to buy that base and apply it to the future foundation print I'm planning on ordering.
Can't wait for more progress on this.
Let's see who gets their TJack combo first haha.
Those lenses should just make that thing pop

Sent from my SCH-I535 using Tapatalk
 
Re: Classic Spider-man Suit: WIP (Pictures and questions inside!)

Progress Update:

The sewn suit arrived today. Needless to say, it's fantastic! I don't have any good pictures yet. Also, I'm not at my physical prowess so I'm hesitant to post pictures of me wearing the suit. It's tighter than I anticipated but it totally fits me. Also, it was a challenge to put the suit on. I had to be some sort of a contortionist to put it on my own. Thanks to my wife's assistance on this, we were able to give it a go.

Here's a bad photo of me trying to move around with the suit:

20140220_184152.jpg

Shoes Update:
The shoes I ordered were a size bigger which was weird. So I'm planning to look at other stores or online for ones that fit me. This is a reason why I'm hesitant to buy shoes online. They often times do not fit me even with the advertised size.

I bought E6000 to attach the soles though. So it should be good to go once we're set.

Challenges:
So far, I have utilized people with the skills on helping put the suit together (Orhadar, TJack, and TrophyWife) - all of which are fantastic to work with.The challenge now is putting the soles and poking eye holes on the suit. I'm not a very handy person so I'm afraid I'll screw this part up. And if I do, I completely wasted all the effort and time to get as far as I am now. But that's me being pessimistic. We'll be okay!

I'm also planning to lose 20lbs before I put or poke anything on the suit. The suit arrived much faster than I expected so I'm not yet at the physical fitness I expected myself to be to wear the suit.

That being said, I probably won't be updating this thread for a while until I lose the weight. I will post pictures once TJack's lenses arrive though. They should be here sometime early next week.

Thanks for reading!
 
Re: Classic Spider-man Suit: WIP (Pictures and questions inside!)

Well, before you cut eyeholes, just be aware that the mask is sitting a bit high on your face in that picture. It's always sad to see a beautiful spider suit like that where the center of the mask ends up on your forehead. :lol

Glad it came out as beautiful as it did! You must be thrilled.

-Nick

Thanks for the reminder, Nick. I'm super thrilled with the whole suit. I'm actually very happy just by looking at it. Here's a picture of just the extra mask without a faceshell:
20140220_203233.jpg

You can see that my face is totally visible through the mask. But even so, I believe I can still fit a faceshell in there because the fabric is so stretchable. So I'm waiting for TJack's faceshell to arrive before I make holes. I'm also going to buy a mannequin head even just the Styrofoam one to help mount it and mark it correctly.

My question (and worry) now is where the heck do I cut the eye holes? I'm afraid to cut along those seem lines because they may come undone. Any advice would help from those who has done it before.
 
Re: Classic Spider-man Suit: WIP (Pictures and questions inside!)

My question (and worry) now is where the heck do I cut the eye holes? I'm afraid to cut along those seem lines because they may come undone. Any advice would help from those who has done it before.
Measure the distance between your eyes (at the pupils) then cut it in half, and use that distance to mark a spot either side of the center of the webbing on the face/nose (while the mask is stretched on a stand-in head). This way the eyes will be level with the center of the mask, as it should be. Cut small 'pilot' holes, aiming for something like the holes in a zorro mask. I highly recommend erring on the small side at first, because you can always cut them larger later once you know where the frames sit, but you can't replace lycra you've cut away at the start. The seams will not come undone nor the fabric unravel by doing this, but if you are paranoid, you can seal the edge of the cut seam with a bit of hot glue to make sure it can't unravel.

Suit looks nice, by the way!
 
Re: Classic Spider-man Suit: WIP (Pictures and questions inside!)

Measure the distance between your eyes (at the pupils) then cut it in half, and use that distance to mark a spot either side of the center of the webbing on the face/nose. This way the eyes will be level with the center of the mask, as it should be. Cut small 'pilot' holes, aiming for something like the holes in a zorro mask. I highly recommend erring on the small side at first, because you can always cut them larger later once you know where the frames sit, but you can't replace lycra you've cut away at the start. The seams will not come undone nor the fabric unravel by doing this, but if you are paranoid, you can seal the edge of the cut seam with a bit of hot glue to make sure it can't unravel.

Suit looks nice, by the way!

Thanks, Lunaman! I will keep this in mind when creating the holes. I'll post the process here so people can refer to it.
 
Re: Classic Spider-man Suit: WIP (Pictures and questions inside!)

Shoes/Soles Update:

The shoes I ordered arrived the other day. I ordered these: Amazon.com: Mens Canvas Slip on Shoes Sneakers 3 Colors: Shoes
NOTE: If you're planning to order the same shoes, ORDER ONE SIZE LOWER THAN YOUR ACTUAL SIZE.

They look like these:
20140226_180223.jpg20140226_180245.jpg20140226_180254.jpg

I removed the soles. The process harder than it looks. The soles were glued very well to the uppers. I used a flat head screwdriver and a hammer to get the soles lose. Using a scissor, I cut the stitches that attaches the shoes to the sole then slowly pulled it by hand.
20140227_204557.jpg

Here's one of the soles removed. I cut the excess thread of the sole to make it as flat and clean as possible for the adhesive. I don't think that matters but I wanted to be sure regardless.
20140227_211345.jpg20140227_215420.jpg

I plan to hand sew the INSOLE to the uppers so the soles have something to adhere to when applying E6000. I'll post the process here later so you can see how I did it. I'll be using a sewing awl.

Thanks for reading!
 
Shoes/Soles Update:

As I mentioned on my last post, I hand sewn the insole of the shoe to the uppers to provide the soles something to adhere to later on.

I used a Speedy Stitcher Sawing Awl: Amazon.com: Speedy Stitcher Sewing Awl: Arts, Crafts & Sewing

It's relatively easy to use. It just needs a little getting used to. Here's the video I watched to learn how to use it: Sewing Awl Kit - Speedy Stitcher - YouTube

Here's what the uppers looks like being sewn:

20140228_230641.jpg20140301_000923.jpg

The finished product up and under:

20140301_151858.jpg20140301_151840.jpg

Here's a comparison of it inside the suit. Left is barefoot, Right has the shoe inside:

20140301_022444.jpg

The potential alignment of the soles. I know I have to align the soles of the suit to the soles of the shoe. We were just eye balling here to see if the size of the sole will actually work. And it actually does.

20140301_022546.jpg

I still have the other shoe to do. If you're planning to do the same method, take your time and be patient. It will take hours (if you're inexperienced like me) to complete just one shoe. But hang in there!

Thanks for reading!

PS: My TJack faceshell and lenses combo are still not here... I'm worried where they are currently and am patiently waiting for their arrival. I do have tracking info, but they're not moving somehow. I'll give it until next week.
 
Thanks for posting this info on the shoes! I'm going down a similar path with my Spidey suit, and I've been trying to come up with something better than the water shoes I used for my last suit. Keep us updated!
 
Thanks for posting this info on the shoes! I'm going down a similar path with my Spidey suit, and I've been trying to come up with something better than the water shoes I used for my last suit. Keep us updated!

No problem. I was originally going to use aqua/water shoes for the soles but I settled for the shoes I used above instead. I think they fit the shape I'm hoping to achieve for the shoes. I also think it's faster if I just glued the uppers to the insole instead of sewing them. But I found it really fun sewing so I stuck with it.
 
I found that Vans work really well and the red bottom tend to look a bit better and don't stick out like the black. Just a thought to ponder. Love the suit, can't wait to see your final pics...
 
I found that Vans work really well and the red bottom tend to look a bit better and don't stick out like the black. Just a thought to ponder. Love the suit, can't wait to see your final pics...

Thanks for the suggestion. I chose this particular shoe because I wanted a black sole. I also found that it does create the shape I'm hoping for the boots. The only thing to keep in mind is to wear really thin socks so it doesn't bulk up the bottom. It looks odd and bulky with thick socks.
 
Today is my birthday. One of the good things that happened is that my TJack faceshell+lenses combo arrived! Talk about a sweet gift. To celebrate, here's a tutorial on how to cut the eye holes for your masks.

How to cut the eye holes:


You may need a stand-in head to mount your mask and faceshell. I bought this one in particular: Amazon.com: Case Pack of 1 Giell Styrofoam Foam Mannequin Wig Head Display Male White: Beauty

Step 1: Mount your mask on the styrofoam head WITH THE FACESHELL (really important if you want to get the eye measurements right). Make sure that the center webbing of the mask is at the center of the head, just right above the nose bridge. Take your time aligning the mask. It's really important that it's aligned correctly.

Step 2: Measure the distance between your eyes. Take that distance and divide it by two. That number will then be the center of your mask (Thanks, Lunaman, for this info). For example, my distance was 8cm. Which means 4 is my center. Refer to the picture:

20140303_121653.jpg

Step 3: Using a fabric marker, make little circles to mark where you're going to cut your mask. Use the measurement you took above to gauge the distance from the center of the mask for each eye. Make small ones first. You can always adjust the size later when you get it right (Thanks again, Lunaman, for the info). I used an orange marker.

20140303_131733.jpg

Step 4: Remove the mask from the stand-in head. Flip it inside out. Depending on what marker you used, you will see some sort of a mark. Use that as your reference point for cutting the eye holes. Again, cut small holes first!

20140303_132128.jpg

Step 5: Flip the mask over again and you're done! This is what the eye holes look like.

20140303_132305.jpg20140303_133319.jpg

The fabric will not unravel if you used 4-way stretch Lycra. If you want, you can reinforce the holes by stitching them or putting glue to be sure they don't grow any bigger.

Now if you'll excuse me, I will be celebrating my birthday as Spider-man!

20140303_133136Resized.jpg

Thanks for reading
 
Last edited:
Great tutorial on a question that gets asked a lot. I'm going to refer folks to your post here from now on.

Gorgeous gorgeous stuff.

I know it's a little self-serving, but hot DAMN am I proud of how those lenses came out. Really love finally seeing them on people's suits. Have a spectacular birthday!
 
Back
Top