Star-Lord - Guardians of the Galaxy - Chris Pratt Costume

athelu

Active Member
Seems this is the big costume for the year. I had no delusions that I would be unique for this years Halloween contests, but I am amazed at how popular this costume is. I have spent weeks gathering parts and picking the pieces that I want to use for my version of the costume. Like always, theRPF has been an invaluable resource in finding details.

I love working on my costumes but I really only do it for Halloween. With the star-lord costume I may keep it around for Motor City Comic-Con next year, but we shall see. My budget for my costumes is normally around $500. This is pretty serious for just a Halloween costume, but pretty minor for a re-enactment or cosplay costume. So if you are looking for screen accurate, then this is not the thread for you. But if you are working on a budget close to mine, then perhaps you will see some value.

My plan is to keep the first post updated with the parts that I find and have decided to use. Maybe people will find this laundry list helpful in their own builds.

Here are links to the templates that I have created for this build. I will try to keep this up to date as I make them:

Ovation Ribbed Suede Leather Half Chaps (not the best choice)
$49.95
Awesome Mix Vol. 1
$22.00
Carbon Fiber Tape (Don't bother - I couldn't get it to work out)
$6.88
Guardians of the Galaxy Nerf Quad Shot Blasters (toys R Us)
$54.98
Speed and Strength Dogs of War Pants Motorcycle Pants [Black,36x32]
$134.99
STARLORD Chris Pratt Red SLIM FIT GENUINE Leather Jacket [Regular,2XL]
$174.98
Orb Sphere Ball -Resin
$32.90
Rawlings Men's Mock Turtleneck LRMT Long Sleeve Shirt
$16.88
Leather (Chap leather 5oz - Medium Brown) (Chap Leather 6oz - Dark Brown)
$89.70
Leather Tools & Fasteners
$56.85
Condor HK226 TAN Stryker Padded Knuckle Tactical Assault Gloves
$19.95
Kevin Gosset Star lord bits kit
$85
Panasonic Portable casset Player
$19
Orange period headphones (not the right ones)
$30
Sling Bag from ebay
$19


Here is the *Budget* option I have found for gloves. They had a close enough color and pattern and feel to them for my needs.:

Condor HK226 TAN Stryker Padded Knuckle Tactical Assault Gloves

CondorGloves.jpg


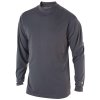
Here is a performance Long Sleeve shirt that I found that is a pretty good match:
Rrawlings men's mock turtleneck lrmt long sleeve shirt (Graphite)
Jersey.jpg


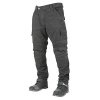
Since I am no tailor, I had to go with a pant option off the rack. I settled on the following pants:
Speed and Strength Dogs of War Pants Motorcycle Pants [Black,36x32]
Pants.jpg


CondorGloves.jpg


Jersey.jpg


Pants.jpg
 
Last edited by a moderator:
Leather

4-5 Oz Medium Brown Leather
This leather is for the Spats of the costume. A fair amount is necessary to make each spat and the necessary straps. I found a 4.5 oz chap side for a reasonable price. This is not the correct texture or color really, but I am hoping will net the overall effect.
Brown Leather.jpg

4-5oz Dark Brown leather
This is the leather for the inset pieces of the spats - and if you are going for the full detail the inset piece at the top/back of the black under boot. I found a nice piece of Oil dyed hide to work with. This is a nice smooth texture, if a little heavy (5.5 - 6 oz).
DarkLeather.jpg


Fasteners/Accessories

3/4" Strap Keeper Nickel plated rings. (Boots require 12 rings)
Tandy part number: 1137-03

These are sold by Tandy leather. They come in 10 packs - so unfortunately you will need to buy two packages to get all the rings you will need. I did not determine the scale from source material, but based upon available options these seem to be the correct ones.
Tandy-Ring.png


5/16" Medium Nickel Plated Quick Rivets (Boots require 40)
Standard quick rivets. Medium sized (based upon the leather weight I am using. These are sold in 100 packs so not a big deal really. It does appear that all of the hardware and fasteners used on the boots are nickel plated and not brass.
Rivets.png

3/8" Button Posts Screw on (boots require 28)
Tandy Part Number: 11311-02
Looking at the hi-res source photos with the back of Chris Pratt's boots, it looks to me that the brown spat is being attached to the boot itself with these type of posts. This is the size I chose based upon the weight of the leather I am using.
ButtonStud.png


Tools

I used to do a little leather work when I was (a lot) younger, but gave all of my tools away some time ago. Since getting into building some costumes, I have started picking tools up again.

Oblong Punches - These are great little tools for making rounded holes in the leather for strap opening or for oblong grommets. These are also used to create the stylized cutouts in the boot/Spat inserts. I purchased the Craft Tool less expensive brand. I would not recommend these. Sizes required - 3/4" Oblong Punch, 1/2" Oblong Punch.

Rivet Set - Pretty standard leather working tool. I am still using the small one that came with a rivet variety pack I picked up while making my bane costume.
 
Last edited:
Boots
This weekend I started in earnest on the boots having received my leather and leather working supplies this week. I started building up a template from craft foam. Due to the size of the templates (larger thank 12x18) I had to find larger foam. Turns out Michaels actually carries 36" x 60" rolls of the stuff in either Black or white. I went with white for visibility of marks and measurements.

Spat Template:
https://www.dropbox.com/s/q12iy0a5ev2grhc/LeftSpat.pdf?dl=0

This template is based upon the height of my half-chaps and the size of my calves (My calf at this position is like 17"). Not sure that this will work for anyone else. I estimated sizes based upon source pictures. The asymmetrical layout is due to the way it wraps around my calf.

Kneed Pad Template:
https://www.dropbox.com/s/5uoeezvr3pi8le6/Kneepad.pdf?dl=0

Here is the template I went with for the Kneepad. I copied the layout of the holes from the pictures available. These cutouts were made with the oblong punches. There are some extra-wide holes - I did these with just overlapping the 3/4" punch for a wider hole. There is extra width in this template to allow it to be placed behind the spat template for stitching. I decided that punching out the holes in the template itself would allow me to mark the cutout positions onto the leather. In practice this worked out very well.

Shoe Top Template
https://www.dropbox.com/s/z4f7nldbddf6f1p/OblongShoeCover.pdf?dl=0
This one I am not so sure about. Trying to get an idea on the dimensions was rather difficult. compensating for the arch and extra dimension (working in 3D here) of the was a pain. I have never attempted anything like this before. The cutout pattern is not exact (the boots should have 10 slits, not the 8 I have here), but I felt it was close enough for my work. This also has some extra length to allow for stitching to the main spat. - In my testing this still does not appear to be wide enough. I went ahead and started sewing this to the outside edge of the spat. This caused the cover to end up a little short on the inside of the foot - but trimming that extra length from the spat was non-issue and did not affect the fit or fastening of the spat at all.
 
Last edited:
Athelu, thanks for all the info! It's definitely helpful. But for some reason, the attachments for the templates won't open for me.
 
Spats

I made all of the straps 3/4", based upon the 3/4 rings. I left a decent amount of length for the straps on the lower portion of the spat, so I can trim once I have the button studs in place.
BackStrap.jpg

I set the Anchor rivet back 1/2" from the 3/4" oblong opening.
Rings.jpg

Straps for Rings -
I used 2-3/4" long straps for the Rings at the top of the spat. This length seemed to give me enough to secure to as well as exposed on the outside.
RingStrap.jpg


I used the rings for measurements on the strap opening. I set them back the long dimension of the ring. I then punched holes 1/2" past the 3/4" oblong punch hole.
Straps.jpg


Here you can see the overall progress. I left a couple of straps off so that they will not get in the way with sewing the detail pieces in place.
Spat.jpg
 
  • Like
Reactions: DRS
Nice work :) are you going to do the whole bottom of the shoe or just the chaps? I'm just now starting my boots. Im re doing the whole bottom then re-gluing the sole back on. Thats a great tip on using the thin flexible craft foam. I picked up 10 12x18 at lunch today. I was using paper but i think the foam will work better.
 
No - I am not going to make the whole boot. I have some sketchers that I will wear - with the ovation half chaps as the boot stand in. Hopefully the Spatz will cover up enough to look like the real deal.
 
So here is the kneepad section cut out. I marked the areas to punch out.
Kneecap-Transfer.jpg

I used the 1/2" oblong punch for the smallest of the marks. I used my 3/4" oblong punch for all of the others. With the wider marks - I just overlapped the punch.

Kneecap.jpg

Here is the arch cover as well. Still not so sure on this piece. We will see how it turns out once I get it sewn in place.
ShoeCover.jpg
 
Had to divert myself for a little while until I can get access to a industrial sewing machine.

So here is my "sony" Walkman. I know it is backwards. I though about flipping it upside down to get the button on the correct side, but decided to just run with it in its original orientation.

Sony Walkman.jpg

The donor Walkman is an old Panasonic about the right time period and sporting a lot of the same features.

I glued an orange lego to the top for my button. It is a little tall, but I think works for the overall effect.
The headphones I found with a New Old Stock (NOS) Unitech FM radio.
This was painted Testors Arctic Blue Metallic - and is a lot more blue in person.
 
Last edited:
So, in the definitive thread, GMBridge had created a holster model that works with the NERF blasters http://www.therpf.com/showthread.php?t=219777&p=3458523&viewfull=1#post3458523, I uploaded this to shapeways and ordered a set, but am worried that they will not arrive in time for Halloween (so may end up with a set I don't need).

Anyhow, took his sketchup model and imported it into Pepakura. There I created a properly scaled paper model for it. I have used paper model templates in the past to create thing out of plastic, but I of course do not need the tabs or fold information. So I used inkscape to just capture the actual planes.

I printed this out and used a glue stick to attach it to some 1/8" thick plasticard. The square/rectangular shapes are glued together to achieve enough thickness. The only added part was some 1/2 round plastruct pieces. the ones I used where 1/4" (.25 or 6.4mm)

Anyhow, i cut all the shapes out and used my nerf blaster to get the alignment of the upright clips.
IMG_0001.JPG

In order to not snap off the base I am going to have to drill some tiny screws in from the back side for the clips.

Here is the template file i created for this:
https://www.dropbox.com/s/lg7eza7talg9k2p/Holster.pdf?dl=0
 
Last edited:
I did some more work on the holster clip - as I knew that it would require screws to keep from snapping off the clips. I shot them flat black.
Blaster-Clip-top.jpg

I bough #4 wood screws that were 5/8" long. I used a 7/32" pilot hole to keep the plastic from splitting. I counter sunk the screw heads on the back side:
Blaster-Clip-Rear.jpg

Probably hard to see the black on black, but here is the Nerf blaster clipped into this clip:

Blaster-ClippedIn.jpg
 
I was able to make it to the canvas shop i use for help on my costumes. She fit me in for a little machine time to get my boots finished. Here is the spat layed out:
Spat-Full.jpg
The black disc is the mount for the rockets. I ordered the 3D printed ones from etsy. They are not terribly accurate or strong. I have already had two pieces break on them while just getting them sanded and basecoated. Anyway - more on those later.

Here are some shots of the boot acutally on:
Boot-Front.jpgBoot-Side.jpgBoot-Rear.jpg
I would definitley recommend using an oil dyed smooth leather for the boot instead of the chapped side like I did.
 
Last edited:
here are some more pieces that I bought for the costume. No work done here by me, just finding the things to purchase :)

Sling bag I found on Ebay:
SlingBag.jpg

Here is a solid Resin Orb I also found on Ebay:

Orb.jpg
 
Back
Top