GotG Starlord/Peter Quill 20 day countdown

Nagano

Active Member
I figured I would create my own thread, rather than hijacking someone elses. I am putting together a Starlord cosplay for Wizard World Chicago on Aug 23rd. I have less than 20 days to get this done. I have already ordered my fjacket..
jacket.jpg
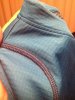
I went with a medium, reading Ironmaniacs thread, I think I made the right choice. For the shirt, I went to underarmour.com and got a longsleeve blue top with some piping detail. This was the closest I found so far, to what he wears in the movie...
shirt.jpg
I just need to figure out how to remove the logo. Ive read some places that maybe acetone or googone will work, We'll see. I got my headphones from junorecords, but they seem to be out of them right now...
headphones.jpg
Im using an old Walkman of mine that is not exact from the movie, but it was the closest I had without spending crazy dollars on one from ebay or something. For boots, I have a pair that I use for the renaissance fair. They are not as "sporty" as the shoes he wears in the movie, but I think with the unique way the boot laces up and how it has almost a spat feel to the shin piece, it works nicely.
boots.jpg
For the jet boosters, I have been going back and forth about how I want to accomplish them, but I think I finally decided. With my time restraint, I think my best option is to repaint a pair of Capt America toy binoculars. They are the same basic shape as the jet boosters, and with some slight modification will look pretty cool.
binoculars.jpg
If I pull off the star piece, which is just a pop up targeting reticule, and paint it all silver and black, should work. Like most people, I also bought the nerf quad blasters..
blaster.jpg
Need to repaint them too. Ive never repainted a nerf gun or anything like that really, so any tips are truly appreciated. For the pants, I found some really cool tactical airsoft pants. They look pretty futuristic and spacey, so I think they will work out.
pants.jpg
They are a charcoal black color. Im still looking for a belt buckle, so if anyone sees something close, let me know. Ill update more when everything arrives.

Also, as a side project, so my wife doesn't feel left out at the con, Im trying to put together a cutesy Rocket crossplay for her. Ears, tail, some heavy eyeshadow, and a big gun. Just having some trouble figuring out the outfit, I have some ideas, but im trying to minimize how much altering/enhancing that I have to do. Any suggestions?
 
Last edited:
Thanks! Also, thanks to Grudgehammer's thread, I was able to pick up a cool looking sling bag that should fit nicely with the whole look. Currently, I have something like 10 items winging their way to me as I type this. It should all make it to me in time, but im crossing my fingers anyway. If im not the only Starlord at Wizard World Chicago, Im determined to at least be the best looking one there. :D
 
My shirt arrived today. It's a little brighter blue than I was expecting. However the texture and stitching is freaking awesome.
 
15 days to go until Wizard World Chicago, and Im a bit anxious. Im eagerly awaiting all the stuff I ordered to be delivered. Its kinda like torture, but Im hoping that at least a few things will show up this afternoon. Also, I will be picking up my hardware supplies to start working on my blasters tonight. Im going to be using the method detailed by IronManiac. I really liked his result. Though, I wont be wrapping the grips in actual carbon fiber mesh like he did. That seems a bit advanced for me, and totally unnecessary, for my purposes at least. Ill also post a close up of the fabric on the shirt I got from Under Armour. Its a really cool texture and a nice alternative to just getting a plain cotton shirt.

As I mentioned in my first post, Im also creating a cutesy-girly "cosplay" of Rocket for my wife. She didn't want to do Lara Croft again this year, so I came up with this so we could kind of be a pair.
Rocket.jpg
I put this pic together to show some of the various pieces Im using. I found some orange cargo pants, and cool orange tank top that kind of matches the detail in Rockets suit. Maybe eventually I will add some buckles to the top and some black stripes for the pants, but for the upcoming Con, this will be just fine. Shes gonna do some raccoon eye makeup, ive left that detail up to her. The gun is a Nerf Stampede. Its pretty much the largest nerf gun I could find. Shes only 5'6" and about 100lbs so, I wanted the gun to comically dwarf her. I plan to add a strap to it so she can sling it across her back while not posing for pictures, etc. Im undecided on whether or not to paint the gun. On one hand, it kind of matches the rest of the outfit, on the other hand, making it look realistic would just be cool in and of itself, so not really sure what to do. What do you guys think, paint the gun, or leave it orange and yellow?
 
Paint your wife's gun! Nerf guns look fun and silly for kids when they're orange and yellow, but they can look truly bad-ass and realistic when they're painted black and silver. There's a nerf-gun weapons thread in the Props subforum, take a look at that and you won't want to show up with a yellow gun. If you're painting your own blaster, you might as well paint hers too!
 
I was a bit disspointed that the receiving room in my building was closed by the time I got home from work, so I wasnt able to pick up the 2 packages I had waiting for me. Now I have to wait for tomorrow morning, torture. Anyway, I did get a chance to take some close up shots of my shirt, and walkman.
Shirt Collar detail.jpegShirt texture.jpeg
Its the same shirt, just a trick of the lighting, the close up of the texture is more true to color.
Walkman.jpeg
This is my walkman, left over from my childhood. It is quite radical :p. Still functional. Though, I think this one was bought somewhere between 89-91. It was missing a belt clip. However, I purchased some covertec clips and the hole in the back fit the screw perfectly. I also plan to use the covertec clips to secure the jets on my boots.
 

Attachments

  • Shirt Collar detail.jpeg
    Shirt Collar detail.jpeg
    2 MB · Views: 125
I painted my guns today! A big shoutout to IromManiac for the guidance. I think they turned out really nice...
Gunrepaint.jpg

It was my first time attempting anything like this, so if was definitely a learning experience. Had some trouble with my spray painting, got some drip marks. I was able to sand them down and touch it up though. There was a surprise tricky bit when reassembling the gun too. It came when putting the back peices on. You have to thread this spring through the connecting tube to make it functional again. It took some fenagling but I managed. By the way, that Rub n Buff stuff is freaking awesome.

In other news, while I havent received my jacket yet, I at least got an email letting me know that it had shipped, So I expect it on Monday. My pants, however, Im a bit worried about, Havent gotten any kind of notifications, and an email to the company has yet to yeild a reply. Im hoping that everything works out.
 
11 days to go!

Last night my jacket finally arrived, along with my headphones, and the Capn America binoculars that Ill be turning into my boot jets. So far, everything looks great together. The fit on the jacket is good, though I think overall it could be cut a bit better. Also, its odd that it has a bunch of snaps that don't actually fasten down to anything. However, for the price, Im extremely happy with it. Ive decided not to remove the underarmour logo from my shirt. Its completely hidden by the jacket, and removing it could be detrimental to the shirt itself. The "boot jets" are going to take some finagling to get them to look right. Hopefully a decent paint job will go a long way. The headphones are sweet looking, the orange really pops and it makes a great detail to the overall look. All Im waiting on now are my pants and bag to arrive. I have notice that the bag should be here by the 15th, but the pants are another story. The website finally wrote me back and when I was able to supply them the order number, they told me it had already shipped. They gave me a tracking number, but neglected to mention which courier they used. So, Im really hoping to get them this week. Fingers crossed.

If I have the time, l'll post some pics later tonight.
 
I'll be interested to see how you put together the boot rockets from the Capn binoculars. I noticed that toy at Target one day and didn't even make that connection, but seeing the photo, they should work as a good base to make the rockets from.

Put your tracking number into google. i often do that and it recognizes the number and which parcel service it belongs to.
 
The binoculars are tricky, despite unscrewing the whole thing, it still didn't come apart. So there wasn't a whole lot I could do without completely breaking it. Because of this the backside of it is not as flush as I would like. Making it difficult to apply the covertec clip that I was going to use to secure it to my boot. Instead, I am going to glue the belt clip directly to the back of the binoculars. So, my game plan is to sand the whole thing down. Then mask off the places where I plan to glue the clip to before painting. Ive heard some stories of hot glue not sticking after a surface has been painted, so Im not taking any chances. I also need to plan a paint scheme. hmmm...
 
I used super glue, worked like a charm to hold my rockets together. I bought some superglue thats labeled as a gel rather than a liquid, helps to keep the glue in place while you line up the pieces.
 
yea found them thanks -

also good job on ur gun - i got 2 of them myself should be arriving soon, did u watch a video or read how to spray them? if so you got a link for that too? thanks
 
Actually, I just followed IronManiacs method that he detailed in his own thread. Sanded them down to rough up the surface. Then I spray painted them using a matte black Krylon plastic spray paint. I then used Rub n Buff (silver) applied with an old sock to streak on the silver. I then sanded them again and reapplied the rub n buff. I then went over the black areas with an acrylic glossy black paint using a paintbrush. For the triggers, I didn't take the grip apart, I just painted them in their housing with the black acrylic and a fine paintbrush, it was a little tricky and required a few coats. Im really happy with the result, and that rub n buff stuff is like magic. I will be using to do my Orb too.
 
This thread is more than 9 years old.

Your message may be considered spam for the following reasons:

  1. This thread hasn't been active in some time. A new post in this thread might not contribute constructively to this discussion after so long.
If you wish to reply despite these issues, check the box below before replying.
Be aware that malicious compliance may result in more severe penalties.
Back
Top