Creator1326's General Zod (Man of Steel) 2014 Halloween Costume Contest Entry

Creator1326

Well-Known Member
Original build thread: http://www.therpf.com/f77/mos-general-zod-kryptonian-build-slow-but-steady-203195/?highlight=zod

This is my first costume build and I fell in love with the Art Nouveau styled Kryptonian armor while watching Man of Steel. The biomimicry of advanced Kryptonian design and Art Noveau are very close and it is beautiful. I do work full time so this took about eight months to complete. Paper patterns were done in two weeks

THIS IS NOT PAPAKURA! I Freehanded (in illustrator) paper patterns taken from measurements of the 1:6 scale DC Zod statue. The pauldrons were freehanded right onto a 8" styrofoam ball, look for that explanation a few posts down. I decided that if I could make it out of paper then I could make it out of Worbla. Even though Worbla can do compound curves I figured I having a working full size pattern lets me work out any kinks before I build it.
French-Curves.jpgTransfer-rubbing.jpgabdominal.jpgCod-Back.jpgCod-Front.jpgFront-shot.jpgKnees.jpgBoot-upper-progress.jpgPauldron-ball.jpg

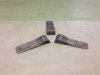
I did attempt a little bit of scultpting, casting, and 3D printing. The side strap segments are cast from a Sculpy original and then four holes were carved in each with a dremel to insert (an oops after thought) loops for the belt that would hold them together.
Belt-Buckle.jpgBelt-Segment.jpgBelt-strap.jpg

The mass of skinny grey strap segments were 3D printed in ABS which is easily smoothed with 100% acetone. No sanding or priming necessary. The round medallions for the knees and elbows were also 3D printed, I tried to sculpt the skinny strap segments and the medallions but it was just... wrong. The skinny segments were hot melt glued onto strips of black spandex which had velcro hand sewn onto the ends to join it to the various armor sections.
belt-segments-pile.jpgBelt-Segments-DONE!.jpgBelt-strap1.jpgelbow-medallion.jpg

Most of the armor is Worbla via the sandwich method, and some of the thicker non structural parts are layered 2mm EVA foam mats. I also used Apoxie Sculpt to make the curvier or beveled details on the chest and to make the contours on the side of Zod's family crest. The black collar is three strips of EVA floor mats and then a piece of pipe foam insulation cut in half to make the top round. I then cut 1/2" wide stips to make the alternating pattern and then small 3/16" wide strips on top of the 1/2" strips for the final detail. It was sealed with mod podge before being primed and painted.
chestplate-front.jpgCollar-Front-details.jpgCrest-apoxied.jpgCollar-details.jpg

The crest is three layers of EVA 2mm foam sheets cut in such a way as to mimic an elevation map. You've seen it in architectural models when they have hills that they cut to show the contour of the hill. I then filled in the "steps" with Apoxie and then a layer of Worbla for the final detail over the foam.
Crest-layers.jpg

The abdominal plates were joined together with elastic straps so they'd be articulated and flex when I moved around.
ab-plate-top-formed.jpgab-plates-assembled.jpg
 

Attachments

  • Belt-Segments-v5.1.jpg
    Belt-Segments-v5.1.jpg
    14 KB · Views: 193
Last edited:
Pauldrons were produced twice: They looked pointy in the movie and statue but were in fact very spherical. The last picture is one of three the "ribs", round on the left, pointed on the right for comparison. The spherical "ribs" nested over each other much more smoothly than the gothic arch style ribs which also poked out too far from my arm. There is one elastic strap inside each pauldron to hold it up off of the cuff so it appears to float over by arm. I used Chicago screws to space the cuff and the pauldron ribs and with a few layers of Worbla over the screw heads they stay in place nicely.
Pauldron-redo.jpgPauldron-lift-over.jpgPauldron-lift-under.jpgPauldron-mounting.jpgPauldrons-DONE.jpg

The sweeping sides of the chest were made out of foam like an airplane wing with ribs of varying width and a "skin" of foam to save on weight and Worbla. They were then covered over with a bit of Worbla for strength to withstand the sculpting that would fill in the voids below the holes.
One-Side-Covered.jpgBevels-covered.jpgPauldrons-Mounted-Front.jpg

The white plates on the back, which I call the butterfly, is on the 3D model on the DVD extras disc and I never knew it existed until I watched that. It's not on the statue and you never see it in the movie. I was LUCKY to have discovered it when decided to watch that extras disc. It's only purpose that I could figure out was to poof out the fur cape so it does go down under the armor and so it doesn't stick to my back. If you are wondering about the back of the collar the Movie CGI armor, DVD Extra's 3D model, DC Statue were all different in this spot. I chose the DVD Extra's version with the five dots because I liked it's repetition and it seemed to harmonize better with the three large circles in the back around that bowtie looking detail.
Pauldrons-Mounted-Back.jpg

Speaking of the cape. Having to pull long "Grizzly" fur out of the seams with a toothpick was not my favorite activity. The inside fabric is a black microsuede. I also had to revise the placement of the rings that help the cape in place. At first there were inside the shoulder supports but were moved to the outside edge of the armor about 15 minutes later. You can see this in the side by side pic below. The left is the new placement, the right is the old placement.
Cape-fur-in-seam.jpgCape-revised-placement.jpg
Cape-rings.jpgCape-full-revised2.jpg

The knees are three double thick layers of Worbla so they could nest over each other and they were later attached to the top of the boots.
knees-done.jpg

The boots were originally a pirate boot where I was able to cut off the upper and rebuild it with Worbla and some foam. The right boot has a scabbard for a knife but it was never seen in the movie so I only made the handle. Plus, con rules frown on blades.
boot-plate-bottom.jpgboot-plate-added.jpgBoot-upper-base.jpgboot-right-scabbard.jpg

I have no idea what this weird piece is called. I ended up calling it the thigh to waist connector. Much like the family crest, a few layers of foam and then Apoxe to ease the edges and make a large blended area (above the darker grey foam). I also had to experiment with dying leather for those four straps between the waist and the thigh plates. The top strip was the natural color, next down is a brown only dye, third down is brown and black dyes, and last one is straight black dye. I ended up going with the third one down and it was pretty darn close to the paint job on the rest of the armor.
thigh upper connector plate.JPGleather-colors.jpg
 
Last edited:
The hands were all formed pieces of Worbla with Apoxie detailed "fins" down the middle of the back 2/3's of each finger series. I also decided to number each piece to make it easier to assemble. The designation R1M is Right tip Middle Finger. 1's were tips, 2's were knuckle bits, and 3's were the piece between the back of the hand and knuckle. I made loops of Worbla though the gloves and then heated the loop and finger bit and joined them together. Assembly went very quickly.
fingers.jpgGloves-Progress.jpg

The bracers turned out better than expected and this is where I did most of the blending with Worbla to make single layers "disappear" into the body of the piece. The main underside detail part of the bracer was a thick piece of black foam floor tile and then a thin 2mm sheet over it to make the details. The light grey sheets were used to make the detail plates on the sides of the bracer. On the right bracer (Middle picture) the housing on top of the bracer was first made out of foam and then napalm hot worbla was draped over it to form the shape and join it to the body of the bracer. The medium grey discs are the 3D printed medallions mentioned earlier.
Gauntlet-blending.jpgGauntley-apoxie.jpgGauntlets-done-front-3-4.jpgGauntlets-done-back.jpg

The thighs were a blast to do, they had thick angular plates as well as curvy sweeping sides. The legs angular plates are sandwich Worbla and the sweeping sides are a double thick layer. Foam tiles were cut on bevels to make the details in the middle. These pieces took the most abuse of the costume from the knees rubbing on them.
Leg-plates-side.jpg

Priming was all Rustoleum filler primer. I tried to use wood glue (Elmers) but it delaminated from the Worbla and since then I've heard Titebond and Gorilla wood glues are better. I also used Apoxie to fill in any weird random hole/dips as well, probably should have used Bondo. If you are wondering why I didn't make the pieces mirror shiny and instead left it pitted it's because this armor is supposed to be ancient. I actually discovered this by accident when I sanded a sample piece and didn't change the sandpaper which had built up primer on it. I later switched to a 3M sanding pad which was 10x easier to sand all those curves with and hold for long periods of time.
boots-thighs-cod-primed.jpgchestplate-sanding.jpg

Painting, as much as I hate to paint, I actually loved it for this costume. 99.9% of this is four colors of Rub n' Buff, the rest is black spray paint on the inside of the armor just to cover it up. The bulk brown patina is "Spanish Copper" which hides the true golden color of the armor which is "Antique Gold". Highlights where the armor is worn and from taking clues from the movie CGI model I've embellished with 100% Antique Gold. Grime is realized through the use of "Ebony". All of the small belt segments are hand rubbed with "Silver". The brown Rub n' Buff was thinned out with turpentine before painting to make coating much easier. I maybe missing a few brain cells now even though I painted in the garage with a fan going and the door open. The Rub n' Buff was left to dry, complete with any blobs so that when it was polished it'd add to the surface texture of the armor. The silver was not thinned since it was hand applied to the slats, it was far easier than using a brush.
Belt-Segments-DONE!.jpgChest-Done.jpgChest-CloseUp-Side.jpgChest-CloseUp-Back.jpgChest-Done-Back.jpgChest-CloseUp-Back-Side.jpgab-plates-mounted.jpgabdominal-plates-done.jpgButterfly-finished.jpgGauntlets-painted.jpgSide-straps-done.jpgPauldrons-painted.jpg
 
Last edited:
The bodysuit material was purchase from RPF member masked rider. This work on this silicone printed glissnette fabric was astounding. I received the fabric a mere two weeks from Salt Lake Comic Con. My seamstress friend Christie and I used a different pattern to be more movie accurate. Instead of a unitard style we chose a high leg cut raglan sleeve leotard and then fitted legs to it (leg pattern via stretchy.org).

Look at the seams by his shoulders and his crotch. A unitard has a straight seam at the shoulders like a shirt, raglan sleeves are angled in. The crotch shows the seam and if you take away the legs it is a leotard. We used parchment paper along with the pins when we basted together the silver under suit and the black silicone fabric. The paper kept the fabric from sticking to the sewing machine's foot.
suit-seams.jpgSuit-top.jpgsuit-pattern-layout.jpgsuit-back-pattern.jpg

FYI, chalk is the absolute best method IMHO for marking this fabric.
 
Last edited:
And here we are, all done.

Proof Photo: Yup, the stache grew back in two weeks :) This is more like two months in this picture. Before this I hadn't shaved in like 20 years, it was a weird weird smooth and cold feeling on my upper lip that week.
RPF-CONTEST-PROOF-PHOTO.jpg


Pictures by Trevor Nielson at ComicCon.Tips

IMG_3266 small.jpgIMG_3216 small.jpgIMG_3309 small.jpgIMG_3326 small.jpg


Pictures from Salt Lake Comic Con.

zod contest.jpg
Natural Designs Photography

SLCC 2014 Zod walking.jpg
Dragon Wing Photography. This picture was featured on the RPF facebook page in September! :-D

DSC00299.JPG
My friend Erika and by far my favorite picture that my wife took. The dim lights were perfect!

SLCC-2014-Eric-Allen-Hall.jpg
My friend Eric Allen Hall from H.E.R.O.I.C. Inc.

Zod and Faora's.jpg
FAORAS!!! Note Quest on the left and Lang Kim and his wife on the right, all three are new friends :)

SLCC-2014-Kamui.jpgSLCC-2014-Riddle.jpg
Kamui Cosplay (left) and Riddle's Messy Wardrobe (Right). My two favorite cosplay gals :) SO excited to meet Kamui for the first time and I had met Riddle once before to show her progress photos from an earlier con that same year.
 
Last edited:
Michael. May I ask why I was placed in the new member category? Your post said new members were "new" as of October 1 2014. I joined the RPF in January of 2014.

Sent from my iPhone using Tapatalk

The condition is "less than a year on the site as of Oct 1, 2014" which means anyone joining the site after October 1st, 2013 is in the New Member category.

Cheers,
~M
 
Added a few more pictures in the earlier posts for continuity. Forgot to add pics of the cape and leather bits and enlarged the thumbnails of the finished pics at the bottom along with some captions.
 
This thread is more than 9 years old.

Your message may be considered spam for the following reasons:

  1. This thread hasn't been active in some time. A new post in this thread might not contribute constructively to this discussion after so long.
If you wish to reply despite these issues, check the box below before replying.
Be aware that malicious compliance may result in more severe penalties.
Back
Top