3D printed lawgiver project.

tobor

Active Member
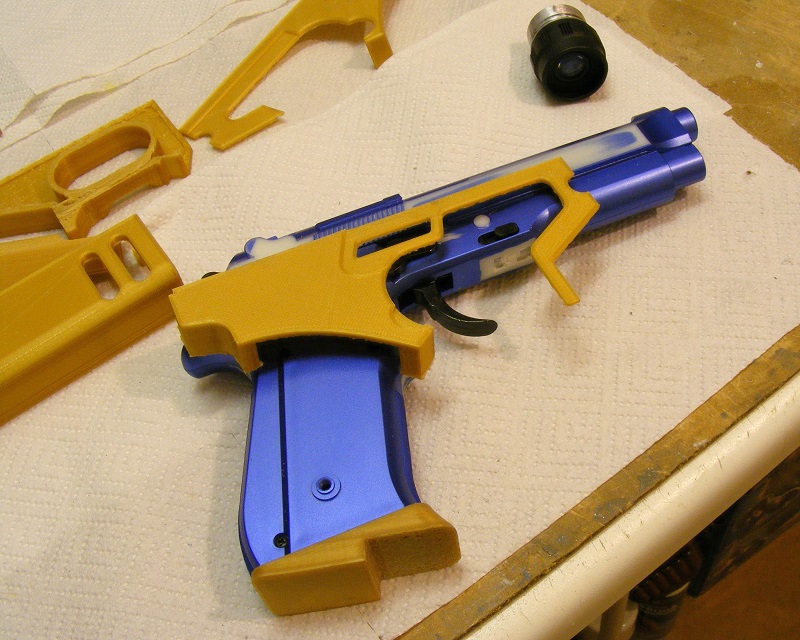
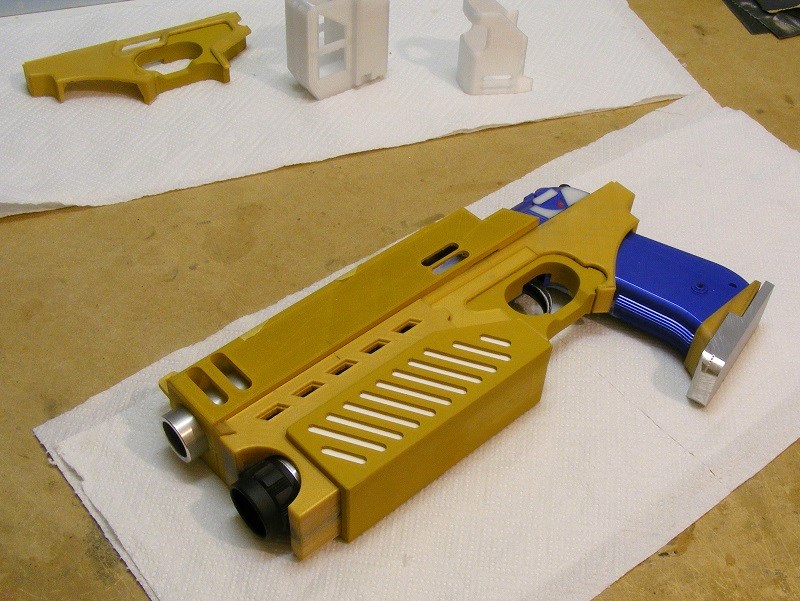
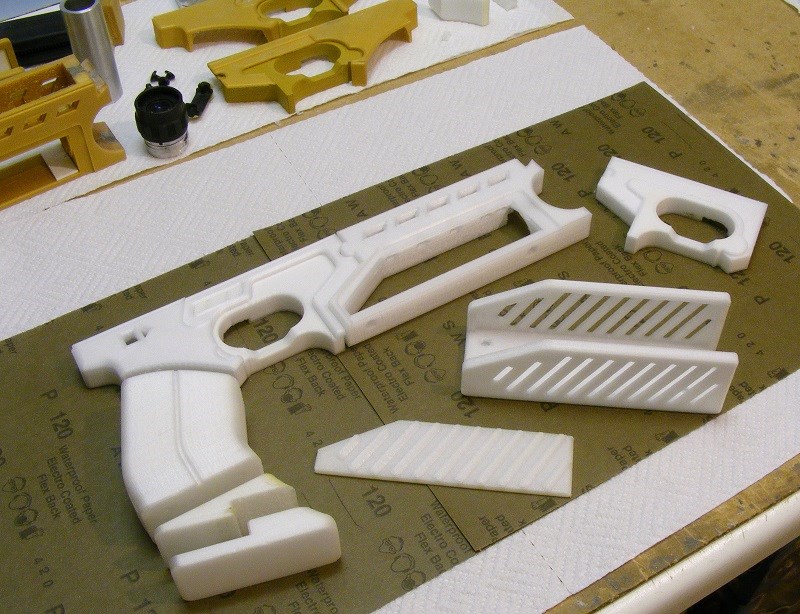
I’m building a Stallone version lawgiver based around an airsoft beretta. It’s a cheap plastic non-blowback gun.

I’ve removed the magazine and slide release buttons and the safety, which were just dummies moulded into the body. I now have nice flat surfaces, which will make fitting a shell around it easier. I think the trigger guard will also have to be removed.
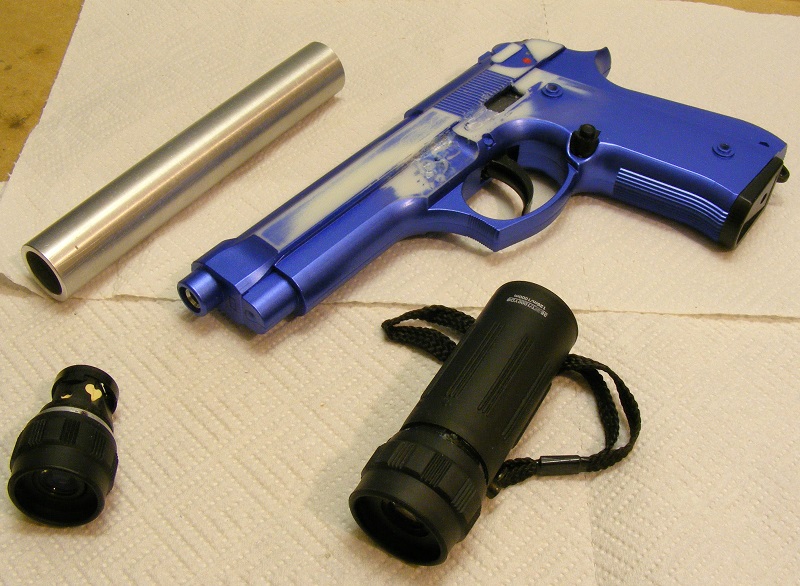
For the barrel I’m using one inch aluminium tube, and the butt plate will be made from aluminium plate.
I have a Vivitar monocular, as well as the slightly smaller Praktica binocular eyepieces.

s3d001.jpg

s3d002.jpg


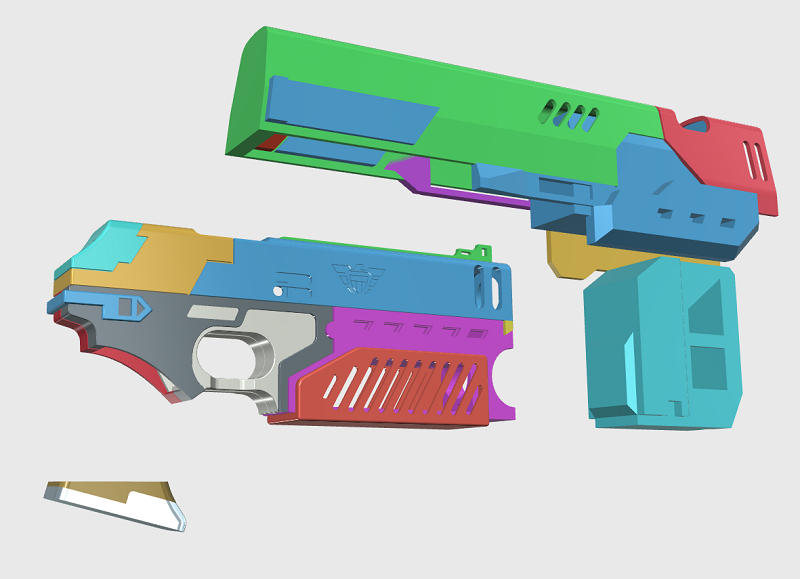
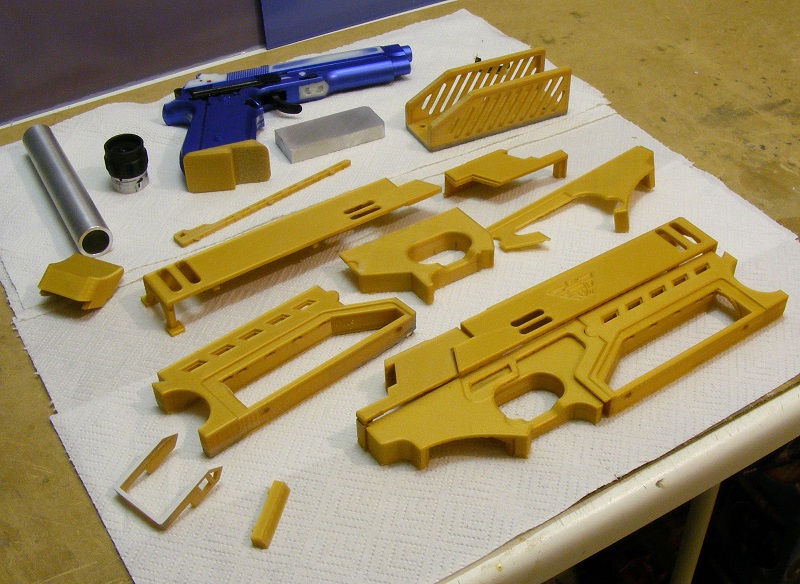
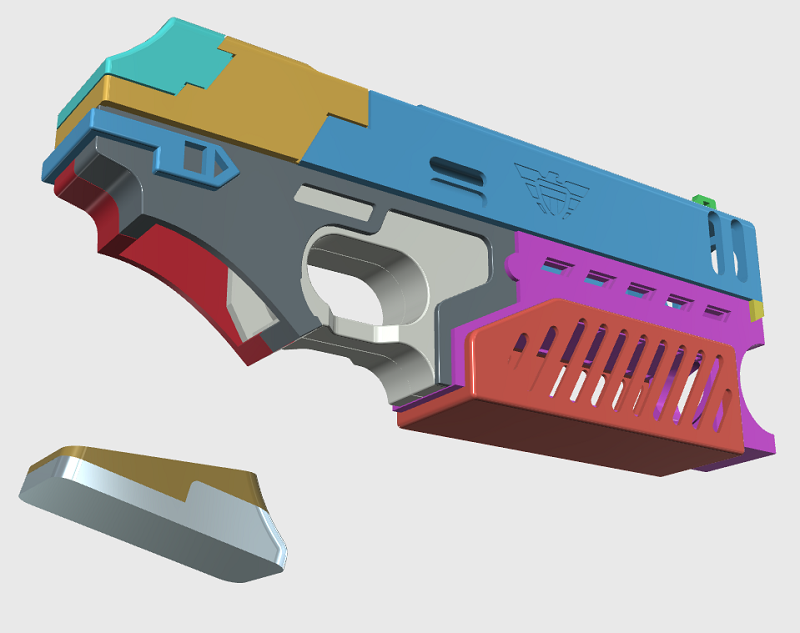
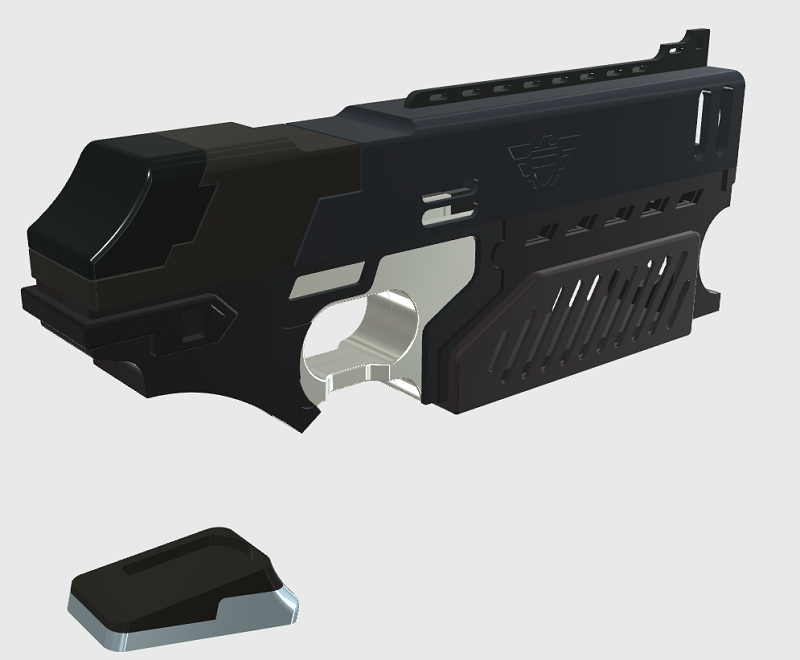
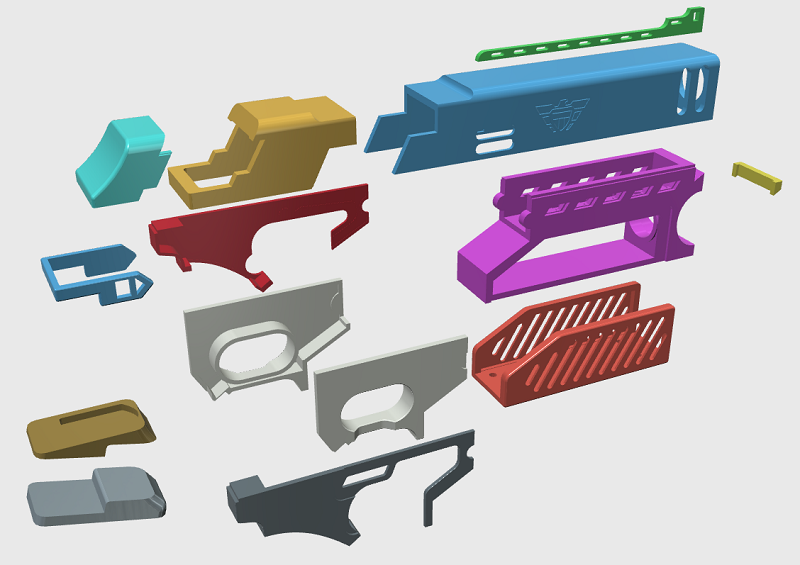
I’ve made 3d models of the parts I need using Autodesk 123 Design, which is free to download.

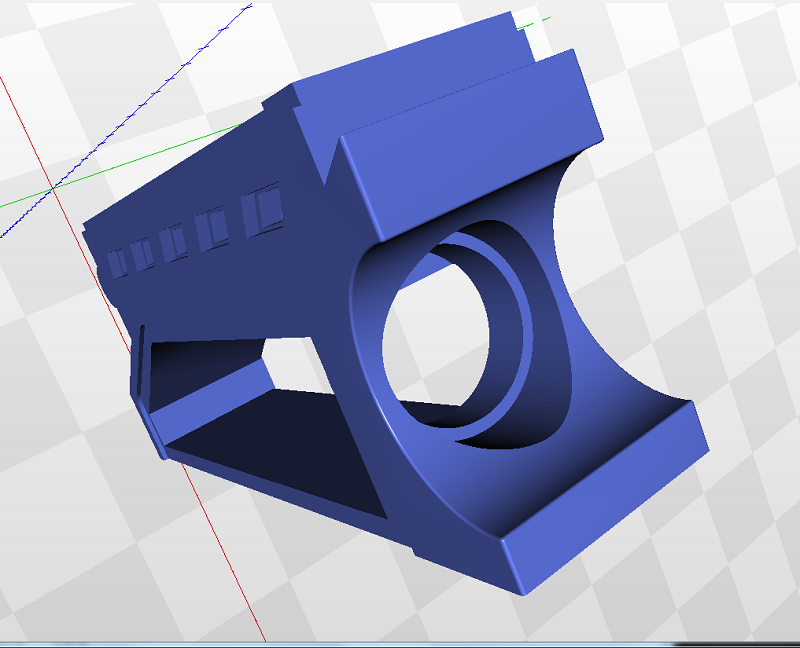
The model is based on the hero prop with the Beretta inside. Some details I left out, like the screw holes and cut-outs for the trigger and hammer. I’ll do these by hand.

I’ll also make the grips by hand.

s3d003.jpg

s3d004.jpg

s3d005.jpg

s3d006.jpg


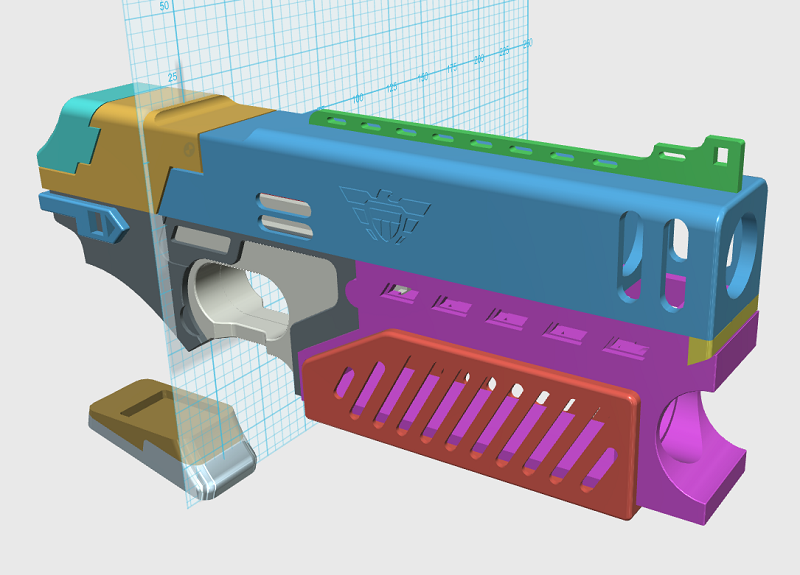
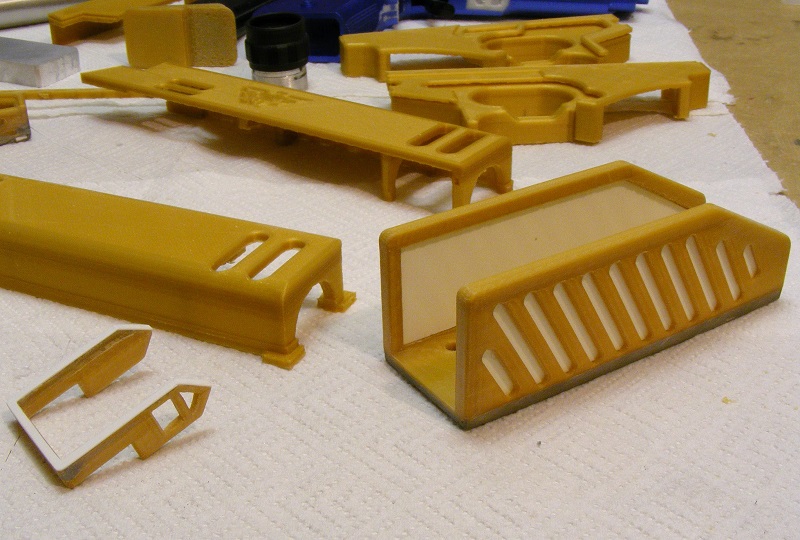
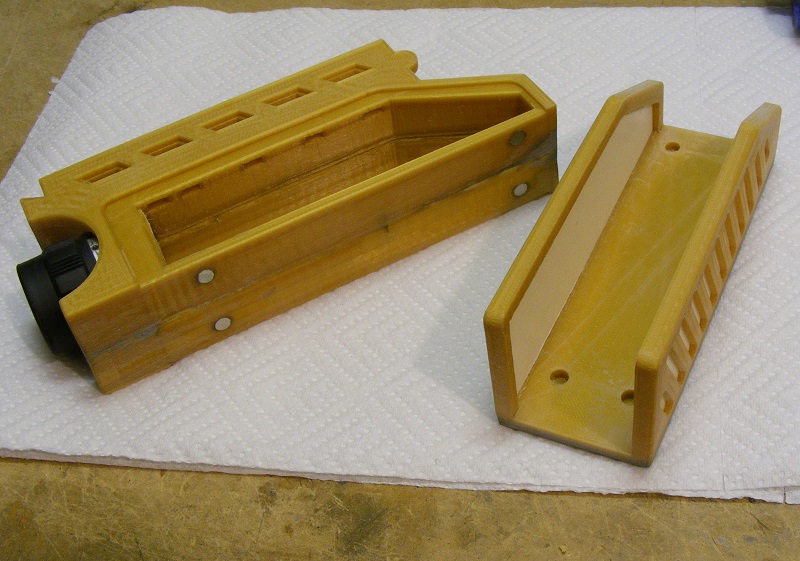
I’ve never made 3d models for printing before, but I think all the pieces I’ve modelled can be printed.
I may modify some of the pieces for printing. For example, the part with the parallelograms in it could be split down the centre line.
The front upper body is 212mm long, which may be too big for some printers. But it could always be split up into smaller parts.

s3d007.jpg


I exported the models as STL files, which I understand is the common format for 3d printing.

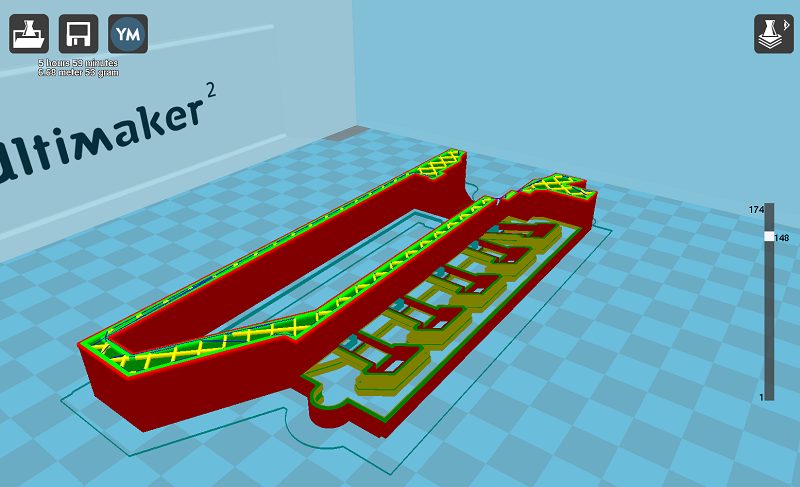
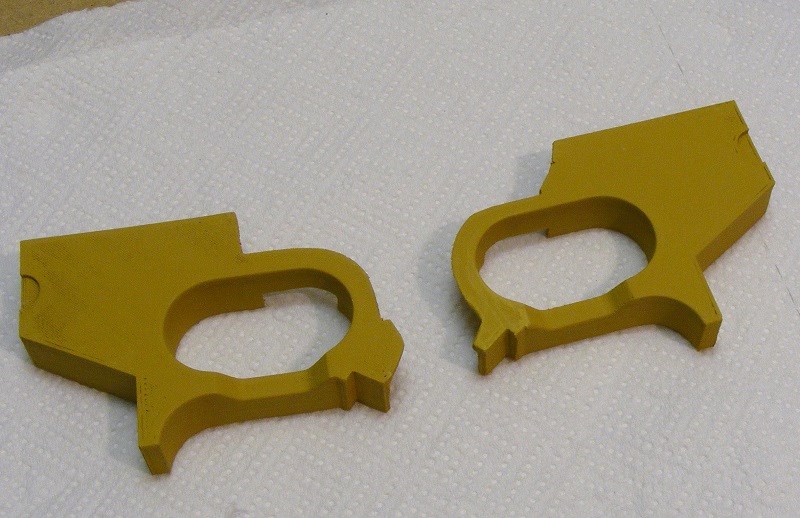
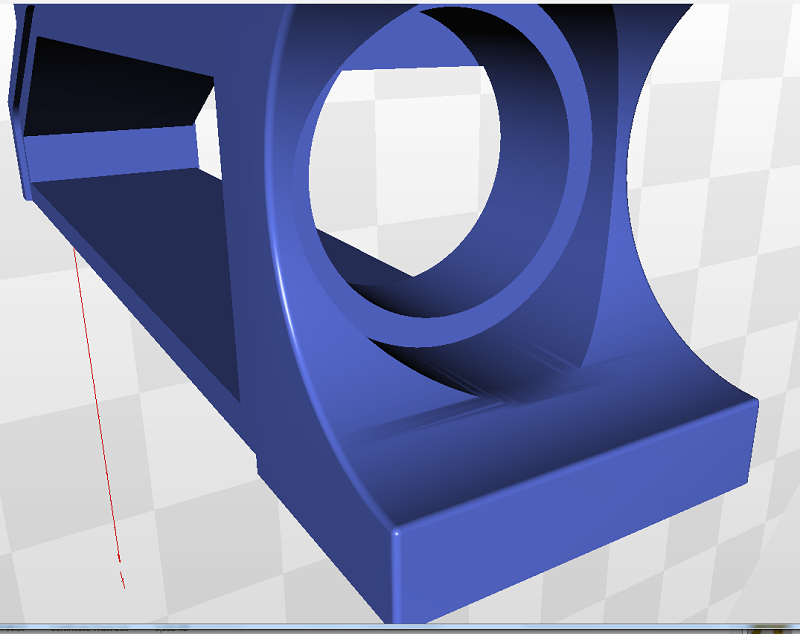
I checked the exported files in a free STL viewer I downloaded. Everything looked fine except for one problem (In the picture below).
The part looked fine in Autodesk 123, but the exported STL file just went wrong. I re-made the front of the part, and now it’s fine.

s3d008.jpg

s3d009.jpg


I’ve been looking online at some companies here in the UK to print this. I haven’t sent off for any quotes yet. I’m not sure if they will have similar policies to Shapeways who won’t print gun shape objects.
If anyone has experience of companies in the UK or knows anyone who could print this, please let me know.
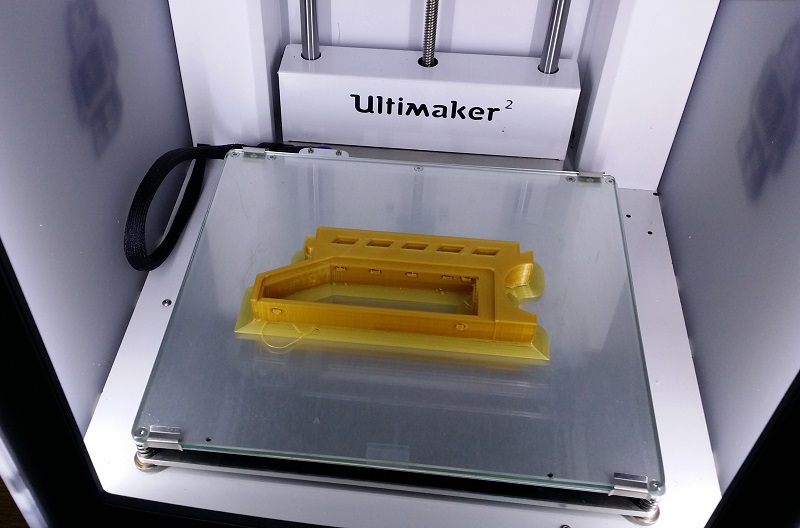
I am however seriously considering buying a 3d printer. I’ve been doing some research, and the one I’m thinking of is the Ultimaker 2. It’s not cheap, but I have so many projects I want to do, it’s probably more cost effective to buy my own printer than pay someone else to do them.
 
I know a few guys in the Dredd Costuming community with 3D printers who might be able to help, ill drop them a message and get back to you. and as a complete aside if you do get this done id be very interested if you elect to do a run at all :)

cheers
 
Just starting out with our 3D Printers ...
Modelling looks neat.
BUT I personally would avoid any high or tall bridging or air gaps.
I prefer to have a solid wide flat base and build walls and sections up from that.
So aim to split it on halves, like you would a model airplane frame in an AirFix kit.
Support structures I avoid where ever possible.
 
Hi redleader, I’ve been using Cura to check the models and how best to print them. In the picture below, I’ve split the front piece down the middle, to print it outside face down. This seems to be the most efficient way to make it. I think I will have to use temporary support and overhangs on some pieces, but as you say, it’s best to avoid them when possible.

s3d010.jpg


Thanks for the offer of help Andy3E, but I’ve just ordered an Ultimaker 2 today, it’s arriving by courier tomorrow. Once I start making this I’m sure there will be some tweaks to the models.
I’m not sure if I will do a run of these, but I will definitely make the files available to anyone who wants to get one of these printed.
I’m also making a 2012 Dredd lawgiver model. This is being designed to fit over an airsoft Glock.

s3d011.jpg

s3d012.jpg
 
I’ve been using the printer for nearly a week now. I’ve had a few problems with some of the early prints. Some of the corners lifted off the print bed, causing the bottom of the pieces to be warped. The top surfaces are perfectly flat, so the pieces are easy to fix. I’ve made changes to the models and printer settings, and now get consistently good results.

s3d013.jpg


I’ve split most of the parts down the centre line, and added some material to be cut off after printing. I’ve also added little pads in areas that are likely to lift, which is working great.
As I want a perfectly smooth finish to the gun, I’ve tried to avoid awkward recesses to sand. So I’ve made the slots open and backed them with styrene sheet.

s3d014.jpg


I was worried that the detail on the eagle would be too fine for the printer. But it came out ok, and with a little bit of work should be fine.

s3d015.jpg


The parts that fit around the trigger and handle will have to be trimmed. Once these are fitted, I will go back and modify the models.

s3d016.jpg

s3d017.jpg


I now have a complete kit of parts. Hopefully all the parts can be used, but of course if I have to do any major modifications, I can just tweak the 3d model and re-print it.

s3d018.jpg


Hi wotz101, that lawgiver is looking nice.
Most of the files have to be adjusted in some way. Give me a week or so to work on the gun and modify the files. Then I’ll put links in this thread to where they can be downloaded.
 
Hi redleader, I’ve learned quite a bit in the first week of printing.
I’ve found that a raft works very well in stopping lifting, but only when the pieces aren’t too big.
I think that modifying the models with pads on the corners and not using a raft works better on bigger prints.

I’ve started using a new filament called colorfabb xt. It’s not PLA or ABS, its Co-Polyester (whatever that is).
I heard it was better at overhangs and easier to sand. From using it, I can say it is definitely better at overhangs than PLA. As to sanding, I can’t really notice any difference, there’re both not very nice to sand.

The first print I did with colorfabb lifted a little, but I increased the temperature of the bed from 70 to 80 degrees and the next one was fine.

s3d019.jpg


In the picture below, I used a raft on the complete Dredd magazine and top front piece, which both came out very well.

s3d020.jpg


The Stallone lawgiver parts needed more work than I thought to make them fit. Especially around the trigger and handle.

s3d021.jpg


I’ve modelled holes for magnets to hold the magazine in place.

s3d022.jpg


The gun is beginning to come together nicely. I’ve decided to try and model the grips, it may take a few goes to get them right, but I think I can do it.

s3d023.jpg

s3d024.jpg
 
I given up too on ABS and PLA as they react like Nylon when you sand it ... they flake, endlessly :-(

I got some HIPS today and that seems a lot better for sanding & Dremel work. I'm hoping it will be workable & glue just like PlastiCard / Styrene sheet :) TBC

I'm faffing about still with endless GCODE permutations ...

Not much to show yet, but here's my waste bin!ImageUploadedByTapatalk1412449740.177383.jpg
 
I recommend High build PRIMER its the best way to get your parts looking decent as trying to sand the raw prints is pretty much a wastye of time with High build primer you can get the lines out below is the 3d printed version ....black primer to see how its going ..but more sanded needed to get the hi build primer nice n flattened out
..2014-10-04 23.37.09.jpg2014-10-04 23.36.36.jpg
 
Last edited:
I given up too on ABS and PLA as they react like Nylon when you sand it ... they flake, endlessly :-(
]

As long as you sand quite slowly, you can sand PLA without it flaking. It peels as sanding quickly causes the PLA to heat up and melt a bit.
 
I’ve found that a combination of sanding, filler primer and filler can give you a smooth finish on a PLA printed prop. I’ve cut it with razor saws and even used a dremel on it. It does melt easily and you have to be careful, especially with the dremel, but it can be done.

I got the 3D printed lawgiver below, on EBay. It’s been heavily modified. It was way too wide so I reduced the width by 10mm. I also added a CYMA frame.

s3d025.jpg


Some surfaces were lightly sanded and given two or three coats of filler primer, rubbing down between each coat.
Some areas I managed to get smooth just by sanding. But there were parts that I had to use filler (Revell Plasto).

s3d026.jpg

s3d027.jpg


The finished surfaces came out very nice, and I don’t think it shows signs that it was ever 3D printed.

s3d028.jpg

s3d029.jpg

s3d030.jpg
 
Wow, that is some impressive finish there tobor!
Looks almost like a 3d render. Are you going to weather it or keep it rookie fresh? Either way it looks awesome!

Im getting a 3d printer just so I can model and print one myself.

Could you tell you tell us more about the finishing? Googling Revell Plasto for sure :)
 
Revell Plasto is great for filling the imperfections in 3Dprinted surfaces. It’s convenient as it comes in a tube and sands easily. I wouldn’t use it on larger areas or on corners; I would use something stronger like car body filler.
The paint is Simoniz Tough Black (satin), with Halfords enamel matt black sprayed on top in some areas.
I’m not going to weather this, I like it looking new.
 
Good god man, that Dredd 3D one is giving me wet knickers.

Will you be releasing the final 3d printer files to the public or just selling in the junk yard?
 
I’ve just finished a complete lawgiver model. Everything is there except the screw heads. I think it will always look better drilling holes and putting real screws in rather than printing them.
I’ve designed the model so that it is relativity easy to put in LED’s, switches etc.
The model is available at the link below.
http://www.tobor2.com/temp/lawgiver_v1.zip
You can load it into Autodesk 123D design, and export the various parts as STL files for printing.
Autodesk 123D design is free to download.
http://www.123dapp.com/design

s3d031.jpg

s3d032.jpg

s3d033.jpg

s3d034.jpg


I’ve started printing it out. It will take another two or three days to finish.

s3d035.jpg


I have a question I hope somebody can help me with.
I’m trying to identify the part below the barrel in the Beretta based lawgiver.
It looks like some sort of eye piece or lens.


s3d036.jpg
 
This thread is more than 9 years old.

Your message may be considered spam for the following reasons:

  1. This thread hasn't been active in some time. A new post in this thread might not contribute constructively to this discussion after so long.
If you wish to reply despite these issues, check the box below before replying.
Be aware that malicious compliance may result in more severe penalties.
Back
Top