New eyes. - another tutorial

claymore61

Well-Known Member
Hi guys
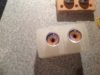
some of you will remember I posted a tutorial on making eyes for sculptures, but they suffered a bit because they were domed, rather than fully round. Well hopefully I've fixed that.

Follow on.......
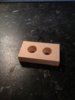
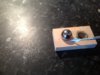
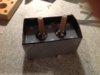
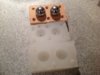
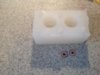
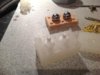
cut a piece of 18 mm MDF around 50 mm x 80 mm, then drill 2 x 22mm holes in the middle.
 

Attachments

  • image.jpg
    image.jpg
    740 KB · Views: 146
Next place some sulphur free clay around the holes to create a seal and place 2x 25mm chrome steel balls onto the holes, pushing them down hard to create the final seal. The clay should help stick the balls in place.
Clean away any loose clay and clean the balls - I use isopropanol or isopropyl alcohol.
This face will be the front of the eyes , so make sure they are clean and highly polished
 

Attachments

  • image.jpg
    image.jpg
    1.5 MB · Views: 189
Once the two balls are in place, build up your mould walls.
I used thin plastic and glue gunned them to the MDF .
Make sure they are sealed all round so the silicon doesn't leak out.

Before pouring he silicon, give your balls another polish ( he he ) :D

- - - Updated - - -

The filled mould box
 

Attachments

  • image.jpg
    image.jpg
    1.4 MB · Views: 151
  • image.jpg
    image.jpg
    1.2 MB · Views: 147
Once your silicon has set, turn the mould over and carefully remove the MDF block.
Clean off any residual clay and clean your balls ( I know, I watch too many Carry On films)

Using a glue gun, stick on a wooden dowel on top of each steel ball. These will be the pouring holes..

Once you've done all that, spray the mould with plenty of silicon mould release .

Then pour more silicon to top off the mould
 

Attachments

  • image.jpg
    image.jpg
    605.6 KB · Views: 160
Once the silicon is set, split the mould and remove the balls.

Before I forget, only use platinum set silicon - not tin based. It works better with water clear resins.

You'll also notice that I drilled some " key" holes into the mdf for aligning the mould laterf.

Next we'll make a couple of eyes
 

Attachments

  • image.jpg
    image.jpg
    1.3 MB · Views: 167
Stick your silicon mould in the oven to pre heat the mould.
I normally go to about 100 deg for about 5 mins.

Mix up some water clear resin and pour it into the deep part of the mould.
Now this is where you need to trial and error.
When you make the eyes there is a pronounced magnifying effect which is more prominent the deeper you do the first pour.
All will become clear, later ( no pun intended)
For " normal" human eyes just pour a small amount, say around 3 - 5 mm deep in the bottom of the mould.
 

Attachments

  • image.jpg
    image.jpg
    1.2 MB · Views: 184
Last edited:
When this little drop of resin gets to the "jelly" stage, drop in your pre printed iris's. the ones shown are 12mm diameter. The same as I used in the previous tutorial.
When you've pushed these in, assemble the mould, trying not to disturb the setting clear resin.

You can then pour in some white resin , completely filling the mould.

Leave aside to fully set hard

- - - Updated - - -

Once the resin has set, split the mould

- - - Updated - - -

The finished eyes should just pop out the bottom mould
 

Attachments

  • image.jpg
    image.jpg
    1.4 MB · Views: 180
  • image.jpg
    image.jpg
    1.2 MB · Views: 213
  • image.jpg
    image.jpg
    1.7 MB · Views: 312
Last edited:
For special effect, or aliens etc, you can pour more clear resin into the mould on the first pour, before the gelling and iris insert.
This will magnify the printed iris, as shown in the 2 pics below.
The second pic shows the effect if you fill the bottom mould to just under the brim, before adding the 12mm printed iris, and closing the mould.


HAVE FUN :D

Comments welcome.
 

Attachments

  • image.jpg
    image.jpg
    1.4 MB · Views: 240
  • image.jpg
    image.jpg
    1.3 MB · Views: 276
Great tutorial! I will definitely be giving this a go!
Thanks for posting this :)

Just yesterday I bought several eyes from Van Dyke's taxidermy, and stumbled over these:
NITE1
I was so close to buying them, but it would definitely be more fun making them :p
If you ever decide to give LED's a try, I hope you'll share some pics on this site!
 
You can make the steel balls 29 - 30 mm diameter for large eyes or human eyes which are to be owned wide.
This should save showing of edges etc.
 
Hi Tess,
Believe it or not , I printed them on an inkjet printer then punched them out using a 12mm punch , purchased from a hobby store.
I devised that system in my last tutorial on making eyes, elsewhere in the RPF.
 
Nice tutorial. I used to paint my irises by hand with oil paint and the printer is far more accurate.

There's one detail you may want to consider in the future. Years ago special makeup effects artist Craig Reardon (Poltergiest) wrote a detailed how to for Cinemagic. He was making a Pan makeup with goat eyes. He went so far as taking round spheres and sculpting onto those the corneal bulge. It's a detail most people would never notice or even consider, but they are more accurate that using sphere only. For the record, I always used spheres and never went through all the trouble to create the more accurate eyes.
 
thanks v3d
Madame Tusauds also uses fine silk fibres to create realistic looking veins in the eyes, but i havent tried that yet.
 
Thanks smelly.

Philly, I don't have any G10, but I've found making the mould with a highly polished master, works to give a high degree of finish. I might try T-Cut when I get time later tho'
 
claymore,

I tried the red fiber trick with questionable results. They are difficult to position without moving. I'll try and find some old ones I made and shoot some pix.
 
This thread is more than 11 years old.

Your message may be considered spam for the following reasons:

  1. This thread hasn't been active in some time. A new post in this thread might not contribute constructively to this discussion after so long.
If you wish to reply despite these issues, check the box below before replying.
Be aware that malicious compliance may result in more severe penalties.
Back
Top