You are using an out of date browser. It may not display this or other websites correctly.
You should upgrade or use an alternative browser.
You should upgrade or use an alternative browser.
Steampunk Ironman Helmet WIP - 5/31 update
- Thread starter indiefilmgeek
- Start date
indiefilmgeek
Sr Member
Re: Steampunk Ironman Helmet WIP - Microphone WIP
I really appreciate all the great feedback and wonderful comments! :$
*****
Quick picture for the evening, as I got a little bit done on the carbon spring microphone...
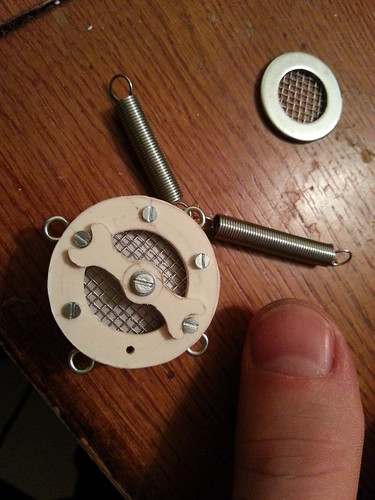
**My thumb is there on purpose to show scale... this little jerk is small - which makes things a pain in the arse.
I really appreciate all the great feedback and wonderful comments! :$
*****
Quick picture for the evening, as I got a little bit done on the carbon spring microphone...
**My thumb is there on purpose to show scale... this little jerk is small - which makes things a pain in the arse.
PepIronman
Member
Re: Steampunk Ironman Helmet WIP - Microphone WIP
Looking awesome!
Looking awesome!
indiefilmgeek
Sr Member
Re: Steampunk Ironman Helmet WIP - Microphone WIP
Thanks! It's GREAT to see you active on the forum again!") :thumbsup
:thumbsup
Great build
Thanks! It's GREAT to see you active on the forum again!
:thumbsupRe: Steampunk Ironman Helmet WIP - Microphone WIP
It's great to have a project...I think :lol
Thanks! It's GREAT to see you active on the forum again!
It's great to have a project...I think :lol
Ashiva
Member
Re: Steampunk Ironman Helmet WIP - Microphone WIP
The nice thing is, you could put as real microphone small enough to fit, and the wires can go through the springs so they remain hidden... And if the drinking tube is small enough, could also go through one of the springs, as long as they remain in a constant state and don't bend around, then no worries on pinching a wire or anything else.. The wires I can definately see, but the drinking tube might not (as looking at the reference to the size of everything with your thumb) although it might be worth it to at least see if it could be done.
The nice thing is, you could put as real microphone small enough to fit, and the wires can go through the springs so they remain hidden... And if the drinking tube is small enough, could also go through one of the springs, as long as they remain in a constant state and don't bend around, then no worries on pinching a wire or anything else.. The wires I can definately see, but the drinking tube might not (as looking at the reference to the size of everything with your thumb) although it might be worth it to at least see if it could be done.
madprops
Member
Re: Steampunk Ironman Helmet WIP - Microphone WIP
That sounds like a great idea. I always forget when you are wearing a costume like this you have to have a handler. :facepalm
That makes much more sense now.
This is turning out great. It's a lot smaller then I thought it would be but the size makes perfect sense.
It's been discussed by Digitizit and I (as well as several others that are going to be working on their own copies of the raw casts).
If not for loud-speaker function, I've actually been toying with this space being used for a mic for a cell phone headset. This costume will likely need a good handler with it (at Cons at least). So, if both the handler and costume wearer had an open cell phone line that's hands-free, communication would be a LOT easier between the two.
That sounds like a great idea. I always forget when you are wearing a costume like this you have to have a handler. :facepalm
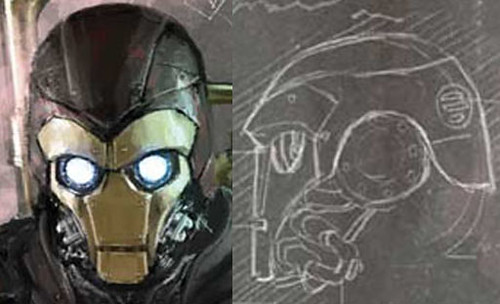
We're actually aiming to replicate a piece of existing artwork, so we'll try to match that as closely as possible. The artwork seems to indicate most of the helmet is metal. But, you're VERY correct in noticing the empty 'cheek' areas look... well, unfinished! :love
Those will have a LOT of 'fine detail' added before they're done... almost so much that there won't be any of the solid section you see there now. So, what you're seeing is mostly 'place-holder.' :cool
I really CAN'T wait to get into that part of the build... but before I can do that the helmet needs to be molded so casts can be made. I guess I'll just practice being patient. :facepalm
That makes much more sense now.
I really appreciate all the great feedback and wonderful comments! :$
*****
Quick picture for the evening, as I got a little bit done on the carbon spring microphone...
**My thumb is there on purpose to show scale... this little jerk is small - which makes things a pain in the arse.
This is turning out great. It's a lot smaller then I thought it would be but the size makes perfect sense.
indiefilmgeek
Sr Member
Re: Steampunk Ironman Helmet WIP - Microphone WIP
I'll say this right up front, I am in total awe of professionals that create molds and cast pieces for a living! :eek
I got to hang out with the folks that are creating the molds for the helmet and faceplate I'm offering over in the JY (HERE).
For anyone as interested in the process they used as I was, I've detailed what I got to see and even snapped a couple photos....
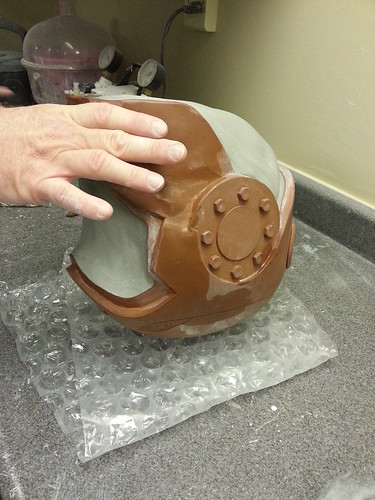
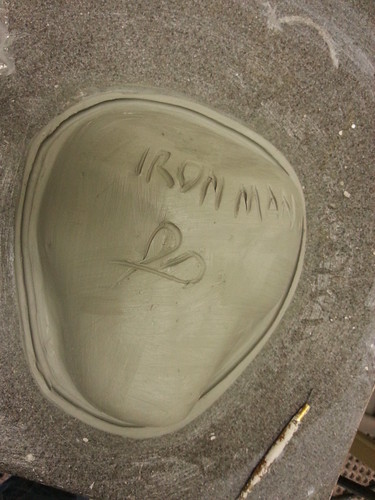
1) Filling all the holes in the helmet for the roto-cast mold.
After enough clay was added, it was smoothed and a 'trench' was created around all the edges. This will make it easier to clearly see where the 'trim lines' are.
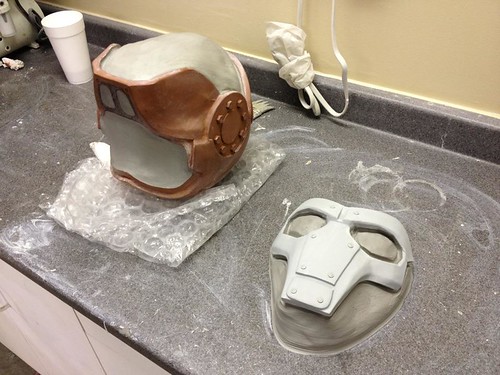
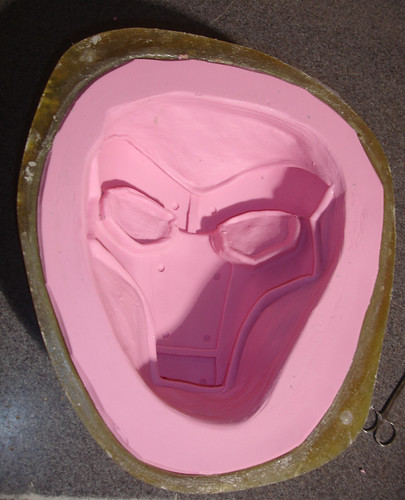
2) Preparing the faceplate for molding.
Like the helmet, the faceplate had to be prepared for molding. In this case, since it is going to be an open-faced fiberglass mold, it was 'mounted' on the workbench surface on a mound of clay.

With this done, they were ready to prep for their fiberglass jackets...
3) Peparing the faceplate for it's Fiberglass Jacket.
Ok, this part is uber-cool... Between what you see in the last photo and the fiberglass 'jackets' will be the silicon mold. But you need to build the jacket BEFORE it can be filled with silicon, so the ingenious solution is to create a 'filler' that will provide the correct ~1" depth all around the piece. Here's the step-by-step:
Here is what the faceplate looked like after this 'filler clay' was added.
REMEMBER: all this clay you now see will EVENTUALLY be the silicon mold and OVER this will be a hardened fiberglass jacket that will hold the silicon in place. So, that clever little groove will turn into a GREAT way to secure the silicon mold to the hardened fiberglass jacket! :love
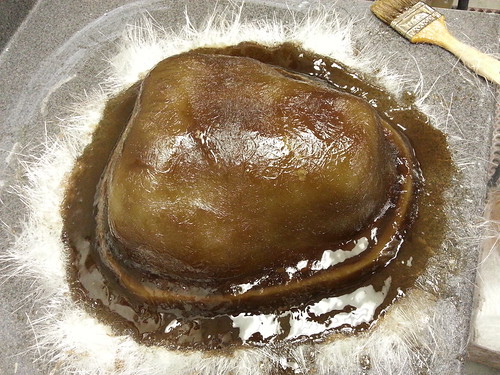
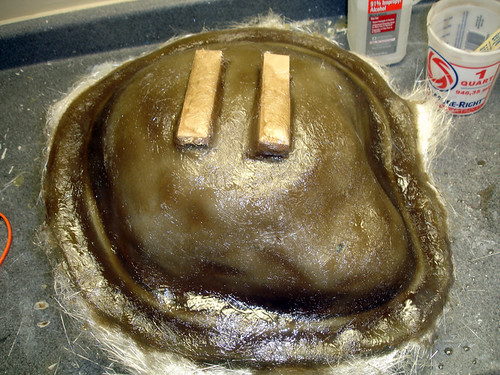
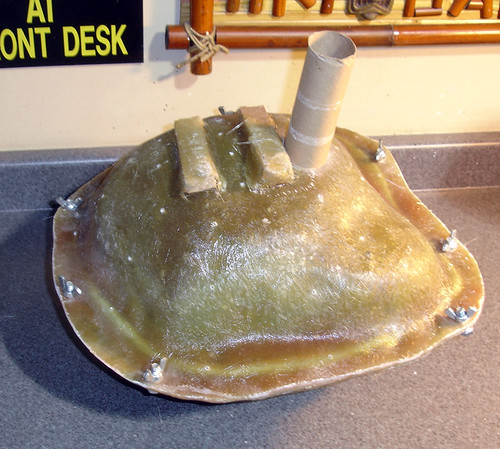
4) Preparing the Helmet for it's fiberglass jacket.
Like the faceplate the helmet needed to have a consistent layer of 'filler' added to it. But in the case of the roto-cast, this will require a two-piece jacket. They decided to seam the two down the middle of the helmet (front to back). So, after the clay was added aluminum sheets were inserted into the clay (like a Mohawk) along this projected seam line. And then the 'lip' with the locking 'trench' was created ON this aluminum ledge.

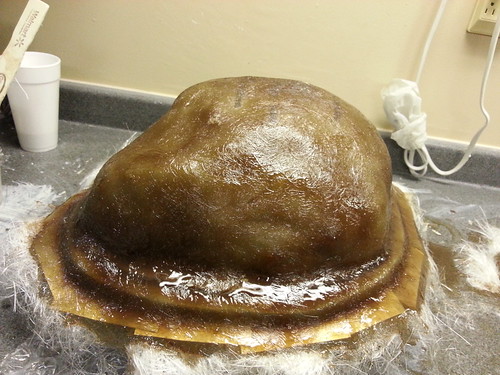
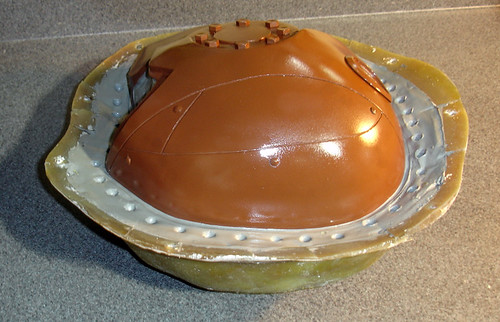
5) Fiberglassing 101
I'm a bloody idiot and a total novice. :confused Seriously, to see this professional whip up high-end resin and then create a perfect double-layer of re-enforced fiberglass that will produce an amazingly smooth and solid mold-jacket was an awesome thing to witness! "I'm not worthy!" ran through my head at least a few times.:thumbsup
Anyway, in less than 25 minutes both the helmet and faceplate was done.
Top one is the faceplate and the bottom one is the left side of the helmet.
6) Pouring the silicon for the faceplate.
At this point I had to leave... Sorry guys! Mikey had his second doctors visit of the day and my wife and I had to swap out. That being said I can provide you with the explanation I got as the to these next step (just with no pictures). :cry
:thumbsup
I'll say this right up front, I am in total awe of professionals that create molds and cast pieces for a living! :eek
I got to hang out with the folks that are creating the molds for the helmet and faceplate I'm offering over in the JY (HERE).
For anyone as interested in the process they used as I was, I've detailed what I got to see and even snapped a couple photos....
1) Filling all the holes in the helmet for the roto-cast mold.
Before a roto-cast mold can be made for any helmet, all the holes (open areas) must be filled. This was done with about 30lbs of clay which was worked down until it filled the entire 'head area' of the helmet. Clay was pushed through the back vents and in between the communicator cross-bars.
After enough clay was added, it was smoothed and a 'trench' was created around all the edges. This will make it easier to clearly see where the 'trim lines' are.
2) Preparing the faceplate for molding.
Like the helmet, the faceplate had to be prepared for molding. In this case, since it is going to be an open-faced fiberglass mold, it was 'mounted' on the workbench surface on a mound of clay.
With this done, they were ready to prep for their fiberglass jackets...
3) Peparing the faceplate for it's Fiberglass Jacket.
Ok, this part is uber-cool... Between what you see in the last photo and the fiberglass 'jackets' will be the silicon mold. But you need to build the jacket BEFORE it can be filled with silicon, so the ingenious solution is to create a 'filler' that will provide the correct ~1" depth all around the piece. Here's the step-by-step:
- Lightly wrap the piece in plastic wrap.
- Shave your clay block into 1" slabs.
- Place the clay slabs (gently) onto the piece and smooth out all the seam.
- Create a lip 1" deep around the outside edge of the piece.
- Carve a 'trench' all the way around that edge.
- Sign the mold with the artist mark and/or the name of the mold.
Here is what the faceplate looked like after this 'filler clay' was added.
REMEMBER: all this clay you now see will EVENTUALLY be the silicon mold and OVER this will be a hardened fiberglass jacket that will hold the silicon in place. So, that clever little groove will turn into a GREAT way to secure the silicon mold to the hardened fiberglass jacket! :love
4) Preparing the Helmet for it's fiberglass jacket.
Like the faceplate the helmet needed to have a consistent layer of 'filler' added to it. But in the case of the roto-cast, this will require a two-piece jacket. They decided to seam the two down the middle of the helmet (front to back). So, after the clay was added aluminum sheets were inserted into the clay (like a Mohawk) along this projected seam line. And then the 'lip' with the locking 'trench' was created ON this aluminum ledge.
5) Fiberglassing 101
I'm a bloody idiot and a total novice. :confused Seriously, to see this professional whip up high-end resin and then create a perfect double-layer of re-enforced fiberglass that will produce an amazingly smooth and solid mold-jacket was an awesome thing to witness! "I'm not worthy!" ran through my head at least a few times.
:thumbsupAnyway, in less than 25 minutes both the helmet and faceplate was done.
Top one is the faceplate and the bottom one is the left side of the helmet.
6) Pouring the silicon for the faceplate.
At this point I had to leave... Sorry guys! Mikey had his second doctors visit of the day and my wife and I had to swap out. That being said I can provide you with the explanation I got as the to these next step (just with no pictures). :cry
- The jacket and table are marked so the jacket can go back EXACTLY where it was.
- The fiberglass jacket is gentle peeled off the and the filler clay is removed (same with the plastic wrap).
- A large hole (the size of a toliet paper roll) is cut in the top of the mold - this is where the silicon will be poured into the jacket.
- A bunch of small holes are drilled all over the jacket.
- The jacket is placed back over the prepared piece (using the markings made earlier).
- It is secured to the table and then silicon is poured into the jacket from the top hole.
- As the silicon fills the jacket it will begin to seep out of the tiny holes. These are then filled with plugs (this insures there are no air bubbles created as it fills).
- Once topped off with silicon, it's left to set for 24 hours.
:thumbsupelectraflier
Well-Known Member
Re: Steampunk Ironman Helmet WIP - Casting the Helmet!
I think I might have given my left n%^ to see the whole process! rats!:cry
Those pictures are so educational and are like the grail of doing this process!Very glad to have seen this much! :cool Thanks for sharing them!
M
I think I might have given my left n%^ to see the whole process! rats!:cry
Those pictures are so educational and are like the grail of doing this process!
Very glad to have seen this much! :cool Thanks for sharing them!M
indiefilmgeek
Sr Member
Re: Steampunk Ironman Helmet WIP - Casting the Helmet!
No need to give up any body parts, Electraflier!
I've got two more pics sent to me this morning showing the hardened fiberglass jacket and the hole at the top (as described in my post).

And here is what the silicon mold looks like!
I'll post pics of the first pulls as soon as I get them! :love
I think I might have given my left n%^ to see the whole process! rats!:cry
No need to give up any body parts, Electraflier!
I've got two more pics sent to me this morning showing the hardened fiberglass jacket and the hole at the top (as described in my post).
And here is what the silicon mold looks like!
I'll post pics of the first pulls as soon as I get them! :love
indiefilmgeek
Sr Member
Re: Steampunk Ironman Helmet WIP - Casting the Helmet!
Here's two more pics for everyone!
First (master) fiberglass pull from the faceplate mold has been started:

And the fiberglass helmet jacket is just about finished!
Here's two more pics for everyone!
First (master) fiberglass pull from the faceplate mold has been started:
And the fiberglass helmet jacket is just about finished!
Graphic Jordan
Sr Member
Re: Steampunk Ironman Helmet WIP - Casting the Helmet!
Great work Jon. You dont' cut any corners, I love your patience, hard work, etc... it really pays off in your final products.
Great work Jon. You dont' cut any corners, I love your patience, hard work, etc... it really pays off in your final products.
indiefilmgeek
Sr Member
Re: Steampunk Ironman Helmet WIP - Casting the Helmet!
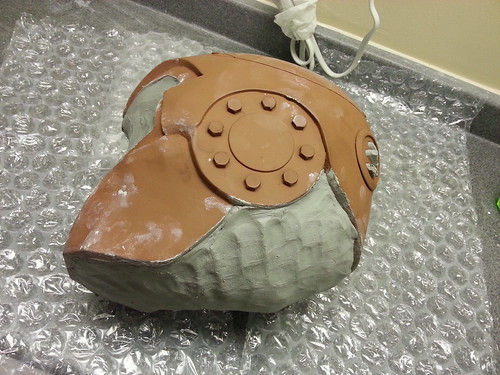
Actually one of the coolest thing about their process are the 'boxes' they make for high-usage molds.
For something they will roto-cast hundreds of times, they build a hinged 'box frame' around the two halves of the mold with hinges on one side and latches down the other side. This allows them to open the mold, pour in the resin, latch the halves together and the place the whole boxed mold into the roto-caster. After it's done, they unlatch the 'box', pop the resin cast out and then repeat the process.
They have a whole storage room full of these odd briefcase-looking mold boxes... it's pretty darn cool!:thumbsup
Different moulding technique than I've seen before but can't doubt it results, mould looks spot on.
Actually one of the coolest thing about their process are the 'boxes' they make for high-usage molds.
For something they will roto-cast hundreds of times, they build a hinged 'box frame' around the two halves of the mold with hinges on one side and latches down the other side. This allows them to open the mold, pour in the resin, latch the halves together and the place the whole boxed mold into the roto-caster. After it's done, they unlatch the 'box', pop the resin cast out and then repeat the process.
They have a whole storage room full of these odd briefcase-looking mold boxes... it's pretty darn cool!
:thumbsupindiefilmgeek
Sr Member
Re: Steampunk Ironman Helmet WIP - Casting the Helmet!
...more cool process pics!!!
So, after both halves of the helmet have had their fiberglass jacket created, they take the top jacket off, remove the clay 'filler' layer and apply a releasing agent to the exposed helmet.
NOTE: The Filler clay is still in place in the bottom half of the jacket - along with alignment 'keys'.
Then they put the top half of the jacket back on (screw it tightly shut) and make that nice hole in the top to pour the silicon in.
**This process will be repeated for the bottom half after the first half of silicon cures for 24 hours.
We should get a picture of the faceplate pull they did this evening!:thumbsup
...more cool process pics!!!
So, after both halves of the helmet have had their fiberglass jacket created, they take the top jacket off, remove the clay 'filler' layer and apply a releasing agent to the exposed helmet.
NOTE: The Filler clay is still in place in the bottom half of the jacket - along with alignment 'keys'.
Then they put the top half of the jacket back on (screw it tightly shut) and make that nice hole in the top to pour the silicon in.
**This process will be repeated for the bottom half after the first half of silicon cures for 24 hours.
We should get a picture of the faceplate pull they did this evening!
:thumbsupindiefilmgeek
Sr Member
Re: Steampunk Ironman Helmet WIP - Casting the Helmet!
Faceplate in Fiberglass!!!
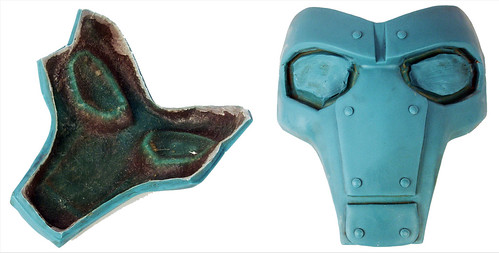
Faceplate in Fiberglass!!!
electraflier
Well-Known Member
Re: Steampunk Ironman Helmet WIP - Casting the Helmet!
Watched this project start, develop and grow, even though I am only buying a helmet, I really feel like a part of the process, which makes it more exciting and special!
Thanks Indie!
M
Watched this project start, develop and grow, even though I am only buying a helmet, I really feel like a part of the process, which makes it more exciting and special!
Thanks Indie!
M
Similar threads
- Replies
- 11
- Views
- 585
- Replies
- 3
- Views
- 995
- Replies
- 11
- Views
- 1,486
- Replies
- 4
- Views
- 1,792