bushybrush
New Member
Okay, while Cap and Black Widow are baking in the background, we decided to go full force with some N7 armor since JENNIFER HALE is going to be at MegaCon in Orlando. ")
I'll be taking note of things everyone should avoid, and things I found very helpful along the way.
Day 1: first dummy complete (using this method)
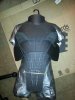
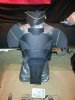
Day 2: second dummy complete and patterns for male chest piece drawn up and cut.
Day 3: I'm wanting to pull my hair out.
 Making more patterns, drawing said patterns, and otherwise waiting for my dremmel to charge again.
(notes: Having a cordless dremel sounds awesome until it dies. I'm opting for less maneuverability and more working time so that I can get it done more quickly.)
I'm making my own patterns, but have the .psd pattern files as a secondary reference.
Materials:
EVA foam
Hot Knife and replacement blades
Buckles and webbing
Heat gun
Hot glue gun (already owned)
Craft foam (Foamies - already had)
Resources:
Cosplay | Pinterest
Still trying to determine how to do the female bust on the EVA. Seen the two bowl method where you press the hot foam onto two round objects then press acrylic just under the bust to get a sharp crease . . . but I don't have those materials available to me. Any suggestions?
I'll be taking note of things everyone should avoid, and things I found very helpful along the way.
Day 1: first dummy complete (using this method)
Day 2: second dummy complete and patterns for male chest piece drawn up and cut.
Day 3: I'm wanting to pull my hair out.
(notes: Having a cordless dremel sounds awesome until it dies. I'm opting for less maneuverability and more working time so that I can get it done more quickly.)
I'm making my own patterns, but have the .psd pattern files as a secondary reference.
Materials:
EVA foam
Hot Knife and replacement blades
Buckles and webbing
Heat gun
Hot glue gun (already owned)
Craft foam (Foamies - already had)
Resources:
Cosplay | Pinterest
Still trying to determine how to do the female bust on the EVA. Seen the two bowl method where you press the hot foam onto two round objects then press acrylic just under the bust to get a sharp crease . . . but I don't have those materials available to me. Any suggestions?