CEREAL KILLL3R'S - Halo 3 Master Chief (WIP with Videos)

CEREAL KILLL3R

Active Member
PLEASE NOTE... The start date of this build was March 21, 2012. Being that I am a new member here and there is much to post, I will be posting my build progress from start until current date in as few "consecutive posts" as possible. Allow me to apologize in advance if there are indeed multi-posts, as I have no idea of what the post limitations are here (word count, image count etc...) So, to the Mod's,... should there be too many posts, adjust post count as you see fit! Thank you!


With all the armor choice out there since the release of ODST and the glorious Reach, I still find myself drawn to the Mk VI. Whenever I hear the name “Master Chief”, “Halo” or “Who could kick Chuck Norris’s ass?” the Mk VI is the image that pops into my mind. Maybe it is because we have been through so much together over the years with all the late nights and tired mornings killing Covenant and Flood scum, we have now formed a special bond. Or maybe it’s like your first car... It may not have been the best machine in the world, but it was special because it was “yours”. An even further stretch, it’s like asking someone “Who’s the Captain of the Enterprise?” (The answer by the way is clearly Piccard!)

Anyways, I digress…

Now to the business at hand; This will be a “comprehensive WIP” what I mean by that is that there will be complete coverage from A – Z, no stone left un-turned so to speak, there will be no rushing through a process and all of a sudden I’m unexpectedly leaps and bounds ahead of where I was in the previous post, everything will be covered with an explanation and documented with a nauseating amount of pictures (I doubt that people around here will suddenly get sick of looking at and critiquing pictures) I guess at the end of it all what I am trying to do is provide “From my perspective” the process of building a complete set of armour with some personal touches along the way.

First of all, I don't plan on bouncing around all over the place with armour scattered about the house. I plan to pep a piece and take it to the point of painting, then and only then will I pep out another piece. So it's a "Wet, Lather, rinse, repeat" approach.

So, here we go...
Let the pepping begin!

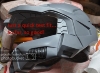
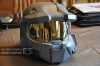
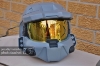
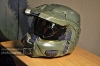
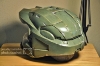
Surprise, surprise... I started with a Helm!... No real shocker there!
Just some quick info about the pep file:
- Pep MK6 Flyingsquirl HD
- Build Height = 280mm
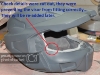
DSC_04471024x680.jpg

DSC_04451024x680.jpg


Resin coat... done!

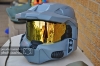
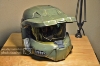
I've crudely attached a temporary face shield for the sole purpose of not making a huge freaking mess when rondoing this sucker. My approach to this project will not be as simple as throwing on some bondo and smoothing out the existing shape for detail. I enjoy making life miserable for myself, and thus I will be cutting into the helmet to enhance the details that I am not happy with.

I anticipate a great deal of hellish fury in the form of quickly gummed up sandpaper, when coming into contact with all of that hot glue that is under the paper layer, but hey... if a job isn't tedious and painfully problematic, then where's the fun!

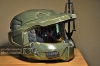
I have always had some personal preferences with regards to the helmet pep detail for the Mk VI;

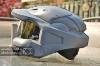
1. The rounded shape of the brim, I have always preferred it in its more angular rendering (kind of like the Halo 3 Legendary game pack head) . So that is what I will do once the rondo is dry.

004.jpg


2. The detail that is on the upright ports on the back of the helmet are quite small and barely noticeable when pepped out. I plan on punching up the detail on these ports once the piece is hardened.

003.jpg


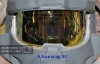
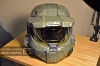
First layer of Rondo... done!

After waiting impatiently for 30 minutes or so the rondo layer had cured up well enough that I could start hacking this poor helmet apart.

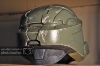
Here is the modification that I was talking about for the angle of the brim. I have always felt that being that the entire suit is so angular that the rounded brim always felt out of place. Now by no means am I crapping on Bungie or the spectacular projects that have come to pass on this forum, this is just a personal choice and what feels right to me.

Who the hell am I kidding, in 3 weeks from now when it happens to be the most inconvenient moment, I will probably want to change it back!

007.jpg


Here are some of the other modifications that I will be doing to the helm. I will be using these pictures as "points of reference" to see how much effect the changes have as they come.

005.jpg

006.jpg


It's amazing how I know that I've put in a lot of work... but it looks like so little!!!

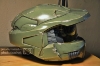
I've been spending time roughing in some of the added details and improving upon the overall shape of the helmet. Figure I'll just let the pictures do the talking until there is something useful for me to say.

Here's the smooting off of the end of the brim

008.jpg


Here is the new angle that I wanted to achieve, just to give a little more feel for depth.

011.jpg

009.jpg

010.jpg


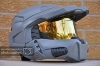
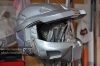
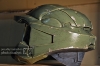
I had painted the upper half of the helmet black, just so I could get an idea of the high and low spots. Also did some sanding and spot filling. Many pieces of sandpaper later, you can barely tell that the it was ever painted black to begin with.

012.jpg


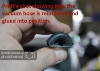
I spent some time messing around, I had thought of adding damage directly to the shell of the helmet rather than relying on paint effects alone. For some extra depth, ended up trying out some different damage and wear techniques and came up with some interesting results.

I am also starting to change the overall shape of the "ear pieces" The new shape and size is going to follow the lower of the two lines.

013.jpg

014.jpg


The way I'm going to control the bondo when I apply it, is I've taped off and cut out the overall shape that I want to get. I've also roughed up the existing piece so the bondo will have a firm hold when applied.

015.jpg


When the bondo starts to cure I begin to remove the tape, cutting along the edge with a razor blade. I find that you can get a lot of the shaping work done easily if you take advantage of bondo while it's in the "rubbery" stage.

017.jpg

018.jpg


Doing a little bit of cleanup work.
019.jpg


Done for now, this is as far as I will take it until the whole helmet is ready for fine detailing.
020.jpg

021.jpg


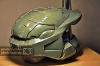
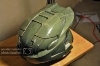
Just some general to-do's here, creeping my way along through the helmet portion of the project. I've cut out a recess into the back, just to give more depth to the back of the helmet. I will be building up the center of the cut-out once done.
022.jpg


I have taken some time to finalize the overall shape of the trench and ports in the back and filled up the hack marks that were previously left from some pepping warpage.
023.jpg

024.jpg


Started out on the neck portion of the back, when it's done it will be 3 levels. Once again, just hacking away...
025.jpg


Once the final shape is where I want it to be, it's time to fill in all the low spots giving a nice smooth final look.
026.jpg

027.jpg


This will be the shape for the 3rd and highest level of the neck, once again using the "rubberish" curing stage of the bondo to get the overall shape.
028.jpg


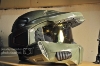
Here is the buildup detail, just about at its final shape.
029.jpg


Cleaning up the underside of the back as there were a few waves in the pep. The 3rd level of the neck is taking final shape.
030.jpg


Done!!!
After some measuring, sanding, filling and then some more measuring, sanding and filling.... I think we're there! I think it came out ok.
031.jpg


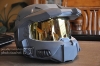
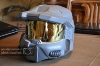
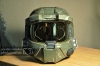
Being that I am one of the most impatient people to have ever existed on this planet, I had to throw some primer on the worked areas of the helmet just to get an approximation of how everything will look. The primer really helps out when you're looking for imperfections.
032.jpg

033.jpg

034.jpg


Here's a quick "Then & Now comparison:
before.jpg

after.jpg


To Be continued in next post...
 
Last edited:
re: CEREAL KILLL3R'S - Halo 3 MK VI Comprehensive wip

I finally got around to removing the temporary visor and also got to work on the sides of the helmet. There are a few details that I put in that I guess in reality... didn't really need to be there. But, being that I have no real time constraints and I was in the mood I decided to go ahead anyways.

No more ugly visor...
035.jpg


Ok, so anyone who knows the pep files knows that all that is supposed to be here is the little notched vent. During game play that is all you see, but during cut scenes when the designers don't care about the models extra poly count you can see the vent tapers almost to the cheek. So I figured why the hell not!
036.jpg

037.jpg


I am seriously debating whether I will ever use hot glue for another pep again! I hate the stuff! Well wait a minute... allow me to qualify:

If you plan on pepping out a model and using filler over top of it, never cutting in; Then hot glue is your friend! However, if you plan on cutting in and doing detail, the hot glue will show it's ugly face and come to the surface as you sand. The only real way to get rid of it is to "Dig it out" and back fill with bondo. Being that the helmet is the piece that deviates the most from the original pep file, I may use the hot glue again. But for any areas that will need heavy work I plan on using CA Glue (super glue) as to make life easier going forward.
038.jpg


I have decided to go the route of the recessed vent/port behind the cheek that will have a bevel that follows up the side of the helmet and possibly continuing on across the side of the brim.
039.jpg

041.jpg

042.jpg

043.jpg

http://i404.photobucket.com/albums/pp125/dghezzo/Spartan MK VI/046.jpg
048.jpg


I've started to finish off the left and right cheek. Yes... I sometimes use that Chief Head for some reference, but not all that much or that often. I find that there are too many elements that are way out of proportion and scale from the rest of the helmet.
039-1.jpg


Cutting out the final shape of the pattern. Used a cut up playing card to make sure that both sides match.
http://i404.photobucket.com/albums/pp125/dghezzo/Spartan MK VI/065.jpg

I'm pretty well done for now...
All the finishing details will be done later, as per my OCD like routine!
066.jpg

069.jpg

070.jpg


Ah, what the hell... Like I've said before, I'm not the most patient person to have ever lived. So I threw a quick coat of primer on the completed parts just to see how it renders as a single colour and not a piece of graffiti covered body work!
072.jpg


And finally, here's another "Then && Now" shot.
ThenSide.jpg

NowSide.jpg


It's time to hit the front of the helmet. Which should move along rather quickly, that is unless I run into any problems!
Below is a picture that lists what work is being done:
077.jpg


The front had a pretty good warp to it that needs to be straightened out and leveled. The warp was caused when the helmet was getting resin coated on the outside. I had a heater running as it was just above 0 in the garage when I did this and despite my efforts to keep the heat up, it still to a while to cure. It cured somewhat poorly as the helmet never lost its tacky feel.

***FYI***
People who experience this "tackiness" with a cured resin coat, it is caused in 1 of 2 ways:

1. Working temperature is out of the recommended range for the product. Ensure that the ambient temp is at least 14 degrees.

2. The proper ratio of resin to hardener is not correct. Read the instructions of your product, then to err on the side of caution add an extra 5 to 10 drops of activator. Remember to only mix small batches and keep your eye on the clock!
078.jpg


Moving along... The angle and overall shape of the front ports is changing, giving it a more rounded effect at the top and widening it out at the bottom and gently flaring out to the outside.
079.jpg


Rough in of new shape is done:
131.jpg


A butterfly flaps it's wings in China... yeada, yeada, yeada...

Cause and effect! Because the shape and size changed above, this will affect the way that the ports on the bottom will look. Besides they were the wrong shape anyway, so this was being changed regardless of the work done above. Below is the course I will take in reshaping the port.
135.jpg


Rough in of new shape done, with a little bit of breakthrough I might add. The thickness of the front of the helm is thinner than the rest and will need a slush coad of rondo to bulk it up.
141.jpg


I find the pep came out rather round a bubble shaped on the cheeks, so I will be changing the angle of the front, creating more of a 55 to 60 degree pitch from over the breathers to the visor line.
145.jpg


Smoothing out some of the work and roughing in the new shape.
147.jpg


A nice coat of spotting putty helps get rid of the low spots and tooling marks.
151.jpg


Just about good to go, all that remains are a few little chips to fill and some pep paper showing that needs to be super glued and sanded.
158.jpg


Oh crap! I knew that I forgot to include something. Sorry folks!!! I forgot to show what the nose did look like. It was warped for the same reason as stated earlier. What I ended up having to do was push back the right side and reshape the whole thing.

Sorry that the process isn't here :cry:
I will try harder next time to make sure that I don't forget anything else! Anyways, here's how it came out:
161.jpg


Here is how the newly re-worked side looks:
163.jpg

164.jpg


That's about it for now, just have to lather, rinse, repeat for the other side; which should go much quicker now that the first side is done. I can use "playing cards to transfer the shapes across to the left side to ensure symmetry between the two halves of the front.

Ok, I had some time to work on the helmet and ended up finishing the front off. It was basically the same process as in the previous update, just had to repeat on the opposite side. I used templates to ensure that all the corresponding parts on the left would match those on the right. So, after a bit of carving, sanding, filling and measuring and then some more sanding and carving and then one last final complete coating of glaze, here is where I ended up:
186.jpg

187.jpg


And then some more sanding....
Which gave me this:
193.jpg

194.jpg


And let's not forget the underside of the chin, yet again...
195.jpg


Once again, my impatient side kicked in and I was once again compelled to shoot some primer onto the front of the helmet, just so I could see how it looks!
210.jpg

211.jpg

212.jpg

213.jpg

215.jpg

217.jpg


Actually, the primer helps out with seeing all of the small imperfections and any highs and lows that there may be which were not visible when it looked like the Technicolor Dream Helmet.

That's about it for now. Next will be the details on the underside of the brim. I also may return to the back of the helmet as there is a feature that I may want to add to the underside of the back. But... that's another topic for another update...

Then & Now.
Front-Then--Now.jpg
 
Last edited:
re: CEREAL KILLL3R'S - Halo 3 MK VI Comprehensive wip

Update time...
It's been a few days since I've posted anything of interest. So here goes. I've started working on the underside of the brim. I will explain step by step what I have done as I go.

I've taped off the brim to contain the overall shape of the layer that I will be adding. When complete it will be about 2.5mm high and be recessed by about 2mm from the outer edge of the brim.
221.jpg


Applied the first of two coats of filler, this first coat will act as a 'foundation' for the overall detail. Once the filler cures up to a rubbery solid I will **gently** pull back the tape piece by piece while pressing down on the adjacent side to prevent lift off.
227.jpg


Once the tape is removed, I clean up the outer edge of the layer with a razor blade; reinforcing it's shape.
231.jpg


After the second filler coat is applied and has cured fully the measuring starts. As shown in the image above, I clean the outer edge of the shape. I do this for 2 reasons;

1. It is far less sanding later, preventing any possible damage to the underlying brim.
2. It gives me a smooth reference point that allows me to completely level this new layer.

What I do it draw a line to indicate the final overall height of this layer. This line goes around the whole piece at about 2.5mm off the face of the brim. Once the line is committed, using a smoothing file; I file the perimeter of the layer on a 45 degree angle bringing the height down to the pencil line I made earlier that outlines the layer. This makes the outer edge uniform and level around the whole layer.

Next, I shade in another line around the face of the layer (as seen below). I use a rasp (flat and level) on the layer and from left to right begin removing material slowly and evenly. Because the outer edge of the layer is on a 45 degree angle, when I file against the face of the layer it will not remove any further material from the outer edge until the piece as a whole is filed down to that level. When the shaded line begins to fade, I stop as that area is now level with the outer edge, and I move on to the right.
239.jpg


Once the rough filing is done, I'm left with a nice level surface.
242.jpg


After a sanding with 120grit, I glaze the whole area with spot putty to fill in all tooling marks and sanding lines.
247.jpg


Once the glaze is cured, it gets another sanding with 120.
251.jpg


Lather, rinse, repeat...

Once again setting up, now to do the final under brim details. I thought about doing this after the face with foam or plastic pieces, but I figured... what the hell. I'm here now, why not go a bit further.
253.jpg


Lather, rinse, repeat... yet again!
257.jpg

262.jpg

266.jpg


As I wait for the glazing layer to dry, I figured that I would take some profile pictures to show the overall look of the additions to the brim. The lower of the two layers that I added blends perfectly with the existing chamfer from the side of the brim. Everything is smooth and equal.

This is as far as I will take it today, not because I'm tired, but because this glaze must cure completely or it will have a crumbly consistency and I will just have to do it over again. I'll pick up from here later today with a final sanding and the top layer will get cut up into its final shapes.
271.jpg

279.jpg


Another Update...

Ok this one going to fell rushed, as I am under the gun to get this posted before I have to leave. So here we go!

Under brim sanding... Done! Next it to measure and mark, measure and mark and then measure some more to get the final position for each individual cut out for the panels.
285.jpg

What a pain in the A$$ this was!!!

Moving very slowly with my rotary tool with no real room to speak of, I finally got the panels cut out. Next I will purposely "dull down" the sharp angles of the panel details and round them over. It will make the whole area flow much better.
294.jpg


Did a little more sanding, applied some spot filler to any little chips or scratched. Also rounded over all the panels. Left the helmet out for a tan and to help cure the spot putty more quickly.
298.jpg


And the impatient side once again shows it ugly head!! A coat of primer to see if there are any imperfections! (That sounds better than "I just wanna see how it looks!!")

But... Here it is.
302.jpg

303.jpg

304.jpg

305.jpg

306.jpg


Update... well a small one.

It's amazing that it's all the little things that need doing that take the most time. Although the pictures below might seem somewhat uneventful, they actually are!! lol

All that has been happening over the last 4 - 5 days is putting in the little details and getting rid of the little imperfections. It is quite time consuming! One thing I did do was test fit a visor that I have on hand and figure out where the mounting points will be for it. Over this weekend I will be ordering the visors that I will be using for this helmet which is kind of a Bitter/Sweet situation. Once I'm done with cleaning up the helmet I will be at a standstill until the visors arrive HOWEVER!!!... what this does mean is I can move on without upsetting my "not working on multiple parts rule!!!

So that being said, tomorrow once I finish the cleanup on the helmet I will just give it a quick coat of primer, then move on to pepping out the torso and work on it until the visors arrive!

Anyways... here are some pics of the work that's slowly been done over this work week:
DSC_0339.jpg

DSC_0340.jpg

DSC_0343.jpg

DSC_0345.jpg

DSC_0352.jpg


I also started roughing in some more of the battle damage...
DSC_0353.jpg


Well, like I said... the pictures look quite uneventful! Sorry about that
However, I promise there will be more to come this weekend...

This will be the last update for the helmet until I order and receive the visors so I can continue working on it, up next will be the torso and maybe the hand plates too (only because I will be trying my hand at sculpting them out of clay. Thank you Tony for the inspiration!!!

Now to business...
Rather than blab on with a bunch of words, I'll keep it brief and only point out the key features. I rounded over the two ports on the top front left and right of the helmet. I much prefer the flow like this! Also, I added separation detail between all of the helmet pieces to enhance the look that they are all separate parts of a whole. This is most noticeable on the details above the brim line.

Anyways... here are the pictures. The detail level is final, other than paint and final battle damage... ENJOY!!!
346.jpg

366.jpg

369.jpg

372.jpg

373.jpg

381.jpg

382.jpg

384.jpg

387.jpg

394.jpg


And finally, just one reference shot! :D
399.jpg
 
Last edited:
re: CEREAL KILLL3R'S - Halo 3 MK VI Comprehensive wip

Dear god this is one of the nicest helmet I have seen in awhile!
 
re: CEREAL KILLL3R'S - Halo 3 MK VI Comprehensive wip

Wow! You Sir are the Bondo master. I'm amazed of the level of detail. I've been working with bondo for a long time and I know the amount of work that has to go in to get that much detail. And you've shown me somthing new with getting the shape you want with tape first. Do you use razor blade to get into those little crevices? Do you mind telling me what tool you use? Thanks and kudos to you on a job well done.
 
re: CEREAL KILLL3R'S - Halo 3 MK VI Comprehensive wip

what an incredible first couple of posts. That is one of the best spartan helmet builds I have seen, Easily one of the best helmets out there. Your work with the body filler is fantastic, to build those details with the filler when most would have gone with styrene is something else. Such clean and well though out work process.

Look forward to seeing the chest piece.
 
re: CEREAL KILLL3R'S - Halo 3 MK VI Comprehensive wip

Dear god this is one of the nicest helmet I have seen in awhile!

Thank you Rdmaul!

Wow! You Sir are the Bondo master. I'm amazed of the level of detail. I've been working with bondo for a long time and I know the amount of work that has to go in to get that much detail. And you've shown me somthing new with getting the shape you want with tape first. Do you use razor blade to get into those little crevices? Do you mind telling me what tool you use? Thanks and kudos to you on a job well done.

I could not agree with you more! It takes much work and thought when working with bond, as once it's set... it set! Thank you for your kind words!

Hrm... It's kind of hard to explain in text form, however I have put a link to my YouTube channel in the Signature line of my posts. There is some pretty good information about working with bonds/rondo/resin.

what an incredible first couple of posts. That is one of the best spartan helmet builds I have seen, Easily one of the best helmets out there. Your work with the body filler is fantastic, to build those details with the filler when most would have gone with styrene is something else. Such clean and well though out work process.

Look forward to seeing the chest piece.

Thank you very much for your kind words welshwarrior!


Just a note to all who may view this thread:
The helmet is complete as of current date, however it takes me some time to post this build thread in it's entire size in one shot.

I will be posting the remainder of this build thread sometime today!

Hope everyone enjoys!
 
re: CEREAL KILLL3R'S - Halo 3 MK VI Comprehensive wip

CHAPTER 2 - PUFF OUT YOUR CHEST!

Chest piece and ab plate have been pepped out over the last couple of days and and have realized that I really don't like hot glue! I just presents so many problems down the road when detailing the piece. Whenever you cut in, the hot glue will be there waiting for you, ready and willing to cause you more work. Now that being said and as I believe I have stated before; This is only an issue if you plan on cutting into the piece, which of course I have every intention of doing!


Here are the spec's for the chest piece:
- Pep MK6 Flyingsquirl HD
- Build Height = 508 mm

407.jpg

409.jpg

412.jpg

413.jpg

418.jpg


My goal with this piece is 100% game accurate!!! (as per H3)
That means there will be a lot of work that will need to be done, as there are many things that are not present on the pep file that will need to be there for this to be fully game accurate.

I will show all of the changes I will be making on pictures in following posts.


*** ANNOUNCEMENT ***

I have decided that I will update with pictures (as per normal) as well as videos that will give a much closer and detailed look at my approach to this build showing how the changes are made.

So on that note, I hope everyone enjoys and are continued to be entertained;
As there is much much more to come!

As usual, comments/questions/crits always welcome!


Okay, Moved ahead a little on the chest piece. All I managed to get done yesterday was to resin the outside of the chest piece.
DSC_0419.jpg

DSC_0422.jpg


Tonight I spent my time making my first video video of the installment! So... here we go:

For some people, the subject of my first video may be something that's already known. But for those who are new to pepping and what not, may learn something!

As promised... Here we go!

********************************************
EPISODE 1 - RESIN COATING YOUR ARMOUR!


********************************************


Alright, got some more work done. Rondo coated the inside of the chest piece, and cut it in half with no incident!
DSC_0425.jpg

DSC_0428.jpg


Here is where I split the chest piece:
DSC_0427.jpg

DSC_0429.jpg


And finally, just to see how it fits...
DSC_0431.jpg

DSC_0432.jpg

DSC_0440.jpg


Overall, I think it fits well, it does need some tweaking, but nothing too major.


Here is the next installment in my video series, as promised!

********************************************
EPISODE 02 - RONDO COATING YOUR ARMOUR & CUTTING A CHEST PLATE


********************************************


Ok...
Started working on the chest piece, I basically started with the largest surface and will move outwards from there. I will complete the "right" side of the chest piece, once done I will follow up with a video on the left.

I printed up some reference pictures and started hacking away, rounding the pectoral to it's rough final shape...
DSC_0016.jpg

DSC_0019.jpg


Slapped on a nice thick coat of bondo to get rid of all the low spots... and there were plenty!
DSC_0024.jpg


Sanding, sanding, sanding...

Using a rasp, I first knocked down any hooks and raised spread marks, then did a thorough pass with a random orbit sander using 120grit. Finally a manual sanding with 220grit with a foam backer as to not leave focused finger pressure. Happy with how it is looking so far...
DSC_0034.jpg

DSC_0037.jpg

DSC_0033.jpg


Finally, some glazing putty to fill in any pits and scratches.
DSC_0041.jpg

DSC_0039.jpg


Ok, the visors I had ordered came in, so back to the helmet we go!!!


I had thought much about HOW I would go about mounting the visor to the helmet. From what I have learned, the MK VI gives little mounting space for the visor! So I had to do what I do best... Get Creative!!!

I have decided to go the route of Cap Screws mounted at key locations inside the helmet.
01.jpg


These Cap screws would then be encased in a 50/50 mix of Rondo. I built the box that the rondo would fill, out of playing cards.
03.jpg


As far as actually mounting the visor, I will be using #10 Nylon Screws as they will not be able to scratch the visor and can be cut to final length with ease!
02.jpg


Before the Rondo is poured, I thread in one of the nylon screws so that the rondo mix cannot fall in from the top. It should be noted that at the bottom of the Cap Nuts, I placed some hot glue so the rondo could not enter when the box was filled. Here is after the pour:
04.jpg


Once the Rondo starts to heat up and cure, I peel off the hot glue and playing cards with great ease thanks to the thermal properties of the Rondo!
05.jpg

06.jpg


What we end up with after a couple hours of curing is a solid block mount with great counter-torque strength; like this:
07.jpg


Part II - The Nerve Wracking Cuts!!

I taped up the front visor with Green Painters Tape as it contains no harsh chemicals in the glue that have a chance to damage the iridium coating on the visor. Once taped, I drew on the shape and size of the detail.

Once I managed to calm myself down, I picked up my rotary tool and attached a 1/32" thick, 30 tooth zirconium cutting wheel and began to Carefully and Slowly cut out the patterns.
08.jpg


Once done, I went over all of the cut lines with a precision needle file to de-burr all of the edges. Once that was done, I broke all of the hard edges with 1000Grit wet sand paper.

Here is where I am now...
F14.jpg

FL9.jpg

FL11.jpg


I am quite happy with how the visor came out
I still have to epoxy all the open spaces, but once that's done it's time to figure out the lighting and breathers.

As per normal, and question/comments always welcome! Thanks to all those following along!!


.
 
Last edited by a moderator:
re: CEREAL KILLL3R'S - Halo 3 MK VI Comprehensive wip

ANOTHER UPDATE!

Ok, a lot of little things have transpired that don't end up looking like a whole lot has happened.
But... much has happened!


First thing first;
Visor seal... Done!
I used plastic epoxy to add the necessary fill for the gaps between the opening and the visor. Wrapped the visor in two layers of plastic wrap and started filling.
0191.jpg


One thing that I reluctantly had to do was cut off the visor's side details as they were interfering with the installation of the visor itself.

I will have to re-add these later on, but this can also be viewed as a positive as now the pieces will flow perfectly as I will use the visor for a backing when I rebuild them.
0193.jpg


Here's how the visor fits now:
0199.jpg


Onward!
Time to make the breathers for the sides of the helmet

Now... Personally... I hate how the breathers always come out. I am not a big fan of using the traditional Wiring Loom that many people use, I find it doesn't look right. There are always too many ridges and... well... it looks like Wiring Loom!

So, I decided to make life difficult for myself again and fabricate a part from scratch! Here's a step by step of what I did:

Items used are:

1. Rubber automotive vacuum hose.
0202.jpg


2. Some ridged plastic for the backer plate.
0203.jpg


3. A metal coat hanger which will be cut to the length of the pieces of hose and inserted to act like a spine as to hold the hose in the position of my choosing.
0204.jpg


Other items user were:
- Hot glue
- Popsicle Sticks / Tongue Depressors
- Petroleum Jelly
- Fine paint brush
- Needle Nose Pliers
- Cutters (for the coat hanger)

Basically what I did was make a template of the backing for the breather area, then I transferred that shape to the plastic and cut it out with my rotary tool. Then sections of hose were cut to length with a corresponding piece of coat hanger inserted inside the hose pieces.

With pliers I then bent the pieces of hose/wire into the half moon shape that was needed for the breathers. They were then one by one hot glued to the plastic backer plate.
0205.jpg

0206.jpg


Once all the pieces were glued into position, I took a Popsicle stick and cut it into little pieces to be used as spacers. These spacers were then wedged between each piece of hose to provide a proportional gap.
0207.jpg


Once this was done, I brushed Petroleum Jelly on the sides of adjacent pieces of hose going about half way down. This would ensure that the hot glue would not stick to the covered areas and only the areas below. The point of this is to create the look of a corrugated hose.
0208.jpg


Once done with the hot glue, I wiped everything down to get the P.J. off of the piece. All of the hot glue slid down and stuck only where there was no Jelly.
0209.jpg


Time for a test fit!
0213.jpg


Lather, rinse, repeat...
0228.jpg


Done!
All I did was throw a little shot of hot glue onto the backs of the breathers just so they don't fall off for now.

NOTE:
These breathers will not actually be used on the helmet. I built these pieces for the sole purpose of molding/casting them into single solid pieces. I feel that there is just too much "stuff" in them, too many parts to be dependable and considered a permanent fixture.


Anyways... Here is how things are looking now:
0239.jpg

0241.jpg

0244.jpg


I can't believe that this helmet is almost done! It has taken some time to get to this point. I would safely assume about 100 Hrs and there is still some more to go!

All that is left to do is rebuild the visor side details, find and install the LED's flashlights and install the padding and internal wiring.

I will be doing something special with regards to the wiring, but that is a surprise for a later date.


Alright, I've managed to get some of the small and time consuming details out if the way:

- Re-created the black visor side details.
- They were over top of the visor, now they are recessed behind it.

- Installed the side light covers
- They are not wired in yet. All the electrical will be done once all of the outside work is complete.

- Painted all the black parts.
- Please excuse the rough look of the black, it's not quite finished as of yet! I just had to get some color on this thing, the dull primer was killing me!


DSC_0258.jpg


DSC_0261.jpg


DSC_0263.jpg


DSC_0270.jpg


DSC_0275.jpg


DSC_0279.jpg


All the remaining painting will be done this weekend.

Here, the painting process has begun!
DSC_0315.jpg


I have so much to say...
However, rather than blab away, I figured that I would rather just let everyone see for themselves!


Below is a video that shows the completed helmet!
ENJOY!!!

************************************************** *************
Making Master Chief: Episode 03 - Mk VI Helmet Complete


************************************************** *************


And of course...
Here are the pictures:


DSC_0343-1.jpg


DSC_0345-1.jpg


DSC_0348.jpg


DSC_0349.jpg


DSC_0350-1.jpg


DSC_0352-1.jpg


DSC_0357.jpg


DSC_0358.jpg


DSC_0364.jpg


DSC_0365.jpg


DSC_0366.jpg


DSC_0369.jpg


DSC_0372.jpg


It's been a long few days...
But words cannot express how happy I am to have finished my first ever pep piece! I couldn't be happier with it!


I hope you all enjoy!
Any questions/comments/critiques... as usual always welcome!
Dave/Cereal


.
 

Attachments

  • 0191.jpg
    0191.jpg
    271.4 KB · Views: 155
  • 0193.jpg
    0193.jpg
    316.5 KB · Views: 148
  • 0199.jpg
    0199.jpg
    255.5 KB · Views: 163
  • 0202.jpg
    0202.jpg
    149.4 KB · Views: 162
  • 0203.jpg
    0203.jpg
    156.5 KB · Views: 156
  • 0204.jpg
    0204.jpg
    203.3 KB · Views: 149
  • 0205.jpg
    0205.jpg
    162.3 KB · Views: 156
  • 0206.jpg
    0206.jpg
    141.5 KB · Views: 143
  • 0207.jpg
    0207.jpg
    236 KB · Views: 152
  • 0208.jpg
    0208.jpg
    244.2 KB · Views: 156
  • 0209.jpg
    0209.jpg
    240.3 KB · Views: 154
  • 0213.jpg
    0213.jpg
    191.4 KB · Views: 138
  • 0228.jpg
    0228.jpg
    166.5 KB · Views: 156
  • 0239.jpg
    0239.jpg
    411.8 KB · Views: 153
  • 0241.jpg
    0241.jpg
    417 KB · Views: 153
  • 0244.jpg
    0244.jpg
    419.3 KB · Views: 141
  • DSC_0258.jpg
    DSC_0258.jpg
    386.2 KB · Views: 154
  • DSC_0261.jpg
    DSC_0261.jpg
    359.8 KB · Views: 147
  • DSC_0270.jpg
    DSC_0270.jpg
    360.9 KB · Views: 144
  • DSC_0263.jpg
    DSC_0263.jpg
    379.9 KB · Views: 128
  • DSC_0275.jpg
    DSC_0275.jpg
    388.5 KB · Views: 153
  • DSC_0279.jpg
    DSC_0279.jpg
    372.6 KB · Views: 149
  • DSC_0315.jpg
    DSC_0315.jpg
    349.4 KB · Views: 148
  • DSC_0343-1.jpg
    DSC_0343-1.jpg
    363.7 KB · Views: 147
  • DSC_0345-1.jpg
    DSC_0345-1.jpg
    386.6 KB · Views: 141
  • DSC_0348.jpg
    DSC_0348.jpg
    369.1 KB · Views: 145
  • DSC_0349.jpg
    DSC_0349.jpg
    389 KB · Views: 152
  • DSC_0350-1.jpg
    DSC_0350-1.jpg
    386.5 KB · Views: 153
  • DSC_0352-1.jpg
    DSC_0352-1.jpg
    414.7 KB · Views: 144
  • DSC_0358.jpg
    DSC_0358.jpg
    384.4 KB · Views: 148
  • DSC_0357.jpg
    DSC_0357.jpg
    372.7 KB · Views: 143
  • DSC_0364.jpg
    DSC_0364.jpg
    412.5 KB · Views: 146
  • DSC_0366.jpg
    DSC_0366.jpg
    348.8 KB · Views: 139
  • DSC_0365.jpg
    DSC_0365.jpg
    379.1 KB · Views: 145
  • DSC_0369.jpg
    DSC_0369.jpg
    377.8 KB · Views: 153
  • DSC_0372.jpg
    DSC_0372.jpg
    448 KB · Views: 136
Last edited by a moderator:
re: CEREAL KILLL3R'S - Halo 3 MK VI Comprehensive wip

You have some interesting techniques. I appreciate the information, and I"ll put it to good use whenever I have the time to work on my own little project.
 
re: CEREAL KILLL3R'S - Halo 3 MK VI Comprehensive wip

Thanks for the tutorials. Goes to show that my work still needs improvement. Thats why this hobby is great cause anyone can make a costume but your part of the elite few take it to the next level and make into an Art form. Thats my goal :)
 
re: CEREAL KILLL3R'S - Halo 3 MK VI Comprehensive wip

You have some interesting techniques. I appreciate the information, and I"ll put it to good use whenever I have the time to work on my own little project.

Thanks mexicutioner!
There are many tips/tricks and processes that anyone could use for inspiration. That was the whole point of this build thread... to help people! :)

Thanks for the tutorials. Goes to show that my work still needs improvement. Thats why this hobby is great cause anyone can make a costume but your part of the elite few take it to the next level and make into an Art form. Thats my goal :)

Hey Doc,
Thank you for your praise! You're very welcome for the tutorials! I just want to build/create props and costumes in a way that when you look at them, you can't help but shake your head and smile! Being able to help others, is always a bonus!

Dave/Cereal
 
re: CEREAL KILLL3R'S - Halo 3 MK VI Comprehensive wip

UPDATE TIME!

Just a reminder to those who are following along, I will be doing the left side of the chest only. As I plan on doing a video for the right side. The video will cover a great deal of work, including "battle damage", "creating layers", "smoothing and leveling" as these are the question's that I am asked about most frequently.

I'll be following the same process that I used for the helmet:
- Work in sections
- Rough in the final shape
- Do mod's as needed
- Primer coat
- (lather, rinse, repeat. Until the whole chest is done)
- Lay in all the final details and final smoothing done.


Back to the chest piece we go!

Same as in the last chest update, a couple weeks ago; first I knock down all of the pep joints and high spots. I also rounded over all of the sharp angles to give a more fluid look.

DSC_0374.jpg


A nice coat of bondo to smooth out all the joints and fill any sags or valleys caused by the resin/rondo. Once cured, start shaping the area to rough final.
DSC_0376.jpg


A coating of glazing putty to fill any scratches and tool marks. The glaze also helps out in rounding over all of the "inside" corners, giving even more of a smooth look.

DSC_0380.jpg


Sanding, sanding and more sanding. The area is now at a point to be considered "Rough final shape" so this is where we stop! **I can't stress enough... STOP!!! All to often, I see people bring their work to a "final state" too early. What ends up happening is when working on the rest of the piece, the final work gets damages, nicked, scratched and or gouged. You also have to worry about blending the other side into this one, any adjustments you end up having to do will mean you have to "rework this section" again! So, let's work smarter... not harder!!***

DSC_0390.jpg


Here you can see the difference that rounding over all of the sharp points and angles has made. The piece looks like a metal casting, not something that was chiseled out.

DSC_0394.jpg


And finally, some primer. Primer is your best friend!! It allows you to:

- See where you are sitting as far as smoothness.
- Will highlight any scratches, pits and rough marks.
- Helps protect the work you just did.
- Looks a lot better too!

DSC_0408.jpg

DSC_0415.jpg


I purposely did not complete the top and bottom area where the front plate connects to the back plate. Those areas will be completed once the chest is re-joined, for a more perfect fitting look.

I get the whole day to work on the chest, If all goes according to plan, the left side should be "rough completed" by the end of the day! Updates will follow.


To finish off the left side of the chest there was one more thing that needed doing...


The locks that bind the front and back of the chest armour. I don't think that I've ever seen these added on a build before on the Mk VI. Below is a reference picture of the locks on the upper chest on either side. (Thank you Church and Washington for posing!)

ChurchWash.jpg


Let us begin!
Now that the primer is nice and dry, I sanded down the whole side of the chest just to get rid of any inconsistencies and added spot filler where needed.

DSC_0424.jpg


Smoothed and rounded out the sharp edges in the recess for the plate locks.

DSC_0433.jpg


Sanded everything smooth and started to mark where everything is going to go.

DSC_0434.jpg


The usefulness of playing cards! I built a template in which I plan on pouring a 50/50 mix of rondo to build up the lock latch. After some careful measuring and cutting, I hot glued (low temp) the cards in place making a dam.

DSC_0439.jpg


After the pour, when the rondo heated up I pulled off the template. Once cured I sanded everything to a nice even surface.

DSC_0446.jpg


Here I'm taping off the inner area so I can build up the perimeter of the latch base. I will add straight bondo to build up the lip.

DSC_0450.jpg


Added the bondo layer and sanded to a rough finish.

DSC_0462.jpg


Lather, rinse, repeat for the outer flared edge of the lock assembly.

DSC_0467.jpg


More sanding and shaping...

DSC_0469.jpg


Added a nice coat of spot putty to smooth everything out and create a arced transition up the side of the ledge so it is not a sharp corner.

DSC_0477.jpg


One final finish sanding with 220 grit to bring it to its final shape.

DSC_0482.jpg


Primer!! Oh how I love thee!

DSC_0504.jpg


Done for now! Here's the overall look of the chest.

DSC_0516.jpg


DSC_0529.jpg


I'm quite happy with how it came out. It took some extra work, but in the end it was totally worth it!!!


As usual, comments/questions always welcome!


Dave/Cereal.

 
re: CEREAL KILLL3R'S - Halo 3 MK VI Comprehensive wip

Dave, WOW..just wow! That is by far the most accurate paint scheme I've ever seen!! I can't wait for more.
 
re: CEREAL KILLL3R'S - Halo 3 MK VI Comprehensive wip

Dave, WOW..just wow! That is by far the most accurate paint scheme I've ever seen!! I can't wait for more.

Well thank you!
It was my first ever attempt at painting in this fashion. It was very nerve wracking while doing it!

More to come!


Dave/Cereal
 
re: CEREAL KILLL3R'S - Halo 3 MK VI Comprehensive wip

Update!.. With some pictures.


Nothing to special tonight, this evening I was in the backyard with the kids and found that I really liked the lighting that was out. So, figured I would take advantage of it as I had yet to take and decent outdoor pictures of the helmet.

Thought that I'd share!


DSC_0593.jpg


DSC_0589.jpg


DSC_0575.jpg


DSC_0571.jpg


Well, that's about it for now. Hope you liked!
Anyways, Video Episode #4 should be out in the next couple of days where I'll be finishing the right side of the front chest. It will be covering a lot of different techniques and bonus things like battle damage (for those who are interested)


Till then,
Dave/Cereal.
 
re: CEREAL KILLL3R'S - Halo 3 MK VI Comprehensive wip

VIDEO UPDATE!


As promised, here is video Episode #4

In this episode we begin the work on the right side of the chest plate. Enjoy!


************************************************** *************
Making Master Chief: Episode 04 - Smoothing And Shaping Your Pep Work


************************************************** *************


I hope that everyone is finding the videos to be helpful, I hope that they are providing some good information and ideas. But most of all, I hope that people are enjoying them!! If there is anything that you would like to see covered, please let me know and I will do my very best to cover it in up-coming videos!

As usual, questions/comment.... always welcome!


Till next time,
Dave/Cereal
 
Last edited by a moderator:
re: CEREAL KILLL3R'S - Halo 3 MK VI Comprehensive wip

WOW!... Your helm reminds me a lot of my Ironman helm...:):thumbsup

But you've done more amazing techniques than I did... You are one very talented craftsman/artist... It's really a pleasure to see someone with exceptional talent and sharing it to the community...:):thumbsup

Congratulations my friend! and welcome to the community :thumbsup

cheers!
 
re: CEREAL KILLL3R'S - Halo 3 MK VI Comprehensive wip

Best Master chief helmet ever!

Can you explain how do sand the undercut in the helmet and have a nice and smooth finish.

Thanks
 
re: CEREAL KILLL3R'S - Halo 3 MK VI Comprehensive wip

WOW!... Your helm reminds me a lot of my Ironman helm...:):thumbsup

But you've done more amazing techniques than I did... You are one very talented craftsman/artist... It's really a pleasure to see someone with exceptional talent and sharing it to the community...:):thumbsup

Congratulations my friend! and welcome to the community :thumbsup

cheers!

Thank you for the praise :)
I've seen you're Iron Man helmet build also, your attention to detail it quite good as well! So far I really like it here, boat loads of super talented, friendly and helpful people! :)

Best Master chief helmet ever!

Can you explain how do sand the undercut in the helmet and have a nice and smooth finish.

Thanks

The underside of the brim is somewhat annoying to sand and cut. There was no real secret way in which I did it, First of all, the brim was done in layers. Once the layer were done, I just marked all of my cut lines, scored them so I wouldn't have any "chip out" then slowly and steadily cut them out with a rotary tool with a flex shaft. Then once done, I sanded down with 220 grit and rounded over all the sharp edges.

This is covered in the build thread with step by step pictures and info... somewhere... ^^ Up That Way ^^ lol...

Sorry about the extremely long posts, btw...


Dave/Cereal.
 
This thread is more than 9 years old.

Your message may be considered spam for the following reasons:

  1. This thread hasn't been active in some time. A new post in this thread might not contribute constructively to this discussion after so long.
If you wish to reply despite these issues, check the box below before replying.
Be aware that malicious compliance may result in more severe penalties.
Back
Top