cayman shen
Master Member
I was going to go as Walter White this year, but decided I really wanted to do something horror themed, as that's a huge part of my Halloween obsession: I love the macabre.
In years past, I've always wanted a cool costume, but balked at spending money and procrastinated, so ended up with something forgettable, halfhearted, and lame.
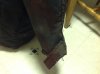
This year I decided on my fave horror killer Jason Voorhees. BUT, I knew I couldn't afford to do any of my three favorite versions (7, Vs., Remake). And though the work shirt and gray pants of part 3 are simple, they're too clean. I like ratty, hobo, zombie Jason. In his new green work shirt, he looks like Bob Villa.
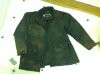
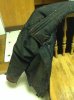
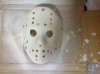
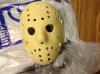
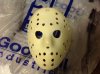
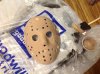
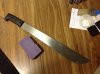
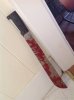
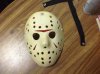
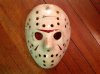
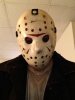
So I went to Goodwill with the plan to do a custom Jason in the spirit of the remake look. I bought a jacket there. On ebay I got a cheapie mask. I used my own tee, pants, and boots. I bought a machete and some paint at Walmart. Total: about $55. That's about my limit. Making something cool is all down to effort and creativity now...no more purchases! Unfortunately, I'm spotty in the creativity department. I also have a history of not finishing things. I was determined to see this through though.
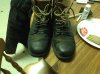
The boots were easiest: a little black paint, and voila.
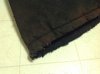
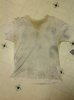
The tee was already a bit mangy. I weathered it with a serrated bread knife, mists of black spray paint, mists of dye made from magic marker inserts soaked in water, and I stained the sweatiest areas with coffee. This shirt smells vile. I couldn't capture it on camera, but the weathering is more subtle than it appears here. Still, this was step one, and the poorest done. Thankfully most of the worst errors will be hidden.
In years past, I've always wanted a cool costume, but balked at spending money and procrastinated, so ended up with something forgettable, halfhearted, and lame.
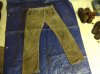
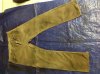
This year I decided on my fave horror killer Jason Voorhees. BUT, I knew I couldn't afford to do any of my three favorite versions (7, Vs., Remake). And though the work shirt and gray pants of part 3 are simple, they're too clean. I like ratty, hobo, zombie Jason. In his new green work shirt, he looks like Bob Villa.
So I went to Goodwill with the plan to do a custom Jason in the spirit of the remake look. I bought a jacket there. On ebay I got a cheapie mask. I used my own tee, pants, and boots. I bought a machete and some paint at Walmart. Total: about $55. That's about my limit. Making something cool is all down to effort and creativity now...no more purchases! Unfortunately, I'm spotty in the creativity department. I also have a history of not finishing things. I was determined to see this through though.
The boots were easiest: a little black paint, and voila.
The tee was already a bit mangy. I weathered it with a serrated bread knife, mists of black spray paint, mists of dye made from magic marker inserts soaked in water, and I stained the sweatiest areas with coffee. This shirt smells vile. I couldn't capture it on camera, but the weathering is more subtle than it appears here. Still, this was step one, and the poorest done. Thankfully most of the worst errors will be hidden.
Attachments
Last edited: