Scratch/Scrap Build Mech Warrior Alien Invasion - Original Design - WIP - Pcoz

Pcoz

Well-Known Member
Hello everybody....

I decided to take a break from painting my transformers wall and started a smaller side project.

I hadn't decided to post it until I stumbled upon TheNylonGag MK1 & MK2 threads and his fantastic scratch builds while I was doing a little research. I am by no means the engineer that he is but I thought I'd give it a shot anyway. I am using mostly foam board, balsa, pvc pipe, and just about anything I can find in my house or garage ! This is my first scratch build project so any advise anyone should have, please feel free to dish it out !

The basis for this design is to have a two manned (one rear facing gunner) Mech Warrior on a foreign planet with multiple indigenous aliens attacking them. I have a loose picture in my head, but pretty much making this up as I go.......

Here we go:

My goal is to build out the larger shapes and then really pull it together with the details.....

Here is the base pod/cockpit where I will be attaching the arms, legs, weapons


20140727_181551.jpg


Some details on the hand and the original control panel


20140727_181755.jpg


potential rockets....haven't decided yet


20140727_181734.jpg

Right Arm with Cannon yet to be attached


20140727_181531.jpg


Parts and pieces

20140727_181518.jpg


Did not like the original cockpit. had a cake topper golf cart laying around and cut it up for parts.


IMG_5384.JPG

IMG_5393.JPG


Foam filled with drywall plaster

IMG_5394.JPG


sanded

IMG_5395.JPG


just so happens the frame of the golf cart looks like the perfect joysticks to operate this mech !

IMG_5403.JPG

IMG_5411.JPG

golf cart greeblies....

IMG_5412.JPG


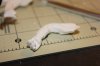
I decided to start the pilot because i will need get all the interior done first.

IMG_5418.JPG


IMG_5420.JPG


IMG_5421.JPG


Let the little dude dry for a day then started to carve him up....


IMG_5568.JPG


dry fit...thumbs to delicate to carve will have to be added later


IMG_5573.JPG


dry fit to cockpit

IMG_5577.JPG

IMG_5581.JPG


this is where i am now....just trying to figure out the style of the pilot and helmet.....

Thanks for checking this out and I will be posting updates soon.

Pcoz
 

Attachments

  • IMG_5570.JPG
    IMG_5570.JPG
    5 MB · Views: 148
Last edited:
Thanks Chaank.....

It looks a little rough around the edges but trust me, I will pull this one out....lol

Pcoz
 
*****UPDATE*****


Got a little more done today.

Decided to start working on the inside and try to get it finished so I can move to the outers.....


Of course my guys gonna need a fire arm.....Probably attach to his leg or maybe over his chest.


IMG_5620.JPG


Painting the innards.... Used a drywall repair mesh for the floor. Thought it had a good look.


IMG_5622.JPG


IMG_5625.JPG


IMG_5634.JPG


IMG_5637.JPG


IMG_5639.JPG


IMG_5641.JPG


IMG_5642.JPG


IMG_5644.JPG

This is about as far as I've got....Thanks for looking


IMG_5647.JPG


Pcoz
 
*******UPDATE*******

Well, got a little more done with the project. It's been fun trying to figure it out on the fly and really making it up as I go along.

I find myself in stores looking at parts and pieces of things to see if they'd fit into my build.....kind of disturbing, but I'm sure most here would understand.

On to the pic's

Rockets or jet packs...not really sure why, but I wanted to include them. To that end, I will probably have to include some type of expandable wing system as if it really were able to fly.


I had a few items laying around...electrical ends, water test bottle containers, etc.


IMG_5672.JPG

A few pvc 45 degree elbows, foam board...


IMG_5674.JPG

Decided to use balsa wood for my frame work. Eventually I'd like to try Plastruct or something similar, but for now, I'll stick with good old readily available Balsa.


IMG_5675.JPG


IMG_5677.JPG


IMG_5678.JPG


IMG_5680.JPG


IMG_5681.JPG

dry fitting the main pod to test best location....

IMG_5688.JPG

I don't have an engineering background, so bear with me on my lack of technical terms.
I thought a spark plug would work well to "drive" the jet pack in and out.


IMG_5704.JPG

I used foam board to sculpt some details

IMG_5708.JPG


covered the foam with drywall mud, let dry, and sanded....


IMG_5711.JPG


Fixed to jets....pretty sweet looking if you ask me....lol


IMG_5715.JPG

So, we took a spare room in our basement and turned it into "the family's" (MY) craft room.....

Thought it was funny because I don't have the blinds open much because I'm usually working at night. So one Saturday morning, I open them to this growing in the window well.....Yes, that's a big ass weed. But still adds a bit of ambiance... I kept it

IMG_5743.JPG


With the main jet packs pretty much determined, I turned my attention to fleshing out the cockpit a little.


IMG_5744.JPG

not sure where I was headed with this other than adding details


IMG_5746.JPG

As I moved through, ideas and sections seemed to make sense and built themselves


IMG_5749.JPG

I used the front of the plastic golf cart and some screen repair material to reinforce the top. I also added the hood for possible air intake


IMG_5751.JPG


IMG_5752.JPG


IMG_5759.JPG


IMG_5766.JPG

I used a small hinge and will conceal it within the build


IMG_5767.JPG

Purchased some random wooden wheels and wafers to help with the round pieces needed for rotation.


IMG_5793.JPG

Dry fitting because it will all have to come apart for final paint


IMG_5795.JPG


IMG_5798.JPG

So eventually the left arm will have a cannon attached to the top that he will be aiming/shooting.


I have a question if anyone would like to help me out...Should I leave the tops of the jets covered as they are now or open them up for air flow with exposed turbines ?

If anyone has any suggestions or ideas, I'd love to hear from you.

More to come soon.....

Thanks for looking !

Pcoz
 
****update****

Hello, it's been a while since I posted anything....

I have made much progress, so here is a bit.

I decided to move the cannon over to the left arm. So in doing so, had to change up a few things.

IMG_5801.JPG

I ended up removing those awful black foam arm bands on the left arm.

IMG_5807.JPG

working on the hand

IMG_5810.JPG


IMG_5811.JPG

here is the rough design of the cannon built from balsa, finger light, and parts from a cheap plastic hand held air pump

IMG_5816.JPG


IMG_5817.JPG


IMG_5823.JPG


dry fitting on arm

IMG_5826.JPG


IMG_5830.JPG


Primed and ready to paint

IMG_5850.JPG


IMG_5856.JPG


I wanted to paint this up to see how it was going to come out

IMG_5878.JPG


added battle damage

IMG_5885.JPG


painting in some detail

IMG_5888.JPG


IMG_5890.JPG


IMG_5895.JPG

ended up over spraying a light coat of that crackle paint to test

IMG_5917.JPG

adding pipes and wires

IMG_6025.JPG


IMG_6026.JPG


IMG_6028.JPG


IMG_6030.JPG


IMG_6033.JPG


IMG_6035.JPG


IMG_6038.JPG


Welp, that's it for now.....I have made way more progress, so that will be coming soon

again, any suggestions / comments welcome

Thanks for looking

Pcoz
 
This project kind of sat around for a long time while I did other things. I did finally force myself to finish !

So, the more I worked on this, the more I learned...so naturally, the more I changed.

I changed a LOT from the original posts, so here are some updates:

I started working on the legs but I guess I didn't take any pic's until I got to this point.

IMG_8595.JPG

I'm using parts from one of my son's toys he doesn't play with...beyblades maybe ? They are the thigh and shin sections

IMG_8604.JPG

The rest are wooden wafers, tire patch tool kit, plastic shims, wire nuts, chair wheels, foam and balsa wood.

IMG_8606.JPG


IMG_8607.JPG


IMG_8609.JPG


IMG_8610.JPG


IMG_8611.JPG


IMG_8612.JPG


IMG_8613.JPG


IMG_8616.JPG

I'll be throwing more updates up pretty quickly until it's done....

Pcoz
 
Don't judge me, I know this workplace is a disaster...lol

As you can see, I'll be using a ton of household scraps, pc speakers, cables, etc for this build.

It's going to look a little crappy for a while until I can fill it out and get a coat of primer on to unify.

I'm mainly concentrating on the form now.

IMG_8598.JPG


IMG_8601.JPG

scavenging parts

IMG_8619.JPG


IMG_8621.JPG


IMG_8622.JPG


IMG_8624.JPG

working a bit on the arms

IMG_8600.JPG

decided to redo the jet pack with a little more detail

IMG_8627.JPG


IMG_8629.JPG


IMG_8636.JPG


IMG_8637.JPG

used a foam ball to use as the a rotating base to the body

IMG_8638.JPG

parts from a McDonalds happy meal toy

IMG_8643.JPG

had this broken pc speaker I thought would be a good starting point for the mech body

IMG_8652.JPG


IMG_8653.JPG


IMG_8655.JPG


IMG_8656.JPG


IMG_8660.JPG

More to come soon...

Thanks for looking

Pcoz
 
thank you... it was really a fun project. I definitely learned a lot in the process and refined things towards the end.
 
Back with a quick update....

working on bulking up the mid section / body

IMG_8664.JPG

used an old key chain calculator cover for intake grill


IMG_8679.JPG

a few flashlight ends for exhaust

IMG_8682.JPG

Speaker cover for grill

IMG_8683.JPG


IMG_8688.JPG

I decided to do away the cannon on the arm...it just got too big, so I decided to put a gatling gun on the front


IMG_8691.JPG


IMG_8693.JPG


IMG_8737.JPG


IMG_8738.JPG


IMG_8760.JPG

Starting to build out the sides and front

IMG_8763.JPG


IMG_8764.JPG


IMG_8768.JPG


IMG_8772.JPG

I'm truly making this up as I go along, so you may see pic's where things may change from time to time depending on how things fit together.


IMG_8776.JPG


IMG_8825.JPG


IMG_8826.JPG


IMG_8831.JPG


IMG_8844.JPG


IMG_8863.JPG


IMG_8869.JPG

old mouse battery cover makes for a nice beetle type "hood"

IMG_8885.JPG

More to come real soon...

Pcoz
 
Last edited:
Since this project is complete, I started a new one this past weekend...another Hasbro x-wing conversion. It should be fun....I'd like to have it complete in 2-3 weeks.

If anyone can point me in the right direction for any w-wing reference photos, I'd greatly appreciate it. I've found a few in my limited research on the internet.

ok, let's move on....

IMG_8887.JPG

using the back of some flashlights....

IMG_8888.JPG

....and parts from liquitite fittings


IMG_8891.JPG

I fashioned some headlights to fix to the mech


IMG_8902.JPG

Chrome reflective paper lined inside and back

IMG_8907.JPG

Fed light through...will determine cover later


IMG_8909.JPG

starting to build out more of the front and add some detail / greeblies

IMG_8911.JPG

As I've said before... there is no method to my madness. Just winging it as I go. Some things worked and some didn't.

IMG_8919.JPG

More wireless mouse parts I thought would be visually interesting

IMG_8922.JPG

Used as some sort of guard / frame

IMG_8925.JPG

Obviously ran into some attachment problems that needed to be solved

IMG_8926.JPG


IMG_8927.JPG


IMG_8934.JPG

adding some more greeblies....from scrap electronic boards, wire, etc

IMG_8936.JPG


IMG_8944.JPG


IMG_8957.JPG


IMG_8959.JPG


IMG_8962.JPG

looking to build out the sides a little more, I found these cable parts

IMG_8964.JPG

wooden dowel and some balsa....

IMG_8966.JPG

I start bouncing around different parts of this mech but soon the entire model will take shape with the addition of some new improvements.

Thanks for meching it out....see what I did there ?

Pcoz
 
quick update: did not like the hands too much so I decided to cut them off and rebuild

pic's speak for themselves....balsa & foam

IMG_9150.JPG


IMG_9151.JPG


IMG_9152.JPG


IMG_9153.JPG


IMG_9154.JPG


IMG_9155.JPG


IMG_9158.JPG


IMG_9159.JPG


IMG_9163.JPG


IMG_9164.JPG


IMG_9165.JPG


IMG_9166.JPG


IMG_9169.JPG


IMG_9172.JPG


IMG_9174.JPG

more to come tonight...

Pcoz
 
ok, back to finish up the new claws....


IMG_9178.JPG

building some protective plates for each claw

IMG_9179.JPG


IMG_9181.JPG


IMG_9182.JPG


IMG_9184.JPG


IMG_9186.JPG

the idea is to have it look like hydraulic actuators

IMG_9187.JPG


IMG_9188.JPG


IMG_9190.JPG

with them fitting snug in the foam...

IMG_9195.JPG

...i can move them to the desired position and glue

IMG_9196.JPG


IMG_9203.JPG


IMG_9205.JPG

Thanks for looking !

Pcoz
 
This is one of the most anticipated ongoing build for me.
Very enthusiastic scratch build and great technique.
I am going to build a mech someday near future and this is very inspiring.

I can't wait to see the finished pics.

All the best

katsu
 
This thread is more than 7 years old.

Your message may be considered spam for the following reasons:

  1. This thread hasn't been active in some time. A new post in this thread might not contribute constructively to this discussion after so long.
If you wish to reply despite these issues, check the box below before replying.
Be aware that malicious compliance may result in more severe penalties.
Back
Top