Fine Molds Slave 1 finished the build!

Re: Fine Molds Slave 1 build. Taking it slow to get it right this time.

Having fun with the spraygun! forgot to take photo's while working. A lot of work, building up layers from light to dark.
I'm sorry mit pictures are rotated. they're okay on my mac, but the side puts them on there side every time. (double click on them will show them okay btw)
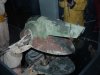
Sprayed the whole with a mixture of white and aluminium, to get a bit of a glitter. Sprayed some parts separatly since I thought it was easier to spray without them allready fixed.
Masked the green areas. Sprayed Olive green mixed with yellow. Then made the color darker/greener with blue. Sprayed over it again unevenly, to get different shades of green going on.

Then masked the parts that are dark grey/black. started of with a brown layer, then added black and neutral grey to the mixture to make it dirtier. Also used that mix for the wheatering on the skirt.
Placed the separate pieces on to do some wheatering (forgetting this would make wheatering stop suddenly)
Sprayed some alluminium lightly over everything to get the metallic back a bit.

IMG_3733.JPG
give these pieces a lot of the aluminium mix. Will be wheatered more after the wings are on to blend them nicely.
IMG_3735.JPG

Isn't that a sweet spot for a lightswitch? Will not glue that part on. Will place to magnets on the back of these holes to hold it in place.
IMG_3736.JPG

Lots of colors going on!
IMG_3737.JPG
 

Attachments

  • IMG_3734.JPG
    IMG_3734.JPG
    896.2 KB · Views: 149
Re: Fine Molds Slave 1 build. Taking it slow to get it right this time.

90% done. Can't wait to start on electronics next week.

Decals were fitted and wings sprayed. Some yellows weren't decals so had to mix the right color to match them
IMG_3738.JPG

took the canopy out for the first time for a first look of the assembled ship. Saw two threads where it broke (not FM I believe, but better save than sorry). Don't wanna get scratches on it so after the shoot it went back in the bag.
IMG_3739.JPG
 
Re: Fine Molds Slave 1 build. Taking it slow to get it right this time.

Was looking at yesterdays pictures and noticed that the colors are way of compared to the model when taken by my Iphone. Especially the red is represented way to red, while it is more of a brownish red.
So i did a little shoot with my canon to give you all a better picture of the colorschemes.
IMG_0950.JPG
IMG_0949.JPG
IMG_0951.JPG
IMG_0952.JPG
Here's a photo for reference. Wings still need more wheatering. Airbrush cloughing up all the time with the black paint.
 

Attachments

  • links erg goed!.jpg
    links erg goed!.jpg
    3.9 MB · Views: 197
Last edited:
Re: Fine Molds Slave 1 build. Taking it slow to get it right this time.

Little update.

But before that there's something I want to say:
If it wasn't for this site, thit build would never have gone the direction it has taken now. I got so much inspiration looking and reading threads from jaitea, haystack hair, GF and Jake88 (among others). Thanks guys, hope you're reading this.

So back to my thread:
Have you ever have the feeling something's wrong about your build and you're not sure to take the step to do it again. I did with the hull (twice) and doing it again improved my skills in masking and making it look more like the studio model. Only problem was: The skirt stayed in the 1st stage and the more I looked at it, the more I disliked it.
Remember my comment on the pink? It's just to much in your face.
Aside from that, my masking with the sponge wasn't that great in my opinion and some panel wheatering I just missed.
So today I cleaned the whole skirt (getting better in that too, took my about an hour) and resprayd and -masked it all over again.
I kept the tone of the pink way down this time and added some drops of yellow to give it a different tone.

So here's the result, thanks for watching.

Jerome
IMG_3744.JPG
IMG_3743.JPG
IMG_3740.JPG
IMG_3741.JPG
IMG_3742.JPG
IMG_3745.JPG
IMG_3746.JPG
IMG_3747.JPG
IMG_3748.JPG
 
Re: Fine Molds Slave 1 build. Taking it slow to get it right this time.

Cracking paint job & modifications,....I've bookmarked this one!!!

J
 
Re: Fine Molds Slave 1 build. Taking it slow to get it right this time.

I'm painting a Revell Slave 1 as we speak. I'm following your picks as well as Johns as a guide. And let me say I've re-started many times to only "try" to attempt a paint job as well as yours and John's. Dude.... you are an animal!!! Your masking, colors and overall paint skills make me want to crawl into the corner and cry! Holy balls that paint work looks righteous!! I cant wait to see what you do with the weathering. :devil
 
Re: Fine Molds Slave 1 build. Taking it slow to get it right this time.

Thank you Jake!
I've learned a lot on how to handle an airbrush during the last three weeks. I always have a go on a blank piece of paper to adjust pressure and flow before I spray anything on. Better safe then sorry.
And what I've learned too is that it's better to put that extra drops of water and thinner medium in so you can do build the color slowly layer after layer. That's what went wrong 1st time around.
Another tip I discovered during the work: masking tape is ideal to get rid of all those tiny Maskol drops. It pulls everything clean off. First I was using fingernails or toothpicks, scrtching the fresh paint...

As for wheatering: I don't know yet how to tackle that on this one yet. I'm thinking of maybe going for this technique, which is completly new to me too. This guy's really good:

https://www.youtube.com/watch?v=LfsFGZbiDLM
 
Re: Fine Molds Slave 1 build. Taking it slow to get it right this time.

I'm using Natural resin liquid mask and let me tell you that is a major job to remove!
 
Re: Fine Molds Slave 1 build. Taking it slow to get it right this time.

Quick update:

Went to my best friend Jos who builds 3D printers from scratch. ( check out: http://www.mauk.cc/webshop/ )
Talked him through my plans and he ordered the stuff I'll need to light this ship
Jos doing some soldering for me
.IMG_3750.JPGIMG_3761.JPGIMG_3762.JPG

1st attempt we tried to put 4 LEDs inside to light up Han Solo. I made for holes star wars style (rectangular with round edges)
Turned out to be tricky and when I finally did I blew the LED by wiring it wrong... But we do everything twice on this build for experience so we had another go, but with only two. This was making everything fit much easer.
Jos had a great tip: use epoxy as glass for the lights. bit of plastic on the back and then filled the holes with a drop of epoxy. Instant glass in 20 minutes!
IMG_3752.JPGIMG_3753.JPGIMG_3754.JPG
1st try looked a bit messy.
IMG_3755.JPG
2nd try only two lights and in the mean time a constructed a little lightbox for it.
IMG_3757.JPG
After a test the unit could be glued together (better not blow those LEDs again)
IMG_3758.JPG
Forgot to make a photo while they were working but here it is put together (well allmost)
IMG_3760.JPGIMG_3759.JPG

oh last thing: found the little jetpack for the standing Boba. Gave it a quick paintjob, but will give it to his brother, so he can throw it in a corner of the cockpit.
IMG_3763.JPGIMG_3764.JPG
 
Re: Fine Molds Slave 1 build. Taking it slow to get it right this time.

I'm using Natural resin liquid mask and let me tell you that is a major job to remove!
Time to switch maybe? Really pleased with Maskol from Humbrol. Goes on great, has a pink shine, so you see where you've masked.
 
Re: Fine Molds Slave 1 build. Taking it slow to get it right this time.

Need some advice in cutting away. Jaitea maybe... you're the king of cutting imho.

Want to cut out the bottom of this piece to modify it for lighting. How do that nice and clean. Power tools?
IMG_3772.JPGIMG_3773.JPG

Jango Fett:
" Boba, clean up your stuff when you're done. Your helmet will get all scratched up and dented if you just lay it on the floor every time."

Well obviously he hasn't learned a bit from his dad, because his spare suit is still laying around in the corner ;-)

IMG_3770.JPGIMG_3771.JPG
 
Re: Fine Molds Slave 1 build. Taking it slow to get it right this time.

Quick update:

Noticed this week one of the wing flaps is just completely missing on the model!

links erg goed!.jpgIMG_3776.JPGIMG_3777.JPG

Once I noticed it started bothering me more and more.
Didn't wanna build it because wing is allready painted, but after a second look I thought it wouldn't be that hard to put it on there in this stage.
Ship is build up by scraped parts anyway, so a slight difference is just adding to the story.

IMG_3780.JPG
 
Re: Fine Molds Slave 1 build. Taking it slow to get it right this time.

So here's my daily update for you all:

Went to Jos' company. He didn't have time to help me out on the lights, so that'll have to wait. Wish I could do it myself, but need an experienced hand in this one.

Stayed there anyway to tackle some other stuff: Drilling holes for the engineLEDs and glueing magnets for the switch and canopy.

glued some M4 bolts to the canopy and 2 magnets to the hull.
IMG_3794.JPGIMG_3795.JPGIMG_3796.JPG

Tried to do it to pretty, but that was to fiddly, so eventually went for the easy, but sturdy way:
1st I tried to fix two metal parts to part and had two magnets behind the big holes on top. Did work: plate didn't fit nice because of epoxy and it didn't hold well all together.
so I decided to fix the magnet to the part and glued a part of a break-away knife to the skirt.(yes I did dull it before glueing it on to prevent injuries).
Works perfect!
IMG_3797.JPGIMG_3798.JPG

Then I went to my father's workshop. Without him I never would have the skills and dedication to do this (thanks dad). Could take the jigsaw home since he had a spare (thanks again dad).
Took a jigsaw to remove the bottom part of the rectangular engine. Filled and sanded it clean.
IMG_3785.JPGIMG_3786.JPG

Did a lot of trial and error on the rebuild. I knew I wanted to make it out of this material. What's it called, a sif? Found a splatterguard, where the material is nice and even.
IMG_3781.JPGIMG_3782.JPG

Cut it with my Stanley knife (it needs a new blade, but great for making straght cuts).
Curled it around one of my files and made a contraption out of an old pen to cast it in epoxyglue.
Lot of work, not the desired result, so threw that idea away.
IMG_3788.JPGIMG_3789.JPG
IMG_3791.JPG

IMG_3787.JPG

So this is what I came up with:
Two styreen strip on the back, the grid in the middle. To make the details I needed some round thingies. Took one of my son's pencils (thanks Puck, he hates yellow anyway).
Glued it together and sprayed it with black primer. Really like how it turned out.
View attachment 444949View attachment 444951View attachment 444950

Still have to find a way to diffuse the lights somehow behind that grid, since the epoxy wasn't working.

That's it for now.

Thanks for watching

Jerome
 
Last edited:
Re: Fine Molds Slave 1 build. Taking it slow to get it right this time.

something went wrong with the last pictures I believe. So here's the end result:
IMG_3792.JPGIMG_3799.JPGIMG_3800.JPGIMG_3803.JPGIMG_3804.JPG
 
Re: Fine Molds Slave 1 build. Taking it slow to get it right this time.

Painting the exhausts.

started with a coat of brass, then masked and mixed what was left in the airbrush with some brown to get the copper look for the second layer.
IMG_3806.JPGIMG_3807.JPGIMG_3805.JPG

Still had to weather the underside of the skirt again. So I did that. Then I gave the exhausts a burned look.
IMG_3815.JPGIMG_3812.JPGIMG_3813.JPGIMG_3814.JPGIMG_3811.JPG

Still no lights as you can see. Can't wait for those engines to light up!

Thanks for watching.

Jerome
 
Re: Fine Molds Slave 1 build. Taking it slow to get it right this time.

Very precise and beautiful work Jerome. I cant wait to see it done and all lit up!
 
This thread is more than 8 years old.

Your message may be considered spam for the following reasons:

  1. This thread hasn't been active in some time. A new post in this thread might not contribute constructively to this discussion after so long.
If you wish to reply despite these issues, check the box below before replying.
Be aware that malicious compliance may result in more severe penalties.
Back
Top