Page 1 of 9 123456 ... LastLast
  1. Formerly NightEyes
    Join Date
    Apr 2005
    Location
    NJ
    Message Count
    1,306
    Apr 14, 2008 - Revisiting the Training Remote #1

    My employer happens to be host to the Star Wars: Where Science Meets Imagination Exhibit. I knew I'd never forgive myself if I didn't seize the opportunity to build something that is in the exhibit. This is my first effort in the Studio Scale world and quite frankly I'm not sure I'm ready to take the plunge with a major ship. Sorry guys! While I do love scale modeling and have been doing so since I was a kid my SW collection is modest to say the least. I'm a huge ANH fan... so the choice to build the Jedi Training Remote was obvious.

    Special thanks to BrundelFly; none of this would be possible without his research:
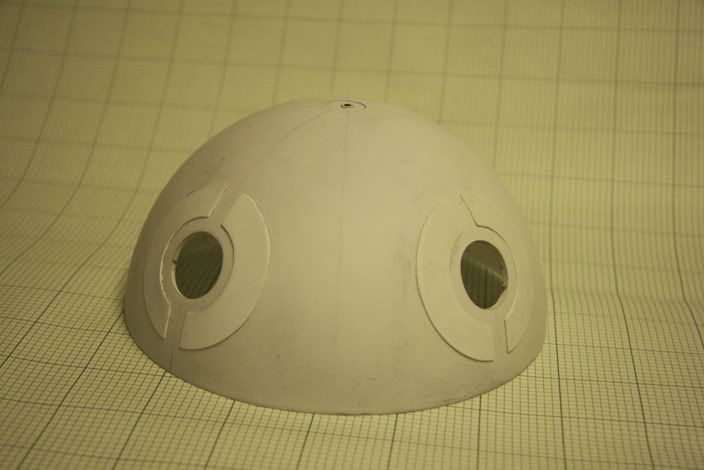
    Training Seeker

    I was lucky and picked up one of Frank's rotocast kits. I thought this would be a piece of cake. I could color match to the real deal since its just a stroll upstairs to the exhibit with some paint chips. This turned out to be harder than expected. Off the shelf model paints didn't quite match. That was, until I found the railroad section.

    If you want your Training Remote to match the original you'll need:

    Floquil:
    Reefer White
    Freight Car Brown

    The grey is a tough call. The following is a testors paint that matches the 3 square panels:
    Flint Gray

    I initially thought Grime was a match for the off-white. It did, but it was barely too dark on my paint sample. Grime matched the overall color of the remote, but if you were to paint a remote Grime and then weather it, the end result would be too dark.

    So all I have to do now is paint my kit. Except that when I spent all of that time matching paint and looking at the photos that I took of the real deal I pretty much decided that I wanted the whole experience of building one from scratch. It is really because the FC kit is too good. Even the truck rims were sharper and more evenly coated with chrome than the originals I sourced later. But mainly, I wanted hollow hatches and cupolas. I want my remote to be as close to the original as possible. To me building anything is more rewarding then shelling out mad loot for something I know I could have executed better myself.

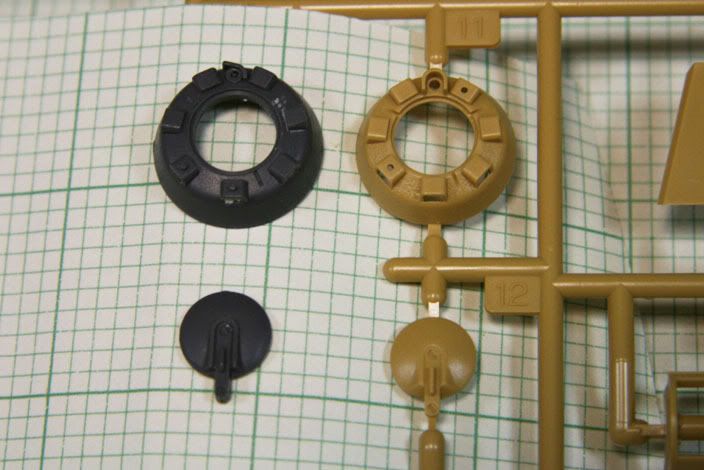
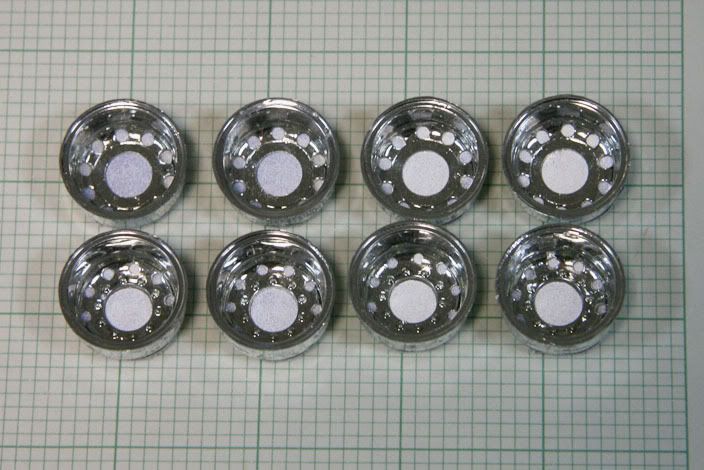
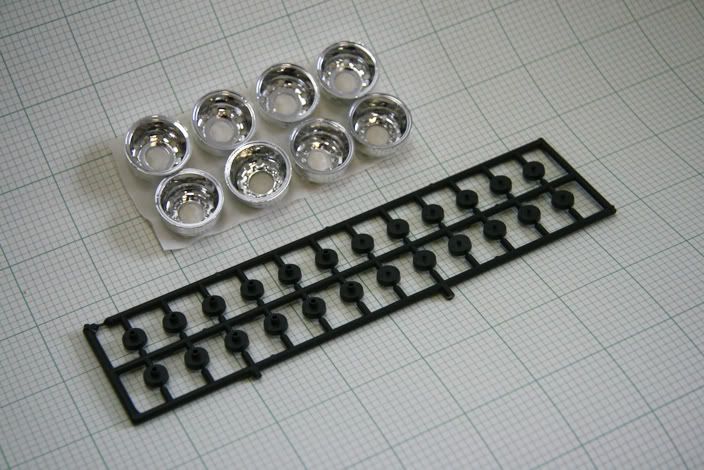
    I'm still waiting on a T600A for axel brackets. An AMT Midnight Express had 10 truck rims (4 with lugs 6 without) but no axel brackets. I'm still not convinced there isn't one AMT kit that has both axel brackets and enough truck rims of both varieties. Then again, there are only a few truck kits that aren't collectible these days. The remote does indeed feature rims that perfectly match 1/25 scale rims from early AMT kits. What do I mean early? Well if you look really close at your chrome rims from your newish Kenworth T600A you'll see that the lugs are less detailed than the older version. A comparison that can only be made by having both side-to-side, and a difference that is nearly undetectable by a regular camera.

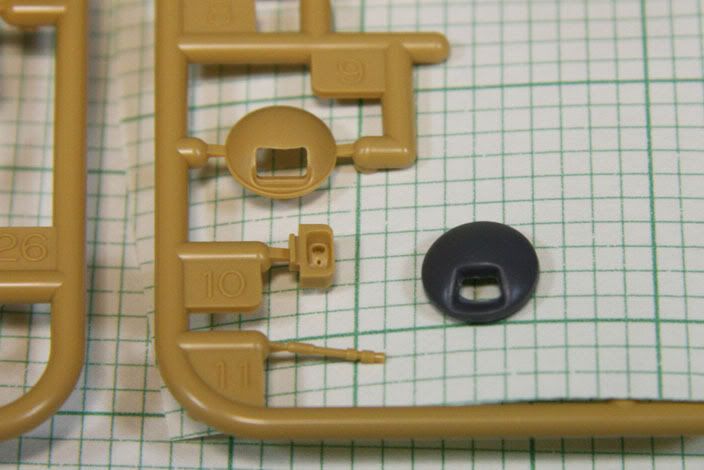
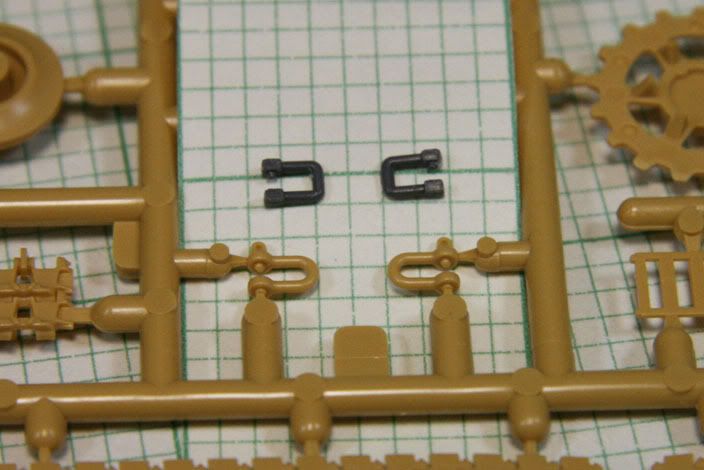
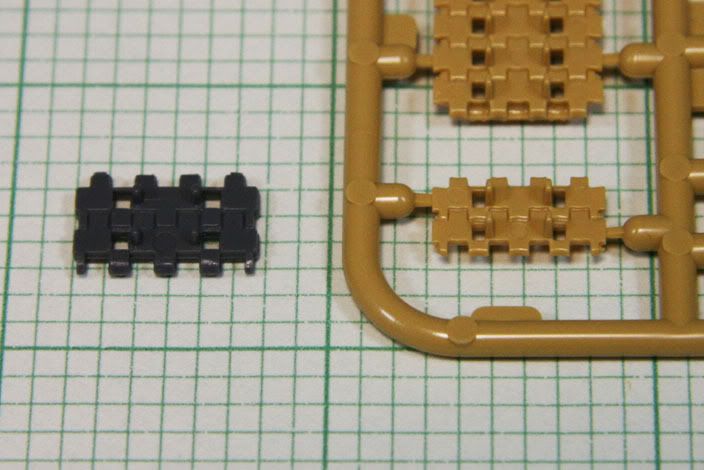
    Speaking of newer kits being different than old kits... I bet you think this thing is going to easy because you searched ebay and found many 1/48 Tamiya Panther G kits. The problem here is that the kit parts are only slightly different than the old Bandai/Fuman Panther G. Still, if anyone is looking to build their own without having to make molds of any parts, just order 8 of the Tamiya kit. These parts are barely inaccurate and would actually add detail to the prop. I will address this later as I'm leaving this open as an option for myself. We'll be talking kits more later when 2 arrive this week.

    This is all I have so far:


    Please check back with updates as there will be many in the next few weeks. I plan on having this thing completed before the exhibit leaves on May 4th.

    Coming up tomorrow:

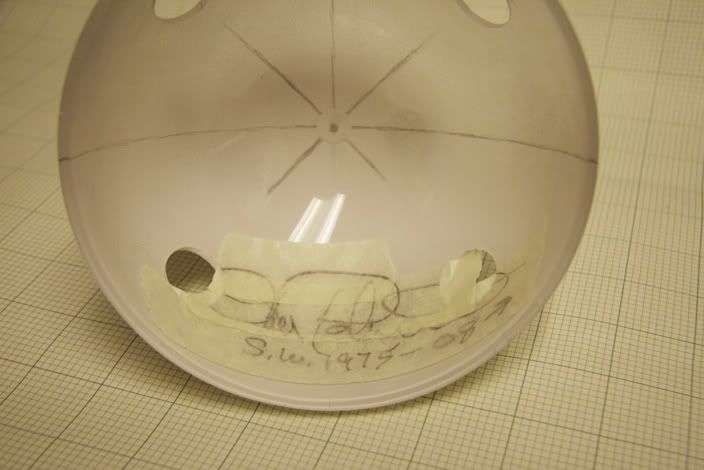
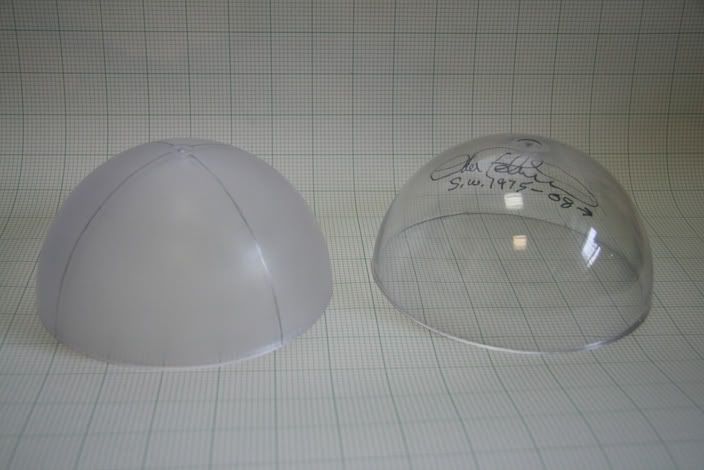
    How to drill holes in a hemisphere while preserving a signature inside.

    EDIT: Trimming the fat.
    Last edited by TheRealMcFly; Jun 12, 2012 at 11:36 AM.
  2. Gigatron's Avatar
    Join Date
    Apr 2002
    Location
    Staten Island, New York
    Message Count
    5,323
    Apr 14, 2008 - Re: Build Diary: Revisiting the Jedi Training Remote #2

    Have fun, Paul. Building one of these from scratch is not something I'd want to experience again .

    And if you figure out a geometrical template for those styrene cutouts around the rims (they're not as simple as they look), maybe you could post them - those are the one part of my remote I was never happy with.

    -Fred
  3. formerly Paul Heaberlin
    Join Date
    Dec 2005
    Message Count
    851
    Apr 14, 2008 - Re: Build Diary: Revisiting the Jedi Training Remote #3

    Looking forward to this thread!
  4. MonsieurTox's Avatar
    Join Date
    Jun 2006
    Location
    Paris, France
    Message Count
    3,220
    Apr 14, 2008 - Re: Build Diary: Revisiting the Jedi Training Remote #4


    Hehe a dome signed by Lorne ! Will you use this one and paint it ?
  5. Formerly NightEyes
    Join Date
    Apr 2005
    Location
    NJ
    Message Count
    1,306
    Apr 16, 2008 - Re: Build Diary: Revisiting the Jedi Training Remote #5

    Its too late I already did! Sorry folks, I'll have an update for you later tonight.
  6. Formerly NightEyes
    Join Date
    Apr 2005
    Location
    NJ
    Message Count
    1,306
    Apr 20, 2008 - Re: Build Diary: Revisiting the Jedi Training Remote #6

    Anymore delays like that and I won't have this thing finished in time.

    Alright, back on track.

    I drilled the 8 holes on both hemispheres using a Dremel. I broke through with an all metal bit and then rounded it out by eye with the a standard sanding drum. Is that what they are called? I would not recommend trying it this way as it was incredibly time consuming to get just right. How did I know when I had hit the right size? I test fit the truck rims and quit when they seemed to fit tightly.

    Fred you are right. The trickiest part so far is cutting the styrene parts for the surface. The best solution I had was to use a compass to draw out my shapes on the surface of the hemisphere itself. Once I had the interior and exterior diameters drawn, I drew on the channel that divdes the circle into two parts. Next, I covered and traced the shape with masking tape. This gave me my template so I could then go back to the flat .020 styrene and cut from there.

    It occurred to me that when cutting your styrene you need to be aware of the basic geometry of the parts you are making. Drawing your first circle (exterior diameter) then the second (interior diameter) and cutting the resulting shape in half is not a solution. Think of it this way. Your styrene parts for around the truck rims are like a big washer. The washer is a perfect circle but you will have to cut out a vertical channel through the top to the bottom to separate. If I was to use a basic bisected circle instead, spreading it out to create the channel would eliminate the perfect outer circle I was trying to create in the first place.

    Gluing is easy, but make sure you coax your styrene into a concave shape beforehand so you have max contact for your surfaces. I've still got some tiny areas of lifting but some glue and a quick wetsand should elminate any traces that my styrene started flat.

    I've only got my styrene glued to the the bottom half:


    The top half remains partially primed but Lorne's signature is intact:


    I had a wonderful conversation with Lorne Peterson when he came to the Franklin Institute Science Museum. I was surprised when he told me that created the original Jedi Training Remote. How did Lorne cut his circles? He told me he vacuformed some styrene over the hemispheres before he got started. Thats why he's the master model builder.

    Next up, the details. The rewards and pitfalls of using original kit parts.

    Also, the barely different Tamiya parts I should have used.

    EDIT: I'll try to get some better lighting in the next set.
    Last edited by TheRealMcFly; Apr 20, 2008 at 12:01 PM.
  7. BrundelFly's Avatar
    Join Date
    Dec 2001
    Message Count
    2,902
    Apr 23, 2008 - Re: Build Diary: Revisiting the Jedi Training Remote #7

    Don't listen to that Frank Cerney guy....he is an a*%hole.

    Use anything published as a guide re: the distance between each of the parts.

    Double sided tape works great to test fit those parts, place them so they LOOK right to you. IF they LOOK right based on your photo reference, they are probably right!

    I had limited photo reference when Imade my remote. Basically, CHRONICLES and a snap shot or two.

    Get your Halves measured out in PENCIL, then TEST FIT Them together. Dont laugh when you realize that they DONT LINE UP. ADJUST THEM AFTER YOU GLUE TOGETHER and PUTTY.

    Sadly, your autograph my soon only be known to you.

    Brundelfly
  8. MonsieurTox's Avatar
    Join Date
    Jun 2006
    Location
    Paris, France
    Message Count
    3,220
    Apr 24, 2008 - Re: Build Diary: Revisiting the Jedi Training Remote #8

    Great job so far !

    Why did you protect the sign ? You wont paint this area ?

    Cant wait to more !
  9. Formerly NightEyes
    Join Date
    Apr 2005
    Location
    NJ
    Message Count
    1,306
    Apr 27, 2008 - Re: Build Diary: Revisiting the Jedi Training Remote #9

    I'm in danger of not having this done before next weekend.

    I had some trouble with my molds. More specifically, the double sided tape I used to hold down the masters was apparently too old as the RTV soaked into the foam.

    The tape covering the signature is to protect from any overspray. The plan is to not glue one of the truck rims. This way you can pop one from the bottom out and peak at Lorne's signature inside. I'm working backwards in layers:the back of the signature (outside of hemisphere) was painted with primer so when I add parts+paint the signature will remain easily read.

    EDIT: We'll still do parts comparison and after that hemisphere assemby.
    Last edited by TheRealMcFly; Apr 27, 2008 at 10:05 AM.
  10. formerly Paul Heaberlin
    Join Date
    Dec 2005
    Message Count
    851
    Apr 27, 2008 - Re: Build Diary: Revisiting the Jedi Training Remote #10

    Aw blues 'em down with Elmer's.
  11. Flintlock's Avatar
    Join Date
    Dec 2001
    Location
    Daytona Beach, FL
    Message Count
    618
    Apr 27, 2008 - Re: Build Diary: Revisiting the Jedi Training Remote #11

    Paul Heaberlin said: View Post
    Aw blues 'em down with Elmer's.
    Paul's right. Double-sided tape reacts to some silicone rubbers. I am molding the two halves of my 1:48 Y wing fuselage - the first one I adhered to the bottom of the mold box with polymer clay. Some of the rubber seeped in between and I was able to clean it up but it is not near as clean as the other half - which I used Elmer's on. I'm going to use it from now on.
  12. Formerly NightEyes
    Join Date
    Apr 2005
    Location
    NJ
    Message Count
    1,306
    May 4, 2008 - Re: Build Diary: Revisiting the Jedi Training Remote #12

    Thanks for the molding tips. Definitely not going to have this thing done by today but the good news is I've got time to do it up right.
  13. Formerly NightEyes
    Join Date
    Apr 2005
    Location
    NJ
    Message Count
    1,306
    May 15, 2008 - Re: Build Diary: Revisiting the Jedi Training Remote #13

    Thanks to Paul's tip I have cast nearly everything I need for the project. That Elmers worked like a charm! But before you get a peak at my duplicates why not take a moment to review those Tamiya parts like I promised.

    If you are going to build one of these from scratch definitely buy the Tamiya 1/48 kit. These parts are barely different... more specifically, they are slightly smaller and more detailed.


    I actually like The U Brackets better. I like the rounded edge and the extra loop on the top. Details like these would be a fine addition to a custom build. In fact all of the Tamiya parts are of a higher level of detail thanks to what I'm sure is the regular advance of technology. Say goodbye to flexible rubber tread. The photo is of a flat tread but there are others that include the flex along the middle perforation. If I could do it all again I'd sacrifice accuracy for keeping my sanity. Molding/casting so many tiny parts takes a really long time. Plus using the variations of the tank treads would give the remote more visual interest and appear less static. Thoughts, gentlemen?

    Almost forgot. The original remote utilizes regular reflective tape. It just so happens that back in 1975 reflective tape appeared as a grayish color instead of the modern white. Using tape would be easier because it is already adhesive on one side. This means the tape was applied to the back of the truck rim, and the adhesive exposed to collect dust. Using Scotchlite gives you an advantage as you can just flip over your rims and make a pass with some spray adhesive. While old grey reflective tape sticky side facing out would be more accurate, Using the Scotchlite gives you the advantage of a better finish.


    EDIT:

    Next up...

    Spending all your time casting you precious parts and accidentally making a 2 part mold.
    Last edited by TheRealMcFly; May 15, 2008 at 10:41 AM.
  14. Formerly NightEyes
    Join Date
    Apr 2005
    Location
    NJ
    Message Count
    1,306
    May 21, 2008 - Re: Build Diary: Revisiting the Jedi Training Remote #14

    I guess you guys want to actually see this thing I'm working on. As soon as I add the equator rectangles I'll post some photos sans kit parts.
  15. Flintlock's Avatar
    Join Date
    Dec 2001
    Location
    Daytona Beach, FL
    Message Count
    618
    Jul 28, 2008 - Re: Build Diary: Revisiting the Jedi Training Remote #15

    Hey - What ever happened to THIS project?
  16. joewhite's Avatar
    Join Date
    Aug 2007
    Location
    Wichita Falls, TX
    Message Count
    566
    Jul 29, 2008 - Re: Build Diary: Revisiting the Jedi Training Remote #16

    incredipaul, I was wondering, were you able to color match any of the other vehicles in the exhibit?

    Joe
  17. Formerly NightEyes
    Join Date
    Apr 2005
    Location
    NJ
    Message Count
    1,306
    Jul 29, 2008 - Re: Build Diary: Revisiting the Jedi Training Remote #17

    Whoa! Boy am I busted.

    I have been working on this, and will need to borrow a camera for an update. Though I did get stuck when my mold gave out and I still need 4 more tank parts. Also, I'm out of the goods to make a new mold.

    On to the paint. The red falcon panels along with the grey are same colors as the remote. However, there were other grey panels on the falcon that exhibited various gradients. I'd say pick up some of the Boxcar color and color adjust your reference photos from there.

    I have more photos of things besides the remote. What are you looking for specifically?

    -PB
  18. franz bolo's Avatar
    Join Date
    Jun 2005
    Message Count
    4,994
    Dec 5, 2008 - Re: Build Diary: Revisiting the Jedi Training Remote #18

    Any progress pics?

    FB
  19. Flintlock's Avatar
    Join Date
    Dec 2001
    Location
    Daytona Beach, FL
    Message Count
    618
    Feb 17, 2009 - Re: Build Diary: Revisiting the Jedi Training Remote #19

    Does anyone know which AMT Semi kit definitely has the right rims? I have a couple semis but none have the right rims. I take that back - one of the kits I have should have the right rims, but I can't find them. I also cannot find my Tamiya 1:12 Matra rims for my TIE Fighter - thinking they are lost for good.

    I need to get the Titan 90. Does that have the correct rims?
  20. Sumatra's Avatar
    Join Date
    Jun 2002
    Location
    Bloomington, MN
    Message Count
    3,569
    Feb 17, 2009 - Re: Build Diary: Revisiting the Jedi Training Remote #20

    The Titan 90 (at least the reissue I have) does not have the right rims.

    The AMT Kenworth T600A has rims that sure look right to me.
  21. Join Date
    Dec 2001
    Location
    Brooksville, Florida
    Message Count
    1,716
    Feb 17, 2009 - Re: Build Diary: Revisiting the Jedi Training Remote #21

    The AMT Kenworth has the CORRECT rims. I have all the correct parts except one. I have the Hasegawa sherman tank wheel, but not the other wheel part that goes around the rims. Don't know what kit that came from. Anyone know?
  22. Formerly NightEyes
    Join Date
    Apr 2005
    Location
    NJ
    Message Count
    1,306
    Feb 17, 2009 - Re: Build Diary: Revisiting the Jedi Training Remote #22

    yodakiller1138 said: View Post
    The AMT Kenworth has the CORRECT rims. I have all the correct parts except one. I have the Hasegawa sherman tank wheel, but not the other wheel part that goes around the rims. Don't know what kit that came from. Anyone know?
    Yes, those wheels you speak of are from a Airfix 1/72 Panzer IV1. They have little posts that stick out, but on the original most of them have broken off over the years.

    The Kenworth T600A appears to have the correct rims... but they are not quite right. We will really be picking at details here on this. Sure you get some with lugs and some without, but if you have an old kit you will notice that just the lug detail has been modified. This is very difficult to illustrate, I'll have some photos for you tomorrow.

    The real trick is to find one Truck kit that has all the necessary rims and axel brackets.
  23. Formerly NightEyes
    Join Date
    Apr 2005
    Location
    NJ
    Message Count
    1,306
    Feb 17, 2009 - Re: Build Diary: Revisiting the Jedi Training Remote #23

    Wooo 500 posts!

    I mean 501.

    Okay make that the Airfix Panzer IV. I dunno how that extra 1 got in there. Here they are with primer:
  24. Rats's Avatar
    Join Date
    Jun 2008
    Message Count
    246
    Feb 17, 2009 - Re: Build Diary: Revisiting the Jedi Training Remote #24

    Flintlock said: View Post
    Does anyone know which AMT Semi kit definitely has the right rims? I have a couple semis but none have the right rims. I take that back - one of the kits I have should have the right rims, but I can't find them. I also cannot find my Tamiya 1:12 Matra rims for my TIE Fighter - thinking they are lost for good.

    I need to get the Titan 90. Does that have the correct rims?
    Flint,
    I got a Peterbilt Wrecker a while back and I'm sure those rims looked like the right ones. I haven't pulled out the parts and compared them directly with pics of the real prop though.

    On another note, does anyone know which of the AMT trucks definitely has the U shaped suspension bits (axle bracket) that go next to the Hasegawa tank wheels? That is apart from the kenworth T-600!

    Cheers, JT
  25. Sumatra's Avatar
    Join Date
    Jun 2002
    Location
    Bloomington, MN
    Message Count
    3,569
    Feb 17, 2009 - Re: Build Diary: Revisiting the Jedi Training Remote #25

    incrediPAUL said: View Post
    Okay make that the Airfix Panzer IV. I dunno how that extra 1 got in there.
    Thanks. That was the last part I needed as well.
Page 1 of 9 123456 ... LastLast

Similar Threads

  1. Jedi Training Remote
    Luke0312, Replica Movie Props
    Replies: 21
    Last Post: Mar 23, 2013, 5:19 PM
  2. Training Remote
    joewhite, Replica Movie Props
    Replies: 6
    Last Post: Mar 24, 2012, 12:46 PM
  3. TRAINING REMOTE: Make your own.
    BrundelFly, Studio Scale Models
    Replies: 4
    Last Post: Jan 18, 2012, 1:35 AM
  4. Question about the training remote...
    Qui-Gonzalez, Replica Movie Props
    Replies: 12
    Last Post: Mar 19, 2008, 2:45 PM
  5. Almost truly hovering Training Remote
    Gigatron, Replica Movie Props
    Replies: 26
    Last Post: Dec 6, 2006, 12:07 PM

1 2 3 4 5 6 7 8 9 10 11